To waterproof a patio, you need to clean the surface thoroughly, let it dry completely, repair any cracks or loose joints, and then apply the right sealer for your specific material. The order matters as much as the products. Skip the cleaning step or rush the drying, and the sealer will trap moisture underneath and eventually peel. Get it right and a good waterproofing job lasts anywhere from 2 to 5 years depending on your surface and the traffic it gets.
How to Waterproof Patio: Step-by-Step by Material

Dylan Hale
31 May 2026

Decide your patio material and why waterproofing matters
Not all patios absorb water the same way, and the sealer that works brilliantly on concrete can cloud or streak on travertine. Before you buy anything, figure out exactly what you're working with. Walk outside, pour a small splash of water on the surface, and watch what happens. If it soaks in within 30 seconds, your surface is porous and genuinely needs protection. If it beads up and sits there, the existing sealer may still be doing its job.
Water damage looks different on different materials. On concrete, water cycles cause spalling, cracking, and freeze-thaw damage over winter. On brick, water gets behind the face and pushes out soluble salts (called efflorescence) that leave white crusty deposits. On natural stone like travertine and flagstone, water carries minerals that stain permanently if left unsealed. On pavers, water erodes the sand joints and causes individual pieces to shift and rock. Waterproofing addresses all of these problems at the source.
| Material | Main Water Risk | Best Sealer Type | Re-seal Frequency |
|---|---|---|---|
| Concrete | Spalling, cracking, freeze-thaw | Penetrating silane/siloxane or acrylic film | Every 2–3 years |
| Brick | Efflorescence, face spalling | Penetrating silane/siloxane | Every 3–5 years |
| Natural stone (travertine, flagstone) | Mineral staining, etching | Impregnating/penetrating stone sealer | Every 1–2 years |
| Concrete pavers | Joint erosion, surface absorption | Penetrating + polymeric sand joints | Every 2–3 years |
| Slate | Water absorption, flaking | Penetrating or enhancing sealer | Every 2–3 years |
Prep step: clean, repair, and dry before sealing
This is the step most people rush, and it's where most waterproofing failures start. If you seal over dirt, mold, or old flaking sealer, you're just locking the problem in. I've found it's worth spending twice as long on prep as on the actual sealing. Here's how to do it properly.
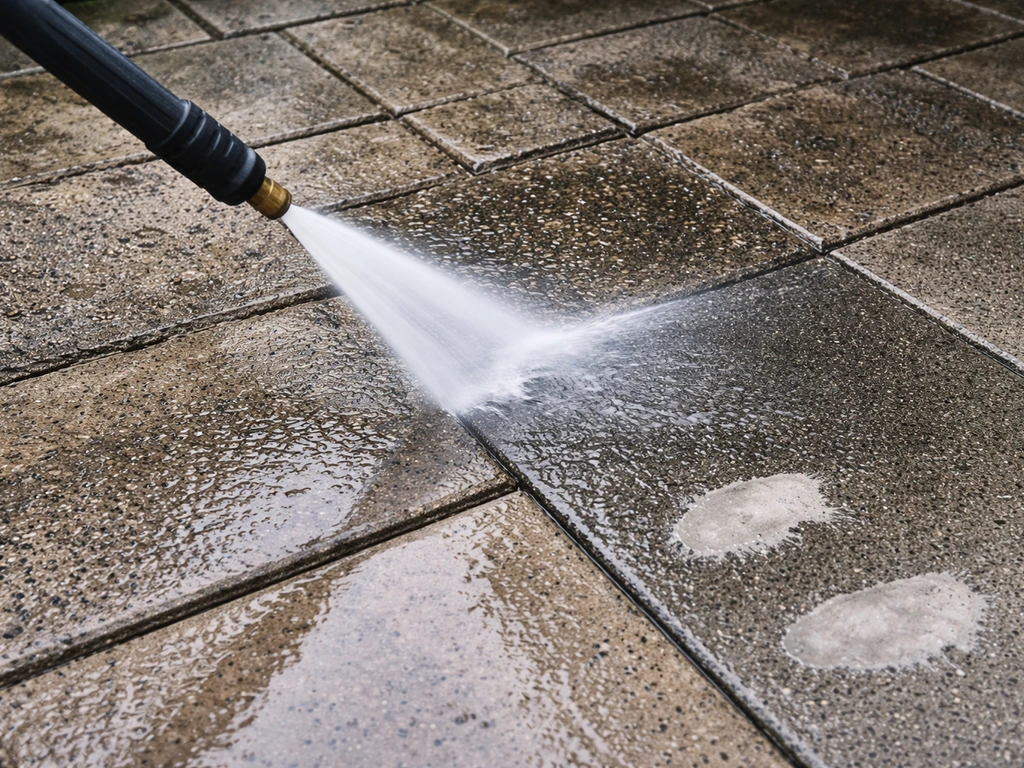
Clean the surface first
Start with a general wash. A pressure washer at 1,500 to 2,500 PSI works well for concrete, brick, and pavers. Drop to 1,000 PSI or less for travertine and softer natural stone to avoid surface damage. If you don't have a pressure washer, a stiff-bristle brush and a garden hose get the job done on most surfaces. It just takes longer.
For mold, mildew, and algae, which are extremely common on shaded patios, a diluted sodium hypochlorite (bleach) solution works effectively on concrete, brick, and pavers. Mix roughly 1 part bleach to 10 parts water, apply it, let it sit for 10 to 15 minutes, scrub with a stiff brush, then rinse thoroughly with clean water. Always pre-wet the surface before applying bleach solution so it doesn't immediately absorb into the pores.
For natural stone like travertine or flagstone, skip the bleach and use a dedicated stone-safe mold and mildew remover instead. For natural stone like travertine or flagstone, LATICRETE’s STONETECH Mold & Mildew Stain Remover is formulated to remove mold, mildew, and algae on natural stone and tile, including grout dedicated stone-safe mold and mildew remover.
Products formulated specifically for natural stone won't etch or discolor the surface the way acid-based or chlorine solutions can.
For grease stains, sprinkle dry dish soap or a degreaser, scrub it in, let it dwell for 5 minutes, then rinse. For rust stains on concrete or pavers, a commercial oxalic acid-based rust remover applied per the label works well. For white efflorescence deposits on brick or concrete, a diluted muriatic acid solution (around 5 to 10%) can dissolve the salts as a last resort.
Work in small patches of no more than about 4 square feet at a time, let it sit for around 5 minutes, then scrub with a stiff bristle brush and rinse immediately and thoroughly with fresh water. Important: muriatic acid is harsh and should be used cautiously on any masonry. The National Park Service cautions that it can damage stone even when diluted, so avoid it entirely on natural stone surfaces like travertine and flagstone.
When using acids on concrete masonry, CMHA recommends using them with caution because even diluted acids can dissolve the cement matrix and damage any integral water repellent, so they should only be used as appropriate and with proper dilution and rinsing. Always wear chemical-resistant gloves, eye protection, and work in well-ventilated conditions.
If you prefer a gentler approach (especially if you have pets or children), white vinegar diluted 50/50 with water handles light efflorescence and mild mold on concrete and brick. It works more slowly but won't damage the surface or surrounding soil. Rinse well afterward regardless of what you used, since any cleaning chemical residue left on the surface can interfere with sealer adhesion.
Repair cracks and loose joints
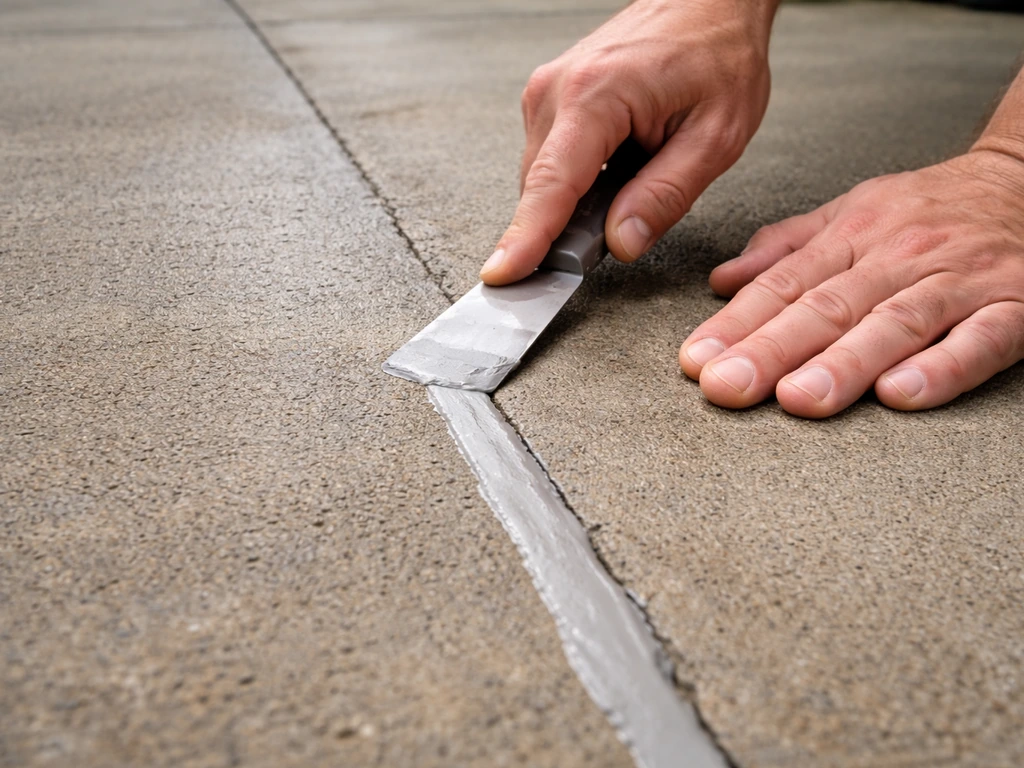
Once the surface is clean, inspect it carefully while it's still damp so cracks are easier to see. For hairline cracks in concrete, a concrete crack filler or polyurethane caulk works well. For larger cracks or spalled areas, use a concrete patching compound and feather the edges smooth. On paver patios, check the joints: if they're soft, sandy, or washing out, that needs to be addressed before sealing. Brush out the old loose material and repack with polymeric sand (more on this in the product section). Let all repairs cure fully before proceeding.
Dry time is non-negotiable
The surface must be completely dry before you apply any sealer. Once the surface is completely dry, you can proceed with the step-by-step process for dry point a patio before sealing. Most manufacturers specify at least 24 hours of dry time after washing, and 48 hours after rain. In humid climates or during spring and fall, I'd push that to 72 hours. You can do a quick moisture check by taping a piece of clear plastic sheeting (about 18 inches square) to the surface with tape on all four sides. Leave it for 16 hours. If you see condensation on the underside, the surface is still releasing moisture and isn't ready.
Choose the right waterproofing method and product by surface
The two main categories of sealers are penetrating (impregnating) sealers and film-forming sealers. Understanding the difference will save you from choosing the wrong product.
Penetrating sealers, usually made from silane, siloxane, or silicone compounds, soak into the material and repel water from within. They don't change the look of the surface much, they don't peel, and they're ideal for brick, natural stone, and any surface where you want a natural matte finish. They're also the right choice when you want vapor permeability, meaning the surface can still breathe and release any moisture that does get in.
Film-forming sealers, typically acrylic or polyurethane-based, sit on top of the surface and create a physical barrier. They can add a wet-look gloss or satin sheen and are popular on concrete and pavers. The trade-off is that they can peel over time, especially if moisture gets trapped underneath or if the concrete breathes moisture upward. On driveways and heavily used patios, a film-forming acrylic provides good protection and is easy to reapply.
| Surface | Recommended Product Type | Finish Options | Avoid |
|---|---|---|---|
| Poured concrete | Silane/siloxane penetrating or acrylic film-forming | Natural or gloss | Avoid film-forming if moisture comes from below |
| Brick | Silane/siloxane penetrating | Natural matte | Avoid film-forming (traps moisture, causes spalling) |
| Travertine | Impregnating stone sealer (neutral pH) | Natural or enhancing | Acid-based cleaners, bleach, film-forming coatings |
| Flagstone | Impregnating stone sealer | Natural or enhancing | Solvent-based acrylics that can discolor stone |
| Concrete pavers | Penetrating silane/siloxane + polymeric sand joints | Natural or wet-look acrylic | Film-forming without checking drainage first |
| Slate | Penetrating or enhancing sealer | Natural or color-enhancing | High-gloss film-formers that look artificial on slate |
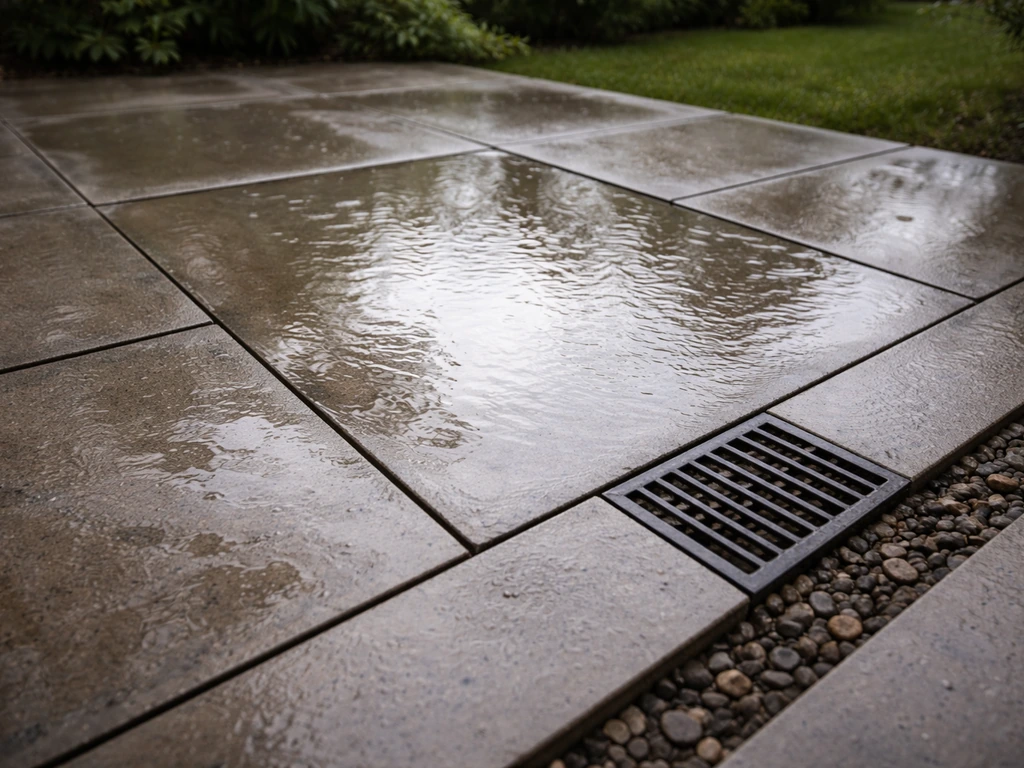
For paver patios specifically, sealing is only part of the answer. Water often undermines pavers through the joints, not through the surface itself. Filling joints with polymeric sand before sealing locks everything in place and dramatically reduces water infiltration. If standing water pooling is a bigger issue than surface absorption, that's a grading or drainage problem that sealing alone won't fix. If you’re dealing with standing water pooling on your patio, check for drainage and grading issues, since sealing alone usually won’t solve it. Related issues like stopping water from pooling or puddles forming on the patio involve separate grading and drainage solutions.
Application steps: how to seal (and how many coats) safely
Weather and timing
Apply sealer when the air temperature is between 50°F and 90°F and there's no rain in the forecast for at least 24 to 48 hours after application. Avoid applying in direct hot sunlight, which causes the sealer to dry too fast and can lead to lap marks and uneven coverage. Early morning, once any dew has burned off, is usually the sweet spot. Never apply over a damp surface or when humidity is above 85 percent.
Tools you'll need
- Low-pressure garden sprayer or pump sprayer (best for penetrating sealers on large areas)
- 9-inch paint roller with a 3/8-inch nap cover (good for film-forming acrylics on concrete)
- Wide paintbrush or edge brush for borders and tight corners
- Safety glasses and chemical-resistant gloves
- Respirator or N95 mask (especially for solvent-based products)
- Painter's tape and plastic sheeting to protect siding, plants, and furniture
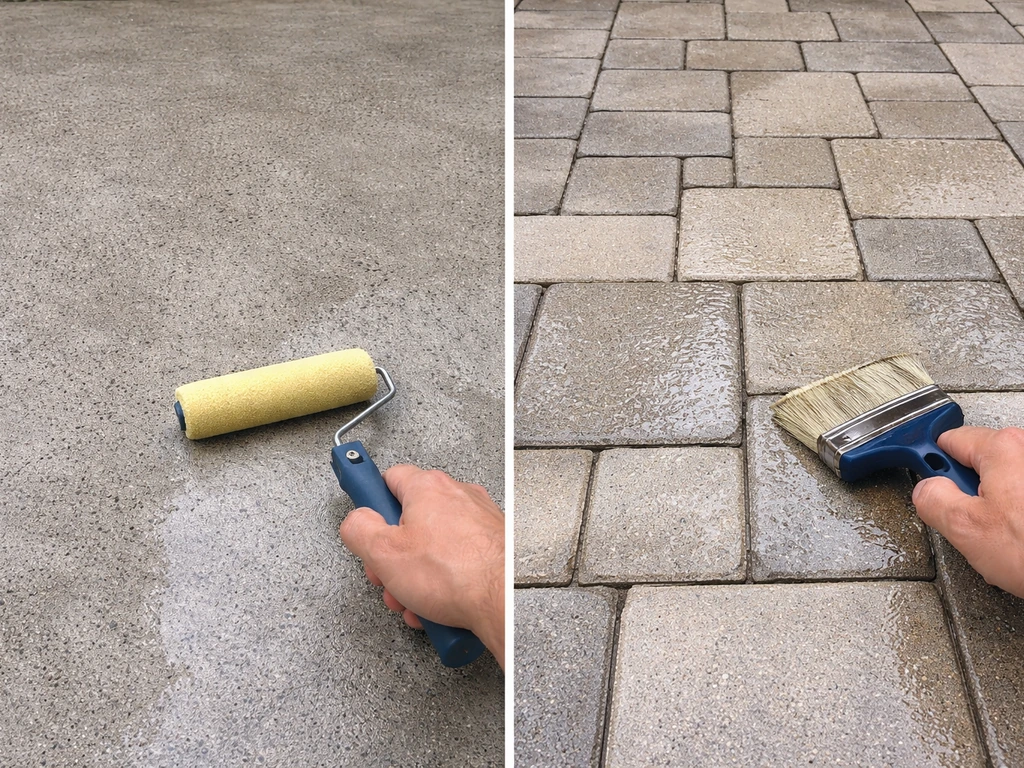
Application process
- Mask off anything you don't want sealer on, including siding, door thresholds, and any planted areas bordering the patio.
- Stir (don't shake) the sealer thoroughly. Shaking introduces air bubbles that cause surface defects.
- Apply the first coat in thin, even passes. With a sprayer, work in overlapping rows. With a roller, work in sections of about 10 square feet at a time and back-roll to eliminate pooling.
- Don't over-apply. Sealer that sits in thick puddles will turn white or hazy as it cures. Thin coats always outperform thick ones.
- Let the first coat dry to touch, which typically takes 1 to 4 hours depending on temperature and humidity. Check the product label for the exact recoat window.
- Apply the second coat in the opposite direction to the first (if you went east-west on coat one, go north-south on coat two). This ensures even coverage.
- Most penetrating sealers need 1 to 2 coats. Film-forming acrylics on concrete typically need 2 coats, and high-traffic areas can benefit from a third.
- Keep foot traffic off for at least 24 hours after the final coat. Keep vehicles off sealed concrete for at least 72 hours.
- Full cure time is typically 7 days, after which the surface reaches maximum water resistance.
Ventilation matters, especially with solvent-based sealers. Work with the breeze at your back, not blowing product toward you, and take breaks. If you're sealing an enclosed patio or area under a deck or covered roof, open up as much airflow as you can and wear a respirator rated for organic vapors. If you are trying to keep a patio under a deck dry, focus on airflow and drainage around the deck so moisture does not build up underneath. In practice, controlling condensation on a covered patio roof often means improving ventilation and insulation so warm, moist air does not hit a cold surface stop condensation on patio roof.
Common mistakes and troubleshooting (peeling, hazing, uneven coverage)
White haze or cloudy finish
This is the most common problem with film-forming sealers. It happens when sealer is applied too thick, applied to a damp surface, or when humidity is too high during curing. For mild hazing on acrylic sealers, you can sometimes buff it out with a clean dry cloth while it's still tacky. For cured hazing, a xylene-based solvent applied lightly can re-emulsify and smooth an acrylic sealer. For penetrating sealers, hazing usually means the product was over-applied: you can try scrubbing the surface with hot soapy water while it's still in the curing window. If the haze is fully cured, stripping and reapplying is often the only fix.
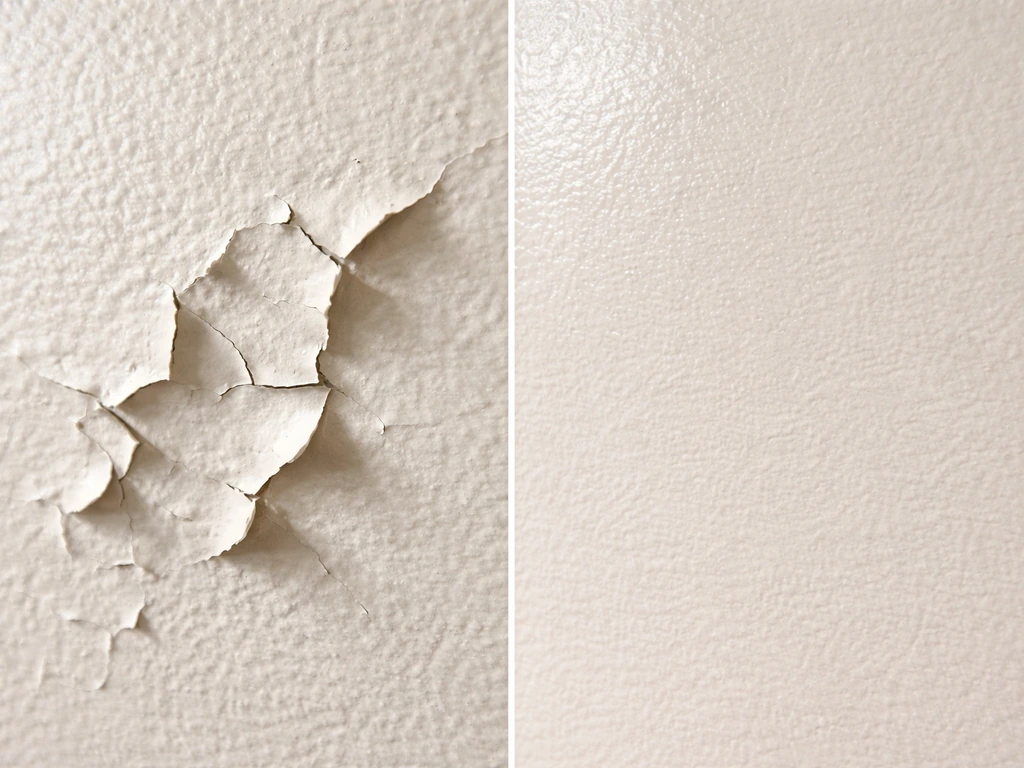
Peeling or flaking
Peeling almost always means the surface wasn't clean enough before application or that moisture was trapped underneath. If a film-forming sealer is peeling, you need to strip it completely before resealing. Use a chemical sealer stripper (follow the manufacturer's instructions) or grind it off mechanically. Applying new sealer over old peeling sealer is a waste of product. Once stripped and recleaned, address the moisture issue first. If the concrete sweats or moisture migrates up from below, you'll need a vapor-barrier coating or a breathable penetrating sealer rather than a film-forming product. If your concrete sweats or moisture keeps migrating up after sealing, you may need to add a vapor barrier coating or switch to a breathable penetrating sealer.
Water still soaking in after sealing
If water is still absorbing after you've applied what should be sufficient coverage, the most likely causes are: the surface wasn't clean enough, the previous old sealer blocked penetration of the new product, or you need an additional coat. Do the water-drop test again 48 hours after final cure. If water still soaks in within a minute, apply one more thin coat of the same sealer. If that still doesn't hold, strip the surface and start over with a fresh clean surface.
Dark patches or uneven color
Dark or wet-looking patches after sealing usually mean uneven application or the sealer pooled in certain areas. If it's a penetrating sealer, the excess product that didn't fully absorb is sitting on the surface. While still in the recoat window, back-roll the area to redistribute. If it's fully cured, try buffing with a dry cloth. For film-forming acrylics, apply a thin additional coat to even out the finish.
Slippery surface after sealing
Film-forming sealers, especially high-gloss acrylics, can make a surface dangerously slippery when wet. If this happens, you have two options: add an anti-slip additive (a fine silica or aluminum oxide powder) to the top coat before applying, or apply a dedicated anti-slip topcoat over the existing sealer. Most sealer manufacturers sell compatible anti-slip additives. For future applications, factor this in from the start on any patio surface that gets rain exposure.
Maintenance plan and re-sealing schedule
The easiest way to maintain a sealed patio is to do a quick annual check rather than waiting for obvious water damage. Every spring, do the water-drop test in a few spots around the patio. Pour a small splash of water on the surface. If it beads up, you're fine. If it soaks in within 30 to 60 seconds, it's time to reseal. You can usually get away with a single thin maintenance coat over an intact existing sealer without stripping, as long as the surface is clean and the old sealer isn't peeling.
Beyond the water test, watch for these signs that your patio needs attention: visible white efflorescence appearing after rain, dark water-stain rings that weren't there before, crumbling or soft grout or sand in the joints, or a noticeable color change on the surface when it rains that takes longer than usual to dry out. Catching these early means a simple clean-and-reseal job rather than a full repair.
| Material | Check Frequency | Typical Reseal Interval | Signs You're Overdue |
|---|---|---|---|
| Concrete | Annually | Every 2–3 years | Water soaks in, surface looks faded, hairline cracks widen |
| Brick | Annually | Every 3–5 years | White salt deposits after rain, soft or crumbling face |
| Travertine / Flagstone | Every 6 months | Every 1–2 years | Water absorbs fast, stains appear, surface looks dull |
| Concrete pavers | Annually | Every 2–3 years | Loose pavers, sandy joints, surface absorbs water quickly |
| Slate | Annually | Every 2–3 years | Flaking, water absorption, color looks washed out |
For routine upkeep between resealing, keep the patio clean. Organic material like leaves, dirt, and pollen hold moisture against the surface and accelerate sealer breakdown. A quick rinse or sweep every couple of weeks is genuinely enough to extend the life of a seal job significantly. If you get a stubborn stain, clean it promptly with the appropriate method for your material before it has a chance to penetrate a worn spot in the sealer.
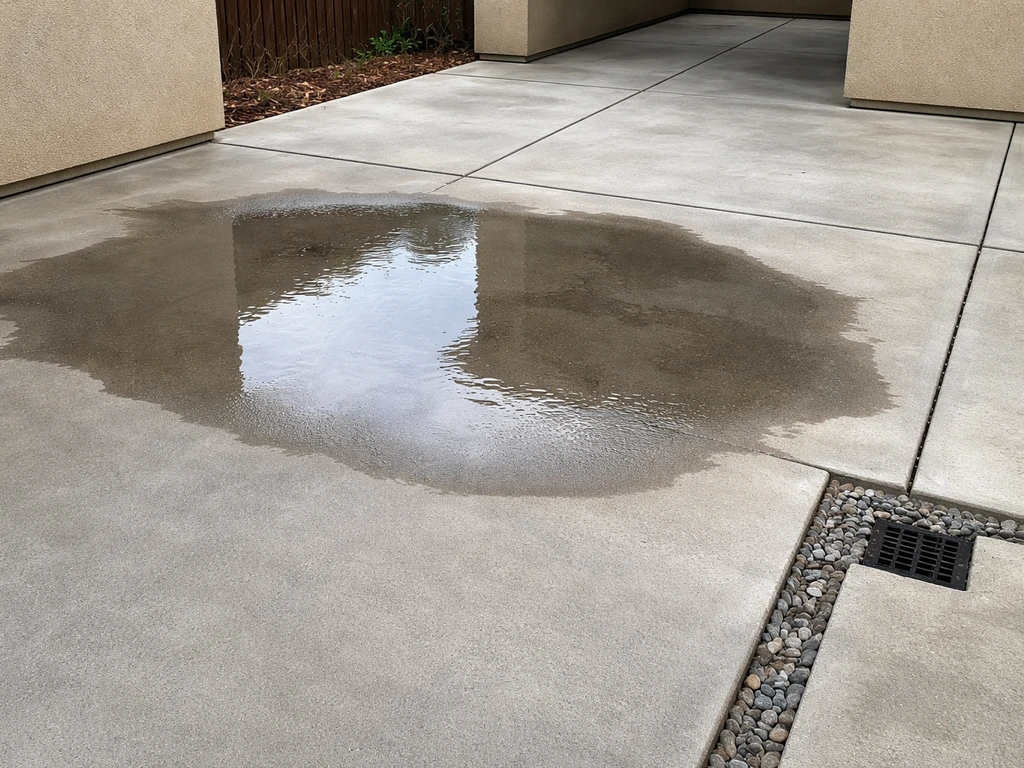
One last thing worth noting: waterproofing reduces how much water your patio absorbs, but it doesn't fix grading or drainage issues. If puddles keep forming on your patio, you typically need to address slope and drainage in addition to sealing fix grading or drainage issues. If water is pooling on the surface or running toward your home's foundation after heavy rain, that's a slope and drainage problem separate from sealing.
If water is pooling on the surface or running toward your home's foundation after heavy rain, that's a slope and drainage problem separate from sealing, see how to stop water pooling on patio for the right fixes. Keeping your patio dry in those conditions involves addressing the grade or adding drainage channels, which works alongside (not instead of) a good waterproofing system.
FAQ
Can I waterproof my patio if it already has old sealant on it?
Yes, but you have to confirm compatibility. Do a small water test and check for peeling, flaking, or areas that look hazy or darker than the rest. If the old layer is failing or peeling, strip it first. If it beads uniformly and the surface is sound, you can usually apply a compatible thin maintenance coat after cleaning and full dry time.
Should I seal a patio that already has efflorescence or white crust on it?
No, treat efflorescence as a moisture and salt problem first. Clean the deposits using the method appropriate to your material (acid-based options only for the surfaces the article calls out), rinse thoroughly, and let the patio dry completely before any sealer. If salts return quickly, you likely have ongoing water ingress through joints or behind brick, which sealing alone will not stop.
What happens if I seal when the patio is still slightly damp?
Even small residual moisture can cause trapped water under film-forming sealers, leading to peeling, hazing, or uneven dark spots. Use the clear plastic sheeting moisture check, and delay sealing until the underside shows no condensation. If you suspect trapped moisture from below, switch to a breathable penetrating sealer or consider a vapor barrier approach rather than a surface film.
How do I decide between a penetrating sealer and a film-forming sealer for my patio?
Use your goal and your substrate. If you want a more natural look, minimal change in appearance, and vapor permeability, start with a penetrating (impregnating) sealer. If you want a stronger surface barrier and easy recoat on concrete or pavers, a film-forming sealer may fit, but it is more sensitive to proper prep, dry conditions, and correct thickness.
Do I need more than one coat to properly waterproof?
Often yes, but the key is thin, even application rather than heavy coverage. If water continues to soak in within the initial cure period, apply an additional thin coat of the same product. If you can’t get water repellency after extra thin coats, it usually means prep or cleaning failed, or previous sealant is blocking penetration, and you may need to strip and restart.
Can I use household bleach on all patio materials to remove algae and mildew?
No. Bleach solutions can be appropriate for concrete, brick, and pavers, but they can etch or discolor natural stone like travertine and flagstone. For those surfaces, use a stone-safe mold and mildew remover formulated for natural stone, then rinse thoroughly so residues do not interfere with sealer adhesion.
Is sealing enough if my pavers shift or the joints wash out?
No. If the joints are soft, sandy, or being eroded by water, repointing is part of waterproofing. Brush out failing joint sand and repack with polymeric sand before sealing. Sealing the tops of pavers without stabilizing joints won’t stop water from undermining pieces through gaps.
What should I do if my sealed patio turns hazy or cloudy?
First identify whether it is mild hazing while tacky, or hazing that has fully cured. Mild acrylic hazing can sometimes be buffed out while still tacky. For cured hazing, the article notes that a compatible solvent approach may help for acrylic, but if the haze is persistent, heavy reapplication or stripping may be required. Prevent it by avoiding overly thick application and sealing under high humidity.
Why does my film-forming sealer peel even after I cleaned the patio?
Peeling usually means one of two things, insufficient cleaning that leaves residue, or moisture trapped beneath the new film. If the surface stays wet or you notice moisture migration, a film-forming coating may not be the right product. In that case, strip peeling film and address moisture movement first, often by switching to a breathable penetrating sealer or adding an appropriate vapor barrier.
How do I keep a sealed patio from becoming slippery after it rains?
If your patio becomes dangerously slick, you can add an anti-slip additive to the top coat before it fully cures, or apply a dedicated anti-slip topcoat over compatible sealer. Check product compatibility with the sealer manufacturer, and plan for this before sealing if your patio frequently gets rain and high foot traffic.
How often should I reseal my patio?
Typical life ranges from about 2 to 5 years depending on material, sealer type, and foot or vehicle traffic. Rather than resealing on a fixed date, do an annual water-drop test in multiple spots. If water stops beading or soaks in quickly, do a maintenance coat if the existing layer is intact and not peeling, otherwise plan for a deeper prep.
What maintenance should I do between resealing to extend waterproofing life?
Keep organic debris from holding moisture against the surface. Sweep or rinse regularly, especially during peak leaf fall and pollen seasons. If you get a stain, clean it promptly using the correct method for your material, because letting stains sit can accelerate breakdown of the sealer at those spots.
If water still pools on my patio, can I fix it by waterproofing alone?
Usually not. Waterproofing reduces absorption, but it does not correct slope, grading, or drainage. If water puddles or runs toward your home after storms, you’ll need drainage and grade corrections, such as adjusting pitch, adding drains or channels, or addressing downspouts. Seal alongside those fixes so water is controlled at both the surface and the penetration level.
Next Articles
How to Fix Standing Water on a Patio: Step by Step
Diagnose and fix standing water on patios with step-by-step drainage checks, material-specific repairs, cleaning, and pr
How to Stop Water Pooling on Patio: Fix Drainage Fast
Quick checks and step-by-step fixes to stop water pooling on patio, clean surfaces, clear drains, and regrade.

How to Remove Thompson’s Patio Sealer Step by Step
Step-by-step removal of Thompson’s patio sealer on concrete, brick, pavers, and stone, with safety, tests, and cleanup.