Standing water on a patio almost always comes down to one of three things: not enough slope away from the house, a blocked or missing drainage outlet, or a sunken section of surface that's created a low spot. Once you know which one you're dealing with, the fix is usually straightforward. Some you can tackle today with tools you already own. Others need a weekend and a little digging. A few require a contractor. This guide walks you through all of it, starting with diagnosis and ending with how to clean up the mess that standing water leaves behind.
How to Fix Standing Water on a Patio: Step by Step

Dylan Hale
17 May 2026
Quick diagnosis: where the water is pooling and why

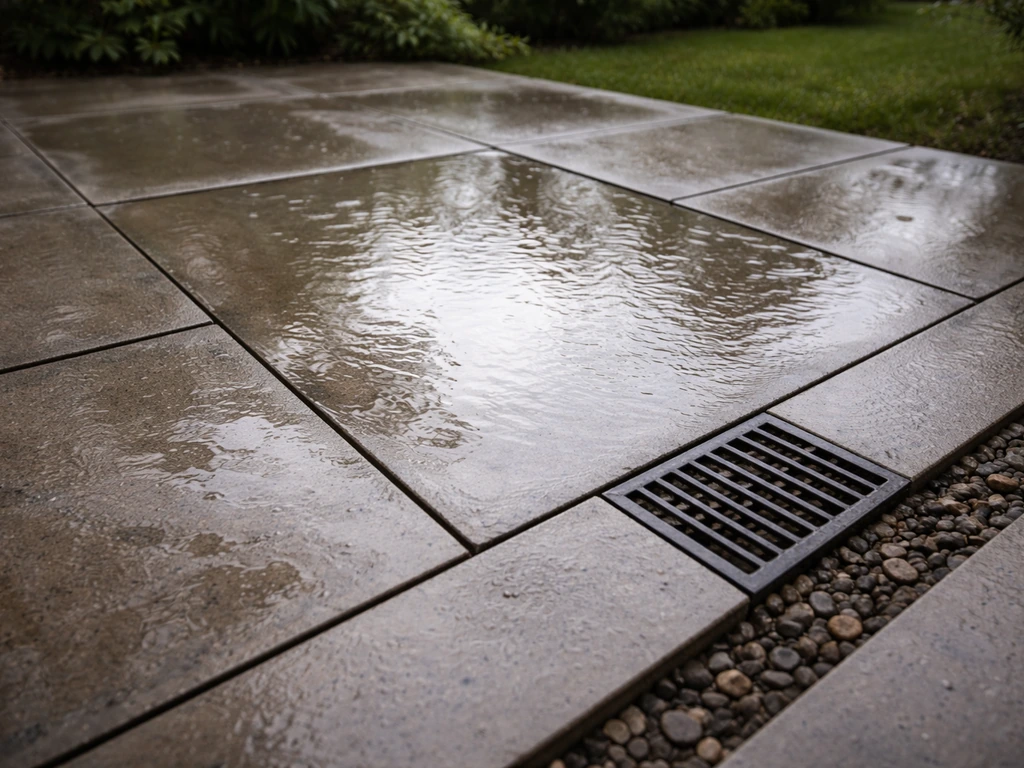
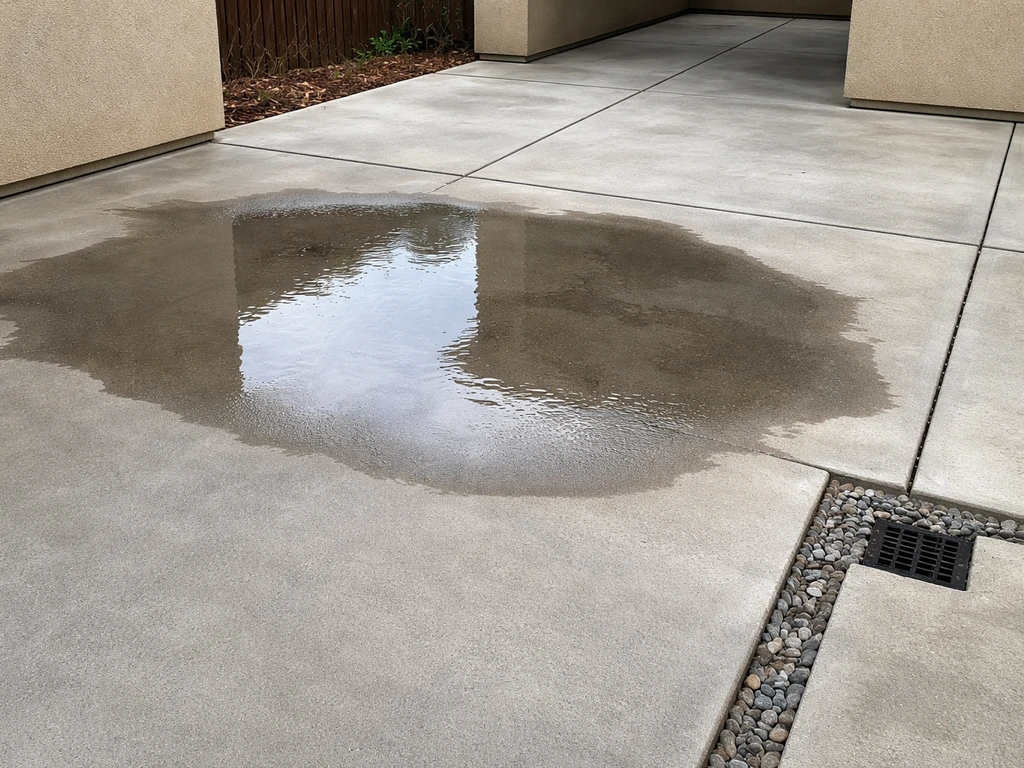
Before you fix anything, spend five minutes watching where the water actually sits after rain. Is it pooling right against your house foundation? Collecting in one corner? Sitting across the whole surface? The location tells you a lot. Water against the foundation usually means the patio slopes toward the house instead of away from it. A single low spot in the middle often signals settlement, where the base material has compacted or shifted under one section. Water sitting across the whole surface suggests either no meaningful slope exists or every drain outlet is blocked.
A few other common culprits worth checking right away: leaves and debris clogging a channel drain or downspout outlet at the patio edge, mortar joints or sand joints that have eroded and now hold water instead of shedding it, weep holes in retaining walls or raised patio edges that are blocked with dirt, and soil that has been compacted so tightly beneath the surface that water has nowhere to go. On older patios, you often see a combination of these happening at once.
The fastest diagnostic tool you have is a long level or a 6-foot straight board and a tape measure. Lay it across the patio surface and measure the gap at the low end. You're looking for roughly 1/4 inch of drop per foot of length running away from the house. If your 10-foot patio has less than 2.5 inches of total drop toward the yard, you don't have enough slope. If it reads zero or drops toward the house, you've found your problem.
Immediate fixes you can do today
Even before you rethink the whole drainage setup, there are quick wins that make a real difference. Start here and you may find the problem is much simpler than you thought.
- Clear all debris from the patio surface, especially around drains, edges, and the junction where the patio meets the house. Leaves and grit pack into channel drains and effectively seal them shut.
- Check your gutters and downspouts. If a downspout dumps water directly onto or immediately adjacent to the patio, that volume can overwhelm any drainage setup. Extend the downspout at least 4 to 6 feet past the patio edge using a flexible extension.
- Locate every drain outlet at the patio perimeter and clear it. Use a garden hose to flush channel drains or weep holes. If water backs up instead of flowing through, you have a clog further along the line.
- For immediate pooling after a storm, a push broom or a floor squeegee can move water off the surface quickly while you work on a permanent fix.
- Temporary absorbent options like sand or pea gravel spread in persistent low spots can slow pooling while you plan the real repair, though these are just stopgaps.
If your patio has a central or edge drain that looks clear but still doesn't drain, run a hose into it and watch what happens downstream. A collapsed or root-invaded drain line underground will need to be addressed before surface fixes matter at all.
Assessing and correcting patio slope and surface flow
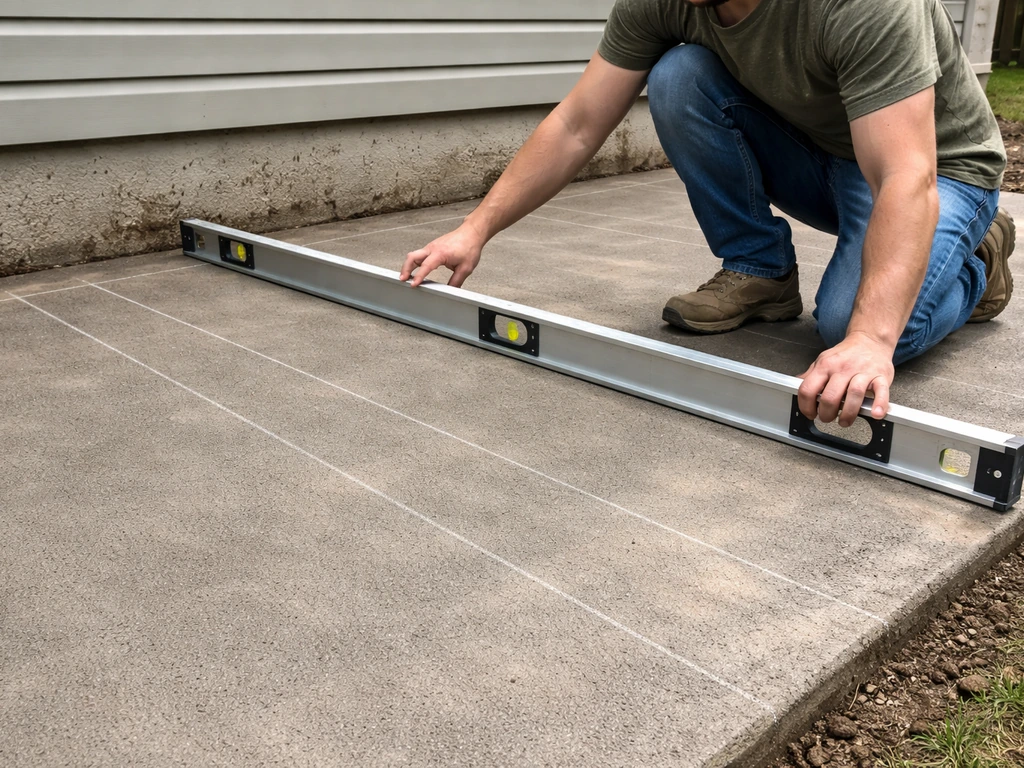
The standard most builders use is 1/4 inch of drop per linear foot, directed away from the house. On a 12-foot patio, that means the outer edge should sit 3 inches lower than the edge against your wall. According to Intermountain Concrete Specialties, this is the widely accepted minimum for concrete, and Rochester Concrete Products recommends the same 1/4-inch-per-foot standard for paver installations. HowToHardscape notes that technically 1/8 inch per foot (about 1% slope) is the absolute minimum for pavers, but in practice anything less than 1/4 inch per foot tends to pool in real-world conditions with any minor settlement.
If the slope is wrong on an existing patio, your options depend on the material. On concrete, you can apply a concrete resurfacer or self-leveling overlay to build up low areas and redirect flow, though this works best when the slope problem is mild (less than an inch off). On paver and stone patios, the best approach is to lift the affected sections, regrade the compacted base material beneath, and reset the pavers or stones with the correct slope. This is more work but it's the right fix. A half-measure like piling sand on top to fill a low spot will wash away within a season.
If the whole patio tilts the wrong way and the slope error is significant, regrading the entire surface is a bigger project. On solid concrete slabs, you're essentially looking at either grinding down high spots, applying a thick overlay (which has adhesion and durability limits), or in severe cases breaking out the slab and pouring new. That's a contractor conversation. On modular surfaces like pavers, brick, or flagstone, the job is more accessible as a DIY project since you're just lifting and resetting.
Material-specific fixes: what works and what to avoid
Every patio surface handles drainage fixes a little differently. What's a simple fix on pavers can cause real damage on natural stone or travertine if you're not careful. Here's what I've found works for each type.
Concrete
Concrete is the most forgiving surface to work with when correcting drainage. Once you have the basics of how water should flow away, you can move on to the next step of drying point a patio by improving the drainage and correcting the low areas how to dry point a patio. For low spots, a hydraulic cement patch or a self-leveling concrete resurfacer can fill depressions and redirect water flow.
Apply it to a clean, damp surface, feather the edges smooth, and let it cure for at least 24 to 48 hours before exposing it to water. For slope correction across a larger area, polymer-modified overlays (available at most hardware stores) can add up to about 1 inch of elevation on the low end without the structural issues of a thick pour.
One caution: if the concrete slab has cracked and settled because the sub-base failed, patching the surface won't stop it from moving again. Fix the base first.
Pavers
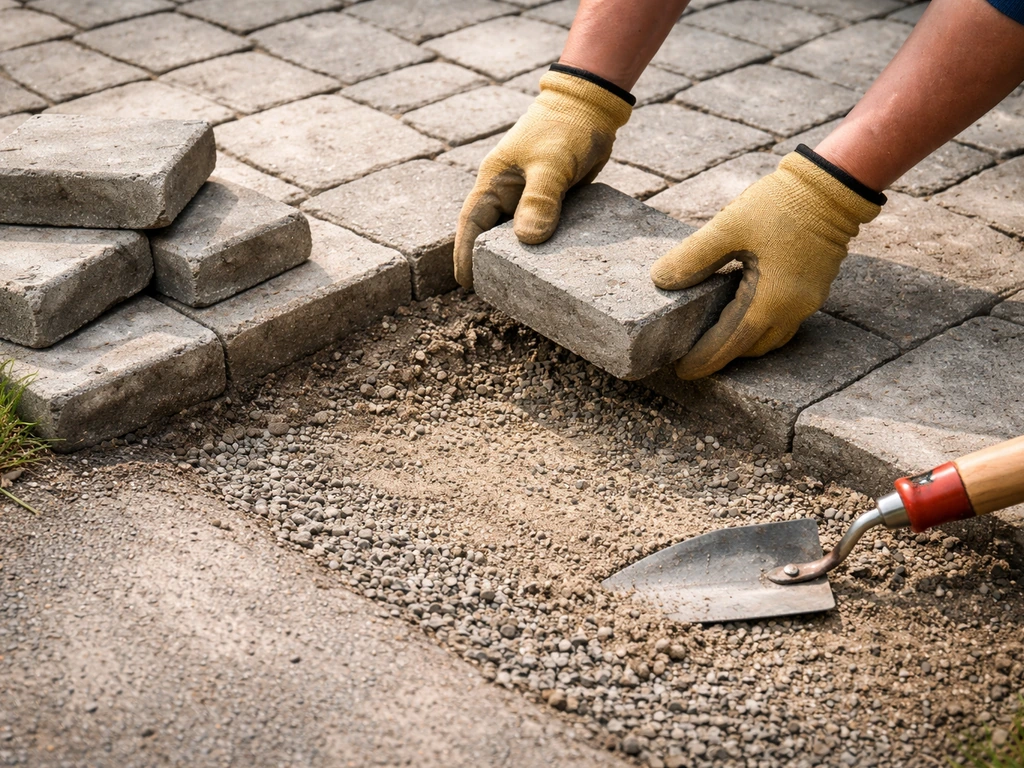
Concrete pavers are ideal for DIY drainage corrections because they can be lifted, the base regraded, and the pavers reset. Pull up the affected section using a pry bar or a flat screwdriver (careful not to chip edges), rake and compact the base material to the correct slope, add or remove base as needed, and reset the pavers. Refill the joints with polymeric sand, which resists washout and discourages weeds better than regular sand. Don't skip compacting: a hand tamper or plate compactor run over the reset area ensures the pavers seat properly and won't rock or tip.
Brick and mortar
Mortared brick patios are trickier because the mortar makes lifting individual bricks destructive. Small low spots can sometimes be corrected by grinding down high adjacent bricks (a job for an angle grinder with a masonry disc) or by carefully chipping out the mortar around a sunken brick, packing mortar beneath it to raise it, and re-pointing around it. If drainage is wrong across a whole mortared section, you're honestly looking at breaking it out and re-laying it properly. For dry-laid brick, the same approach as pavers applies: lift, regrade, reset. Check that the mortar joints on a mortared surface aren't cracked and holding water rather than shedding it. Re-pointing deteriorated joints is a simple repair that makes a real difference.
Natural stone (flagstone, slate)
Flagstone set in sand or gravel can be lifted and reset just like pavers. The challenge is that flagstone is irregular, so you need to re-seat each piece carefully so it doesn't rock or tip. Use a rubber mallet to seat stones firmly once the base is corrected. Flagstone set in mortar follows the same constraints as mortared brick. One thing to be careful about with natural stone: aggressive cleaning products like muriatic acid will etch and discolor the surface. Stick to pH-neutral cleaners or diluted oxygen bleach when cleaning water-stained stone.
Travertine
Travertine is porous and sensitive to acids, so fixing drainage on a travertine patio requires extra care both in the repair process and the cleanup afterward. If travertine tiles are set in mortar and are sitting in standing water, water can infiltrate the grout joints, erode the mortar bed beneath, and cause tiles to lift or crack. To correct slope issues, work one tile at a time: chip out the existing mortar, correct the height of the setting bed, and re-set the tile with fresh polymer-modified tile mortar. Re-grout with a sanded grout rated for exterior use. Never use muriatic acid on travertine. For cleaning, use a pH-neutral stone cleaner or a heavily diluted dish soap solution.
Quick comparison by material
| Material | DIY-friendly fix? | Slope correction method | Products to avoid |
|---|---|---|---|
| Concrete | Yes, for mild issues | Resurfacer overlay or hydraulic cement patch | Muriatic acid on colored/coated concrete |
| Pavers | Yes | Lift, regrade base, reset with polymeric sand | Pressure washing sand joints excessively |
| Brick (dry-laid) | Yes | Lift, regrade base, reset | Muriatic acid on older handmade brick |
| Brick (mortared) | Partial | Re-point joints, lift individual bricks | Wire brushes on soft mortar |
| Flagstone (sand-set) | Yes | Lift, regrade base, reset with rubber mallet | Acid cleaners, power washing at high PSI |
| Travertine | Partial, careful work | Chip out tile, correct mortar bed, re-set | Muriatic acid, vinegar, any acidic cleaner |
| Natural stone (mortared) | Partial | Re-point joints, chip out and re-set individual stones | Acidic cleaners, bleach at high concentration |
Base and sub-drain fixes for deeper problems
Sometimes the surface isn't the problem at all. The issue is what's happening underneath. Standing water on a patio over time seeps into joints and beneath the surface, eroding the sub-base and causing slabs or stones to sink, heave, and become uneven, as Homebuilding.co.uk explains. This is a slow process but it accelerates once it starts, because sunken sections hold more water, which causes more erosion, which causes more sinking.
Settlement and compacted base
If sections of your patio have clearly sunk or tilted, the sub-base has either settled or washed out. On paver and stone patios, the fix is to lift the sunken section, excavate the area, add compacted gravel base material (typically 4 to 6 inches of compacted crushed stone), and reset the surface. On a concrete slab, mudjacking (also called slabjacking) is a process where a contractor pumps a grout or polyurethane foam beneath the slab to lift and level it, which is less disruptive than breaking out and pouring new concrete. Small cracks and single sunken sections are good candidates for mudjacking. A slab that's cracked in multiple places and settling in different directions usually needs full replacement.
Clogged or absent drainage
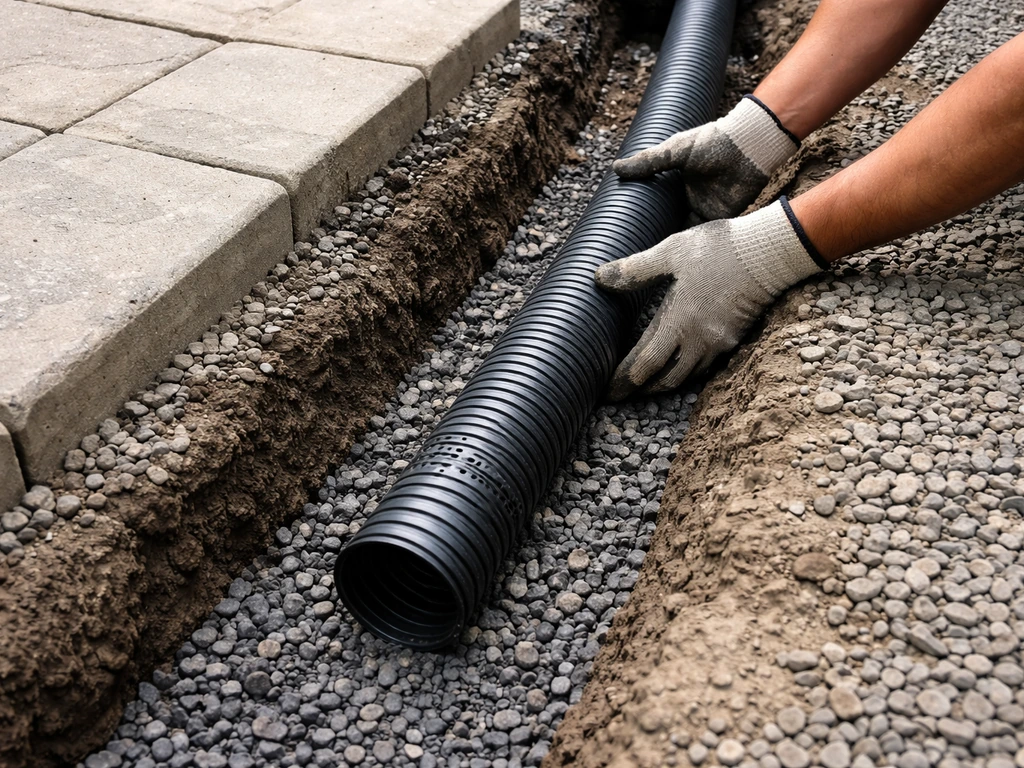
If water is hitting your patio surface and has nowhere to go, adding drainage is more effective than trying to move all the water with slope alone. A channel drain (also called a trench drain) installed at the low edge of the patio catches surface water and routes it through an underground pipe to daylight or a dry well. For patios that are already built, surface-mount channel drains can be set into a shallow saw-cut channel across the patio and are a reasonable DIY project for those comfortable with concrete cutting. A catch basin in a persistent low spot is another option: a grated box drain set into the patio surface that connects to an underground pipe.
French drains around the patio perimeter
If your patio collects water from surrounding yard runoff, a French drain installed around the uphill perimeter of the patio intercepts water before it reaches the surface. A French drain is a perforated pipe wrapped in landscape fabric and surrounded by gravel, buried in a trench that slopes to an outlet. Eger Excavating notes that good drainage design combines correct slope with permeable base materials and properly positioned drain outlets. A French drain handles the water that arrives from uphill; slope and surface drains handle the water that falls directly on the patio. You often need both.
Cleaning up the damage standing water leaves behind
Standing water is basically an invitation for algae, black mold, and organic staining. Once you fix the drainage, you'll likely still have a green or black residue on the surface, slippery patches, and possibly rust staining from wet metal furniture. Here's how to deal with it safely, without making the underlying surface worse.
Algae and mold
For most patio surfaces, a diluted sodium hypochlorite (bleach) solution is the most effective cleaner for algae and black mold. Mix 1 cup of household bleach per gallon of water, apply it to the affected area, let it dwell for 10 to 15 minutes, then scrub with a stiff brush and rinse thoroughly. This works well on concrete, brick, and pavers. I've found that a garden pump sprayer makes application easy and controlled. Rinse completely, because bleach residue left on pavers can affect joint sand over time.
For natural stone (flagstone, travertine, slate), bleach at full dilution can affect the color and surface over time. Use oxygen bleach (sodium percarbonate) instead: mix 1 to 2 tablespoons per gallon of warm water, apply, and let it work for 20 to 30 minutes before scrubbing. It's gentler and still effective on organic growth. For very light algae growth, white vinegar diluted 50/50 with water works and is a good pet-safe option, though it takes longer and doesn't penetrate heavy growth as well. Important: never use vinegar on travertine or marble, as the acidity will etch the surface permanently.
Staining from standing water
Rust stains from wet metal furniture are common after pooling. On concrete, a commercial oxalic acid-based rust remover applied to the stain, left to dwell for 5 minutes, then scrubbed and rinsed, usually lifts the stain without damaging the surface. On natural stone, use the same oxalic acid approach but test a small hidden area first, since some stones react.
Muriatic acid is sometimes suggested for stubborn concrete stains, but it should be a last resort: dilute it heavily (1 part acid to 10 parts water, always adding acid to water), wear chemical gloves and eye protection, work in a ventilated space, and neutralize the surface with a baking soda and water solution afterward. Never use muriatic acid on brick with soft mortar, travertine, natural stone, or any surface with a coating or sealer.
Pressure washing considerations
Pressure washing is efficient for post-standing-water cleanup, but use it carefully. On concrete, 1500 to 3000 PSI is appropriate. On pavers and brick, keep to 1200 to 1500 PSI and use a wide fan tip rather than a pinpoint nozzle, or you'll strip the joint sand and erode mortar. On flagstone and natural stone, 1000 to 1200 PSI maximum, and keep the nozzle moving. On travertine, I'd skip the pressure washer and use manual scrubbing. If you don't own a pressure washer, a stiff deck brush and bucket method gets the job done and is safer for delicate surfaces.
Preventing it from coming back
Once you've fixed the drainage and cleaned the surface, a few maintenance habits will prevent you from dealing with this again next season. Seal paver joints with fresh polymeric sand every two to three years. It locks out water infiltration, resists erosion, and slows organic growth. For concrete patios, a penetrating concrete sealer applied every two to three years reduces how much water the surface absorbs.
If you are seeing condensation or damp patches on your patio surface after rain, start by fixing drainage and then use a penetrating concrete sealer to help prevent that moisture from being absorbed how to stop concrete patio from sweating. On natural stone, use a stone-specific penetrating sealer, not a topical film sealer that can trap moisture beneath it.
Keep gutters and downspouts clear and directed well away from the patio. Check drain outlets every spring and fall and clear debris before it has a chance to compact into a blockage. If you've installed a French drain or catch basin, flush it with a garden hose annually to confirm it's flowing freely. These are small tasks that prevent large, expensive repairs. Related problems like condensation on a patio roof or sweating on a concrete surface can also contribute to moisture issues, so it's worth addressing those at the same time if they're present.
When to call a contractor instead
Most drainage fixes are DIY-friendly if you're comfortable with physical work and basic tools. But there are situations where calling a pro is the right call. If your concrete slab has cracked in multiple places and sections are heaving or sinking in different directions, the sub-base has likely failed in a way that surface patching won't solve.
If you've cleared every visible drain and added slope correction but water still consistently pools in the same spot, you may have a collapsed underground drain line or a high water table issue that needs professional assessment. If that happens, follow the steps above to correct slope and clear or add drainage so the puddles do not return how to stop puddles on patio.
If the standing water is happening under a deck, the same drainage planning and slope adjustments can help you figure out where the moisture is coming from and how to keep the patio area dry how to keep patio under deck dry.
If your patio is immediately adjacent to your home's foundation and water is pooling there, don't delay: that moisture can work its way into the foundation and cause structural problems that make a patio repair look minor by comparison.
A good landscape contractor or drainage specialist can camera-inspect underground lines, assess sub-base failure, and design a proper French drain or catch basin system sized for your actual runoff volume. Get at least two quotes and ask specifically about long-term maintenance access for any drain system they install. The fix should be something you can keep working on your own, not a black box buried under your patio.
FAQ
How can I tell if standing water is from runoff, sub-base failure, or a plumbing leak?
A quick safety check is to confirm the water is surface runoff, not a leak. Run a hose for 10 to 15 minutes in the same pattern as rainfall (or watch after irrigation) and see if water appears only at the low spot you measured. If it forms in multiple, shifting areas or comes up after only one nearby fixture runs, investigate possible plumbing leaks first, since fixing patio slope or drains won’t stop a pipe problem.
Can I fix standing water with patching alone, or do I need to regrade?
Yes, but only in specific cases. If the patio is within about an inch of correct grade in the localized area, leveling compounds and patch products can redirect flow. If the whole patio has the wrong tilt, or you see progressive cracking or recurring puddling in the same exact location after cleanup, you likely need regrading or a drainage addition, because filling low spots won’t correct the underlying direction of water movement.
What should I test if my patio drain looks clear but water still pools?
Before buying materials, verify that the drainage path is actually working. Use a hose to fill the patio drain outlet or channel drain and watch where the water goes underground (toward daylight, a cleanout, or a dry well). If water backs up at the surface drain even briefly, you may have a blocked or collapsed line, and surface slope fixes will keep failing.
How do I measure patio slope correctly if puddles appear in more than one spot?
If you’re measuring slope, don’t rely on “eyeballing” the low edge. Measure across the whole width in at least two directions, then re-check using a long level plus tape measure, because patios can have a compound tilt (one direction pushes water toward the house, the other direction pushes it to the side). A single measurement can miss the true low area that controls puddling.
Why does dumping extra sand into a low spot not work long term?
Avoid using top-fill sand as a long-term fix. Joint sand and polymeric sand are designed for topping off joints, not for building structural grade over compacted base. Piling sand on top will wash out or compact unevenly, and it usually changes the drainage pattern again within a season.
What are common mistakes when lifting and resetting pavers or brick?
For pavers and brick, the biggest “make it worse” mistake is skipping compaction and using the wrong joint material. Always recompact the base after regrading (hand tamper for small areas, plate compactor for larger ones), and refill joints with polymeric sand so rainfall doesn’t wash fines out. Also keep water runoff away from the edge during the first curing period, otherwise the reset can shift.
Do I need to size a French drain or channel drain, and what discharge options should I plan for?
If you add a French drain or trench drain, size and outlet matter more than the pipe itself. A drain that discharges to a dead-end area can still cause standing water. Plan an outlet that accepts the flow (daylight, properly sized discharge line, or a dry well designed for your soil), and confirm the trench has consistent fall so water keeps moving.
When should I avoid concrete resurfacer and instead consider mudjacking or slab replacement?
Concrete resurfacer or self-leveling products can fail when the slab movement continues. If you see widespread cracking, multiple settled areas, or movement that reappears after rain, address the sub-base first (or consider mudjacking or replacement). A patch that hides the low spot may crack, debond, and re-create pooling once water cycles through.
What’s the safest way to clean algae or black mold after fixing the drainage, by patio material?
For cleanup, match the cleaner to the surface. Bleach-based solutions are generally fine for concrete, brick, and pavers, but they can discolor or dull natural stone over time. For flagstone and travertine, oxygen bleach is safer, and for travertine you should skip vinegar and pressure washing to avoid etching and grout damage.
What should I do first if my patio is pooling right against my home’s foundation?
If the patio is adjacent to a foundation and water pools there, treat it as urgent. Standing water can increase moisture intrusion and contribute to foundation problems, even if the patio itself looks stable. Focus first on directing surface flow away from the house (slope correction plus surface drains where needed), then verify downspouts discharge far from the foundation.
What maintenance actually prevents standing water from coming back next season?
Use maintenance to prevent reoccurrence. Refill paver joints with fresh polymeric sand every couple of years (or when you see joints washing out), and keep gutters and downspouts clear so runoff doesn’t overwhelm the patio drainage. If you have a trench drain or French drain, a simple annual flush helps catch early blockages before they become surface puddles.
Next Articles
How to Stop Water Pooling on Patio: Fix Drainage Fast
Quick checks and step-by-step fixes to stop water pooling on patio, clean surfaces, clear drains, and regrade.

How to Remove Thompson’s Patio Sealer Step by Step
Step-by-step removal of Thompson’s patio sealer on concrete, brick, pavers, and stone, with safety, tests, and cleanup.
Can You Remove Patio Sealer? How to Strip It Safely
Learn if you can remove patio sealer and how to strip it safely by type, material, and method.