
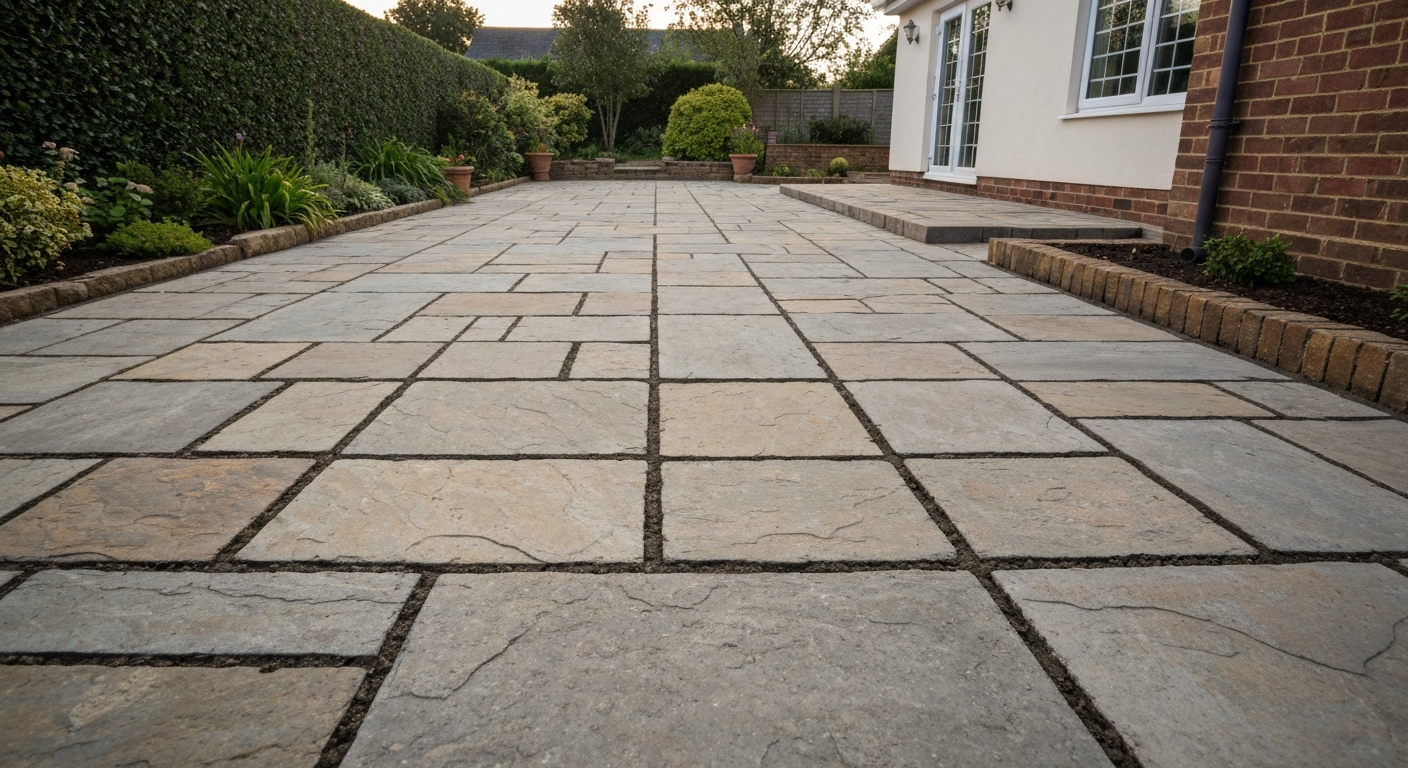
Dry pointing a patio means raking out the old, crumbled mortar or sand from between your slabs, pavers, bricks, or flagstones and packing new material back in. Done right, it stops water from getting underneath your patio surface, prevents weeds from taking over every joint, and buys you years of solid, level footing. Most homeowners can do the whole job in a weekend with basic tools, a bag of the right jointing material, and a bit of patience.
How to Dry Point a Patio: Complete DIY Repointing Guide

Dylan Hale
14 Jul 2026
What this guide covers and who it's for
This guide is for homeowners and renters who've noticed crumbling, missing, or weed-choked joints on their patio and want a lasting fix without calling a contractor. I'll walk you through exactly what dry pointing is, when you genuinely need it, how to pick the right material for your patio type, and the full step-by-step process from stripping out old joints to finishing and curing. I'll also cover the drainage and water-management side of things, because in my experience bad jointing and poor drainage almost always go hand in hand. If your patio is also dealing with standing water or puddles, those issues need diagnosing at the same time, and I'll show you how.
What dry pointing actually is and why it matters
The term 'dry pointing' is used mostly in the UK and Australia to describe filling patio joints with a dry or semi-dry mortar mix that is then activated by rain or light misting, as opposed to traditional wet-mixed mortar applied with a trowel. In everyday use, homeowners and patio guides use 'dry pointing' and 'repointing' interchangeably to mean the same job: removing degraded jointing material and replacing it. In the US, the equivalent product is polymeric jointing sand for pavers and flagstone, or mortar for brick and stone. Whatever you call it, the function is the same: the filled joint acts as a seal that prevents surface water from trickling down into the sub-base, stops the freeze-thaw cycle from prising slabs apart, and holds each unit firmly in position so the surface stays level and safe to walk on.
When joints fail, water gets in. That water softens the sand or mortar bed under your slabs, causes individual units to rock and sink, and creates the perfect damp environment for moss, algae, and weeds to establish themselves. I've seen patios that looked fine on the surface turn out to have completely hollow sub-bases because the joints had been open for two or three winters. Repointing early is always cheaper than relaying.
Signs you actually need to dry point your patio
Not every patio problem is a jointing problem. Before you buy materials, check which of the following symptoms you actually have, because some of them point to drainage issues rather than joint failure.
- Joints that are visibly cracked, crumbling, or missing entirely — this is classic joint failure
- Weeds, moss, or grass growing out of the joints — roots have exploited gaps and are actively widening them
- Individual slabs or pavers that rock or feel hollow underfoot — the bedding beneath has been washed out
- Gritty sand washing onto the surface after rain — the joint filler has already broken down
- Surface lifting or heaving in winter — water is entering joints, freezing, and expanding
- Staining lines along joint edges — water is tracking through and depositing minerals (efflorescence)
If you're also seeing puddles sitting on the surface for hours after rain, or water pooling near your house wall, those symptoms point to a slope or drainage problem rather than (or in addition to) joint failure. Repointing alone won't fix poor drainage, and I'll explain how to tell the difference in the next section.
Diagnosing the real cause before you start
I always spend ten minutes diagnosing before I touch anything. Getting this wrong wastes a day of work and money on materials that won't solve the problem.
Joint failure
Prod the joints with a screwdriver. If mortar or sand crumbles out easily to a depth of more than 6–10 mm (about a quarter inch), the jointing material has failed and repointing will fix it. If joints look intact but you're still seeing water problems, the cause is elsewhere.
Poor surface slope
A correctly laid patio should fall away from the house at a minimum of 1.5–2%, which works out to roughly 1/4 inch of drop per foot (about 6 mm per 300 mm). Place a long spirit level on the surface and check. If water is running toward the house or pooling in a flat low spot, that's a slope problem. Repointing will still be necessary, but you'll also need to address the grade. Patios under decks have a particular tendency to develop this issue because they're sheltered from the frost cycles that would normally signal trouble earlier. For specific steps on how to keep a patio under a deck dry, see this practical guide on how to keep a patio under a deck dry.
Blocked outlets and channel drains
If you have a channel or linear drain, lift the grate and check whether it's blocked with debris. A blocked outlet can cause backing-up that looks exactly like a slope or jointing issue. Clear it and see whether the problem resolves before committing to a full repoint.
Sub-base failure
If several adjacent slabs all rock or feel springy, the compacted base underneath has shifted or washed away. In this case, repointing the joints without lifting and re-bedding those slabs will not hold. You need to lift the affected area, recompact or top up the sub-base, re-lay the units, and then repoint.
Standing water and drainage upgrades
Persistent standing water that doesn't relate to blocked outlets usually needs a structural drainage solution: regrading the surface, installing a channel drain at the low point, or in severe cases adding a French drain at the perimeter. For a concise guide on how to stop puddles on patio, see the internal resource on how to stop puddles on patio. For step-by-step solutions to persistent puddles and pooling, see our guide on how to fix standing water on patio. These are bigger projects that go beyond repointing, but getting the drainage right first means your new jointing material will last far longer.
Choosing the right jointing material for your patio
This is the decision that most DIY articles rush past, and it's the most important one. Using the wrong material for your patio type is the single biggest reason repointing fails within a year. Here's what works where.
| Patio Type | Recommended Material | Why | Avoid |
|---|---|---|---|
| Concrete block / interlocking pavers | Polymeric jointing sand | Flexible, weed-resistant, water-activated; suits standard joints of 1/8" (3 mm) to about 2" | Cement mortar (too rigid, cracks with paver movement) |
| Brick (modern, hard) | Type S cement mortar (ASTM C270) | Strong, weather-resistant; suits exposed horizontal joints | Lime mortar (too soft for high-traffic brick paving) |
| Brick (historic, soft) | Lime mortar (NHL or lime putty mix) | Softer than brick itself; allows movement and drying without cracking the units | Portland cement mortar (harder than brick, traps moisture) |
| Natural stone / flagstone | Lime mortar or polymeric sand depending on joint width | Wide joints (over 1") need lime or weak cement mortar; narrow joints suit polymeric sand | High-strength Type M mortar (can crack softer stone) |
| Sandstone / travertine | Lime-rich mortar (Type O or lime putty) | These stones are porous and soft; a flexible, breathable mortar protects them | Neat Portland cement (staining risk, spalling risk) |
| Concrete slab (crack/joint repair) | Flexible polyurethane or epoxy jointing compound | Accommodates thermal expansion in large slabs | Rigid cement mortar (will re-crack with slab movement) |
A note on mortar types: ASTM C270 defines the four standard mortar types used in the US. ASTM C270 is the current U.S. standard specification for mortar for unit masonry and defines two compliance methods (proportion specification and property specification) and the four common mortar types (M, S, N, O) with required properties and applications ASTM C270 - Standard Specification for Mortar for Unit Masonry defines the four standard mortar types (M, S, N, O) and specifies compliance methods and required properties.. Type M is the strongest (high Portland cement content) and is suited to below-grade or very heavy-duty work but is too rigid for most patio jointing. Type S is the standard choice for horizontal masonry work like brick patios. Type N is a softer, more flexible mix suited to above-grade work and some stone applications. Type O is the softest and is used for interior or sheltered work, or for repointing historic and soft masonry. The governing principle in masonry preservation, reinforced by NPS guidance, is to always use the weakest mortar that will do the job, a mortar softer than the masonry unit protects the unit from cracking.
For historic or soft brick and stone, lime mortar is the right call. It cures slowly through carbonation rather than rapid hydration, which means it needs longer damp-curing control and takes several weeks to reach full strength. The payoff is a jointing material that flexes slightly with the masonry rather than forcing cracks into the units themselves.
Sand and screed for re-bedding
If you're lifting and re-laying any slabs as part of this project, the bedding sand or mortar screed underneath must also be appropriate for the load and material. Masonry sand used in mortar mixes should meet ASTM C144 grading requirements for quality and consistency. Don't use builder's sand straight from a bag without checking it's graded for mortar use, the wrong sand makes weak joints regardless of the cement ratio.
Sealers
Sealing after repointing is optional but worthwhile for porous materials like sandstone and travertine. A penetrating impregnator sealer reduces water absorption and extends the life of the new jointing material by reducing freeze-thaw cycling through the joint faces. Film-forming sealers are not generally recommended for exterior horizontal paving because they can trap moisture underneath and peel. If you're concerned about condensation or sweating on your patio surface (more common with concrete), sealing is part of the solution alongside improving drainage and airflow.
Tools, PPE and prep supplies you'll need
You don't need professional equipment to repoint a standard residential patio. Here's what I'd gather before starting.
- Angle grinder with a diamond tuckpointing/raking blade (for hard set mortar) OR a manual plugging chisel and club hammer (slower but safer on softer stone)
- Wire brush or stiff-bristle brush for cleaning out loose debris
- Vacuum with a HEPA filter or a wet/dry shop vacuum for dust and debris removal
- Garden hose or low-pressure sprayer for flushing joints and misting during cure
- Soft rubber mallet and tamping tool (for compacting polymeric sand)
- Pointing trowel and a margin trowel or jointing iron (for mortar application)
- Grout bag or caulking gun (optional — useful for mortar in tight joints)
- Stiff brush or broom (for sweeping polymeric sand into joints)
- Bucket and paddle mixer (for mortar mixing)
- Measuring tape and spirit level
- Knee pads — you will be on the ground for hours
- P100 or FFP3 respirator (not just a dust mask — cutting old mortar releases respirable crystalline silica)
- Safety glasses or goggles
- Heavy work gloves
- Hearing protection if using power tools
On silica dust: OSHA's construction silica standard (29 CFR 1926.1153) specifically lists tuckpointing and mortar removal as regulated tasks. The standard requires either wet cutting with water suppression, or power tools equipped with a shroud and HEPA-vacuum dust collection. If you're using a dry angle grinder without these controls, you must wear a P100 respirator rated for crystalline silica. I can't stress this enough, old mortar dust is a genuine long-term health hazard, not just a nuisance. Even on a small DIY patio job, a proper respirator is not optional.
Preparing the patio and joints before you start pointing
Preparation is where the job is actually won or lost. New jointing material applied over dirty, damp, or dusty joints will fail within one season. Take the time to do this properly.
Step 1: Clear the surface
Remove all furniture, pots, and anything else from the patio. Sweep the entire surface thoroughly with a stiff broom to remove loose debris, grit, and leaf matter.
Step 2: Kill and remove vegetation
Any weeds growing in the joints need to come out roots and all. I use a flat-bladed weeding tool or an old screwdriver to work them out. If you have extensive moss or algae, treat the surface first with a diluted sodium hypochlorite solution (about 1 part household bleach to 5 parts water, applied with a stiff brush and rinsed off after 15–20 minutes) or a commercial patio cleaner. For a gentler option that's safer if you have pets or nearby planted areas, a strong white vinegar solution (undiluted) applied and left for 30 minutes will kill moss and algae without harsh chemicals. Allow the surface to dry for at least 24 hours after any wet treatment before starting joint work.
Step 3: Check for structural issues
Walk the entire patio and press on each slab or paver. Mark any rocking, hollow-sounding, or significantly sunken units with chalk. These need to be lifted, re-bedded, and relaid before you repoint. Don't repoint over a failing base, new pointing over a rocking slab will crack within weeks.
Step 4: Check weather conditions
For polymeric sand, manufacturer specifications (including products like Techniseal SmartSand and Gator SuperSand G2) require that the paver surface and joints be completely dry before application, that temperatures be above freezing (above 32°F / 0°C), and that you have a clear weather window with no rain expected for at least 24 hours after activation (some products claim a shorter 15-minute rain-safe window after the water activation step, check your specific product's technical data sheet). For mortar, you need temperatures between about 40°F (5°C) and 90°F (32°C), no rain forecast for at least 24 hours, and protection from direct strong sun during the early cure phase.
Removing old mortar and preparing joints: techniques by patio type
This is the most physically demanding part of the job. The goal is to remove all deteriorated material to a depth at which you reach sound, intact jointing material or a clean substrate, and no more. NPS Preservation Brief 2 recommends removing to a minimum depth of about 2 to 2.5 times the joint width, with a practical minimum of around 1/2 inch (12–15 mm) for most paving joints. Going deeper than necessary is wasteful and can destabilize adjacent units.
Brick patio joints
For modern hard brick, an angle grinder with a diamond raking blade is the fastest method. Set the depth carefully so you don't contact the brick edges, I set mine to cut about 15–20 mm deep for a standard 10 mm joint. Keep the grinder moving steadily; if you dwell in one spot you risk cutting into the brick. For historic or soft brick, ditch the power tool entirely and use a plugging chisel and club hammer. It takes longer, but it's the only method that won't chip or crack soft handmade bricks. After raking, brush out all loose material with a wire brush, then vacuum the joint thoroughly.
Natural stone and flagstone joints
Power grinders are risky here because stone edges chip easily. For most flagstone work, I use a cold chisel and mallet to break out the old mortar, then a stiff brush and vacuum. Wide flagstone joints (over 25 mm / 1 inch) often have mortar applied in layers, when removing these, take them out in stages to avoid disturbing the bedding underneath. Historic England and preservation guidance specifically recommends hand tools wherever possible and stresses the importance of brushing and vacuuming (or low-pressure water flushing) the joint after raking to eliminate all dust before new material goes in.
Interlocking concrete pavers
Paver joints typically hold polymeric sand or plain kiln-dried sand rather than mortar. These joints are shallower and easier to prepare, use a stiff brush or a leaf blower to clear out existing sand and debris. If weeds have colonized the joints, a flat weeding tool followed by a thorough brush-and-vacuum is usually sufficient. ICPI (Interlocking Concrete Pavement Institute) guidance makes clear that the paver base and bedding system must be performing correctly before joint stabilization is done; if the base is compromised, the polymeric sand won't compensate for it.
Concrete slabs with expansion joints
Concrete expansion joints are a different animal, they're designed to accommodate thermal movement, so filling them with rigid mortar is wrong. Rake out any failed sealant or backer rod with a utility knife and narrow chisel. The joint needs to be clean and dry, with sound concrete on both sides, before a flexible polyurethane jointing compound is applied.
After raking: the critical cleaning step
Regardless of patio type, once you've finished raking, go back along every joint with a stiff brush, then vacuum thoroughly. Historic England and NPS guidance both emphasize brushing and low-pressure water flushing (or vacuuming) joints to remove all fine dust and loose particles before pointing. Silica dust left in the joint weakens bond and can cause new mortar to delaminate. If you're using mortar (not polymeric sand), lightly mist the joints with water so they're damp but not saturated, a wet joint improves bond and reduces the risk of the mortar drying out too quickly and shrinking. Don't flood them.
Applying the new jointing material: step by step
Polymeric sand (for pavers and flagstone with narrow joints)
- Confirm joints and surface are completely dry — even morning dew will prevent proper activation. Wait at least 24 hours after rain.
- Pour the polymeric sand across the patio surface and sweep it diagonally into the joints using a stiff broom. Work in multiple passes to fully fill every joint. Techniseal and Gator products both require joints to be filled to within about 1/8 inch (3 mm) of the surface.
- Compact the sand into joints using a plate compactor (for large areas) or by tamping with a rubber mallet and a timber offcut. Add more sand and sweep in again — joints compress more than you expect.
- Blow or brush excess sand completely off the paver surface. Any sand left on the surface when you activate it will bond there permanently.
- Lightly mist the surface with a garden hose on a gentle spray setting — not a jet. The goal is to activate the binding agents, not to flood the joints. Follow your product's specific water volume guidance; over-watering washes the binders out of the joint.
- Allow to cure undisturbed. Keep foot traffic off for at least 24 hours; avoid heavy rain for the period specified on your product's data sheet.
Cement mortar (for brick and hard stone)
- Mix your mortar to a stiff, workable consistency — it should hold its shape when squeezed and not slump. A Type S mix for most patio brick work is approximately 1 part Portland cement to 4.5 parts sand (by volume), per ASTM C270 proportion specifications.
- Lightly dampen (don't flood) the prepared joints with a mist of water immediately before pointing to improve bond.
- Load a small amount of mortar onto a hawk board and use a pointing trowel or a purpose-made jointing iron to press mortar firmly into the joint in layers. For joints deeper than about 25 mm (1 inch), fill in two lifts, allowing the first to stiffen slightly before adding the second.
- Compact each lift firmly as you go — loose, air-gapped mortar is weak mortar.
- Finish the joint with a profile appropriate to your paving. For horizontal patio joints, a flush or slightly recessed finish is standard. A flush joint repels water and doesn't collect debris.
- Remove any smears from the slab or brick face with a barely damp sponge while the mortar is still fresh. Don't smear — dab and remove. Dry-brush residue off after the mortar has stiffened.
- Mist the finished joints gently with water at least twice a day for 7 days (and ideally up to 14 days) to support proper hydration and curing. Cover with damp burlap in hot, dry, or windy conditions. Bureau of Reclamation and ACI guidance both recommend this extended moist-curing period for durable concrete and mortar repair.
Lime mortar (for soft, historic, or natural stone)
Lime mortar is applied with the same technique as cement mortar but requires more patience. Mix to a firm but workable consistency using either lime putty or a natural hydraulic lime (NHL) product, following the manufacturer's mix guidance. NHL 2 or NHL 3.5 products are suitable for most sheltered patio applications; NHL 5 is used in exposed or load-bearing situations. Press firmly into joints in layers no more than 25 mm deep at a time. Lime mortar cures slowly through carbonation, it needs weeks rather than days to reach full strength. Keep it damp and shaded during the early cure period, and don't allow it to freeze before it has hardened. Don't rush this material.
Drainage fixes to do alongside repointing
New jointing material works best when the surface is draining properly. If your diagnosis revealed a slope or drainage problem, here are the practical fixes to combine with your repointing work. For practical tips on reducing surface moisture and preventing pooling, see how to keep patio dry.
Correcting surface slope
A patio needs to fall at a minimum 1.5–2% gradient (1/4 inch per foot) away from the house and toward a designated outlet or lawn edge. If yours is flat or falls the wrong way, the only real fix is lifting and re-laying the slabs on a correctly graded bed. That's a bigger job than repointing, but it's the correct solution. Patching grout over a flat patio just delays the problem.
Adding a channel drain
Where you can't improve slope easily (for instance, where the patio abuts a wall on both sides), a channel or trench drain installed at the lowest point will capture surface water before it pools. Products like NDS Dura-Slope come pre-sloped to simplify installation. The key is matching the outlet location to an existing drainage point and ensuring the grate is load-rated for foot traffic.
Permeable joints
If your patio has a suitable free-draining sub-base, you can use open-graded jointing sand or permeable polymeric sand that allows water to drain through the joint rather than run off the surface. This is especially practical for paver patios and eliminates pooling entirely on well-prepared bases. Check with your local municipality, some areas offer stormwater incentives for permeable paving.
Waterproofing, sealers and moisture control
Sealing after repointing is a good investment for porous materials and any patio exposed to harsh winters. For step-by-step advice on sealing and waterproofing patio surfaces, see how to waterproof patio. A penetrating silane/siloxane impregnator sealer reduces water absorption without changing the surface appearance significantly. Apply it after the mortar or polymeric sand has fully cured (at least 28 days for cement mortar, at least 72 hours for most polymeric sands) on a dry, clean surface. For concrete patios that 'sweat' or produce condensation on humid days, the underlying cause is warm humid air contacting a cooler slab, ASHRAE building science guidance points to controlling liquid water entry and allowing the assembly to dry as the key strategies. For practical steps on preventing and managing that issue, see our guide on how to stop condensation on patio roof. Sealing reduces the amount of moisture the slab absorbs from below, which helps. Improving drainage and ventilation around the patio edge addresses the other half of the problem.
Cost ranges for DIY dry pointing
| Material / Task | Approximate Cost (DIY) | Notes |
|---|---|---|
| Polymeric jointing sand (50 lb bag) | $25–$45 per bag | One bag covers roughly 30–50 sq ft depending on joint width and depth |
| Type S bagged mortar mix (60 lb) | $8–$15 per bag | Pre-mixed bags are fine for small areas; bulk sand + cement is cheaper for large jobs |
| Natural hydraulic lime mortar (25 kg) | $35–$70 | Specialty product; available from masonry suppliers and online |
| Diamond raking blade for angle grinder | $20–$60 | Buy quality here — cheap blades wear out fast on hard mortar |
| Manual plugging chisel set | $15–$30 | Essential for soft or historic brick and stone |
| HEPA-rated shop vacuum | $80–$200 | If you don't own one; worth it for health protection and general use |
| P100 respirator (half-face) | $25–$60 | Non-negotiable for mortar removal work |
| Penetrating patio sealer (1 litre) | $20–$50 | Coverage varies by porosity; sandstone and travertine need more |
For a typical 100–150 square foot residential patio, a full DIY repoint using polymeric sand usually costs $60–$120 in materials. Mortar repointing on the same area runs $80–$200 depending on joint depth and whether you rent a grinder. Professional repointing costs roughly $3–$8 per square foot in labour, so DIY saves meaningful money on anything more than a very small area.
Curing, finishing and what success looks like
For polymeric sand, success means joints that are firm to the touch within 24–48 hours, hold their shape when you press on them with a fingernail, and don't wash out in the next rain event. For mortar, you're looking for joints that are fully filled to the correct depth, have no visible cracks or shrinkage gaps, and are the same colour and texture as each other. Don't worry if there's a slight colour variation at first, mortar darkens and lightens as it cures and will even out over several weeks.
During the mortar cure period, mist the joints gently morning and evening for the first week. In hot or dry weather, drape damp burlap or hessian over the surface to slow evaporation. Don't let the joints freeze in the first two weeks, cover with fleece if a frost is forecast. Portland cement mortars benefit from moist curing for up to 14 days; lime mortars need several weeks of careful moisture management before they're fully robust.
Troubleshooting common problems
- Mortar cracking within days: Usually means it dried too fast (direct sun, hot weather) or the mix was too dry. Re-rake affected joints, re-dampen, and reapply with better moisture control during cure.
- Polymeric sand washing out: Either the joints were damp at application, the surface wasn't fully cleared before activation, or too much water was used. Re-do the affected joints on a dry day following the manufacturer's activation volumes carefully.
- White powder (efflorescence) appearing on joints: Soluble salts migrating to the surface during curing. It usually weathers off within one or two seasons. Accelerate removal with a mild acidic cleaner (diluted white vinegar) after full cure; never use acid on marble or limestone.
- Joints still cracking after repointing: Check whether the slabs themselves are moving — rocking units will always break new mortar. Those slabs need lifting and re-bedding.
- Weeds returning quickly: Polymeric sand with poor initial compaction or improper activation leaves gaps that weed seeds exploit. Re-apply with better compaction and a full sand top-up.
- Joint mortar staining the stone: Apply mortar carefully to damp but clean stone and remove smears promptly with a damp sponge. After full cure, a diluted phosphoric acid solution can remove stubborn cement haze — but always test on an inconspicuous spot first and never use muriatic acid on natural stone.
When to call a professional
DIY dry pointing is genuinely achievable for most homeowners on standard patios. But there are situations where I'd recommend getting a professional involved. If your patio is historic, listed, or built with antique handmade brick, the consequences of using the wrong mortar are serious enough to warrant expert input, a specialist mason will assess the original mortar composition and match it properly. If more than 20–25% of your slabs are rocking or sunken, you're looking at a partial or full relay rather than just repointing, and the ground preparation required for that is more involved than most DIYers are set up for. Any work involving gas or electrical services buried under the patio should be left to professionals. And if your drainage problems are traced to subsoil movement or a failing perimeter drain, a groundworks contractor is the right call.
Ongoing maintenance to make your repointing last
Once you've put the work in, a simple annual routine keeps the joints in good shape for many years. In autumn, sweep the patio and clear debris from joints before winter, accumulated leaf matter holds moisture and accelerates joint deterioration. In spring, check for any joints that have opened up over winter and top them up before water gets in. Treat moss and algae promptly with a patio cleaner or diluted bleach solution before roots can penetrate the joints. Re-apply sealer every 2–5 years depending on foot traffic and exposure. Catching small joint failures early, a quick patch with a bag of polymeric sand or a small batch of mortar, is far less work than a full repoint.
FAQ
What is dry pointing (repointing) a patio and when is it needed?
Dry pointing, commonly called repointing, is removing deteriorated joint material between pavers, bricks, flagstones or stone and replacing it with fresh jointing material (mortar, polymeric sand or lime/cement mortar). It’s needed when joints are cracked, missing, eroded, or allowing weeds and water migration; when mortar is loose or powdery; when puddles form because joints no longer shed water; or when joint failure threatens the paving units’ stability.
Which joint materials should I use for concrete, brick, stone, flagstone and interlocking pavers?
Choose materials by substrate and condition: - Interlocking concrete pavers: polymeric jointing sand (for narrow joints) or coarse jointing sand per ICPI; ensure properly drained and compacted base. - Concrete slab joints: cementitious repair mortar or concrete patch products for wide/open joints; sealers for cracks if structural repair not needed. - Brick and natural stone (historic or soft units): lime‑rich mortars (lime putty or hydraulic lime mixes) to match original strength and permeability. - Hard masonry (modern brick, structural concrete): Portland cement mortar (types N/S/M per ASTM C270 selection rules) or blended cementitious pointing mortars. - Flagstone with wide joints: coarse mortar mixes or polymeric sand depending on joint width and expected movement. Always choose the weakest acceptable mortar compatible with the unit to avoid damaging softer masonry.
How deep should I remove old mortar before repointing?
Remove deteriorated mortar to a depth of about 2–2½ times the joint width, and not less than roughly 1/2 inch for many joints, until sound material is exposed. For wide beds or historic work, follow guidance to fully expose sound mortar and consider layered application in thick joints.
What tools and safety gear do I need?
Tools: cold chisel and mason’s hammer, tuckpointing tools, raking tools, jointing trowels, pointing irons, grout bags, wire brushes, shop vacuum with HEPA filter, small angle grinder with dust shroud (only if necessary), water spray bottle, compactor/plate tamper for sands. Safety gear: eye protection, gloves, dust mask/respirator (N95 or P100 for silica exposure), hearing protection, long sleeves, knee pads. Follow OSHA silica controls: use wet methods or shrouded power tools with HEPA vacuums when removing mortar.
Step‑by‑step DIY method for repointing patios (general workflow)
1) Inspect and diagnose: identify material, joint width/depth, drainage and movement issues. 2) Fix drainage first: regrade, improve slope (≥1.5–2% recommended), add channel drains/French drains or adjust gutters. 3) Remove old joint material to required depth with hand tools (avoid aggressive grinders). 4) Clean joints thoroughly: brush, HEPA vacuum and low‑pressure rinse; let joints dry if installing polymeric sand. 5) Prepare and match mortar or sand per material choice; pre‑test small area for compatibility and color. 6) Install jointing material: compact polymeric or grout/lime mortar in layers, tool finish to required profile (flush, recessed or concave) and remove excess. 7) Cure appropriately: moist cure cementitious mortars (several days to 2 weeks depending on mix); follow product water‑activation and cure windows for polymeric sand. 8) Final cleaning and sealing if needed; monitor for settlement or re‑wetting.
How do I prepare joints differently for polymeric sand vs. mortar?
Polymeric sand: joints and paver surfaces must be completely dry, joints should be full of compacted sand, sweep excess clean, then apply staged water activation per manufacturer (avoid over‑watering). Mortar (cement or lime): joints should be damp but not saturated at time of application, place mortar in well‑compacted lifts if deep, tool to desired profile and begin moist curing soon after placement to ensure hydration or carbonation for lime mortars.
Next Articles
How to Stop Concrete Patio From Sweating: Fix Moisture
Stop concrete patio sweating with quick diagnostics, cleanup steps, sprinkler and drainage fixes, and proper sealing cho
How to Keep Patio Dry: Diagnose, Fix, and Clean Today
Step-by-step how to keep patio dry: find the water source, fix drainage and runoff, then clean mold and stains by materi
How to Keep Patio Under Deck Dry: Fix Moisture Fast
Diagnose why your under-deck patio stays wet and fix leaks, drainage, and cleanup for concrete, pavers, stone, and trave