
You can remove mortar from a patio using a combination of mechanical scraping and either a diluted muriatic acid wash (1 part acid to 10–20 parts water) or, for lighter haze on safe surfaces, white vinegar or plain water and a stiff brush. The right approach depends on two things: how long the mortar has been sitting there, and what your patio surface is made of. Fresh mortar wipes off in minutes with water. Cured mortar that has been sitting for 28 days or more needs either physical chipping, chemical dissolution, or both. This guide walks you through every scenario, from soft smears on brick to rock-hard lumps on concrete pavers, so you can clean your patio without damaging the surface underneath.
How to Clean Mortar Off Patio: DIY Steps for All Surfaces

Dylan Hale
4 Aug 2026
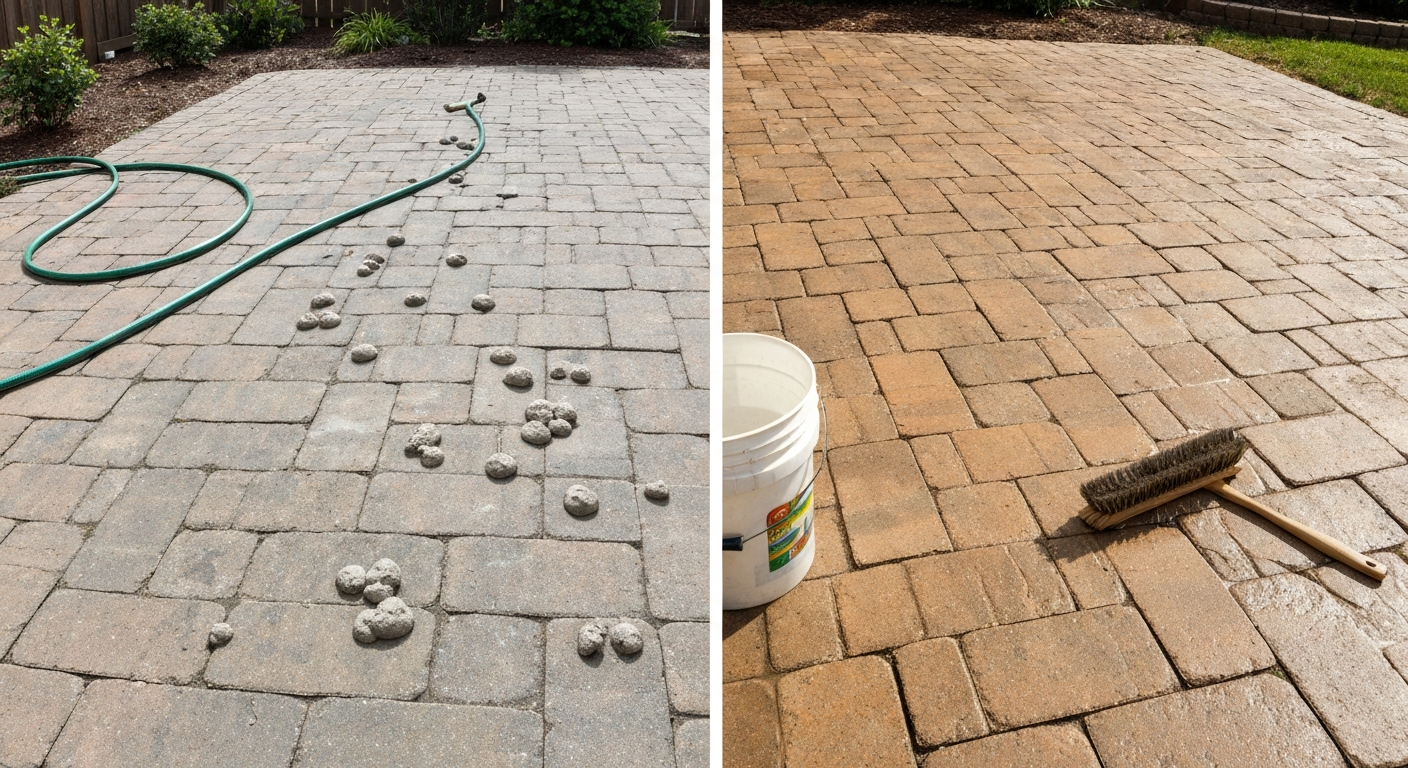
What this guide covers and who it's for
This guide is written for homeowners and renters tackling mortar cleanup after a patio repair, repointing job, or a new paver installation gone slightly messy. You do not need professional tools or experience. Whether you are dealing with a thin cement haze left behind after grouting, scattered mortar blobs from a DIY repair, or an old crust that has been baking in the sun for months, there is a workable DIY method here. The surfaces covered include concrete, clay and concrete brick, natural stone (flagstone, sandstone), travertine, and clay or concrete pavers. Where a technique is only safe on certain surfaces, that is called out explicitly. I will also tell you when the damage is significant enough that calling a professional mason is genuinely the smarter move.
Fresh mortar vs cured mortar: pick your method before you start
The single most important question is how old the mortar is. Getting this right saves you from using acid unnecessarily or wasting an afternoon with a brush on something that needed a chisel.
- Is the mortar still soft or tacky? (laid within the last few hours) — Use water and a stiff nylon brush immediately. Wet the surface, scrub gently, and rinse. Do not wait.
- Is it firm but not rock-hard, roughly 1–3 days old? — Try warm water with a scrub brush first. If it resists, a plastic scraper helps. Avoid acid at this stage; the mortar may still be porous enough to rinse clean.
- Does it feel like concrete and ring slightly when tapped? (set beyond 7 days, likely 28+ days) — This is cured mortar. You need mechanical removal, chemical treatment, or both depending on your surface.
- Is it a thin milky or dusty film rather than a raised lump? — That is mortar haze (also called cement smear). On brick and concrete it responds well to diluted muriatic acid. On travertine and flagstone, skip the acid and try gentle mechanical methods with water.
- Are you also seeing white powdery deposits separate from mortar blobs? — That is efflorescence, a salt migration issue. The removal process overlaps with mortar haze but dry-brushing first is recommended before any wet or chemical treatment.
Polymer-modified mortars (the kind that come in pre-blended bags with latex or polymer additives) are significantly harder to dissolve with acid than plain cement-lime mortars. Polymer‑modified mortars are cement‑based mortars blended with polymer latexes or redispersible polymer powders (typical polymer content often 5–20% of cement), which improve adhesion, flexibility and water resistance and generally make chemical removal harder than with plain cement‑lime mortars (Polymer‑modified cement mortars: review of composition, properties and implications, ScienceDirect (peer‑reviewed)) Polymer‑modified cement mortars: review of composition, properties and implications — ScienceDirect (peer‑reviewed). If you used a modern polymer-modified product, expect mechanical removal to do most of the heavy lifting, with acid acting as a finishing wash rather than the main event.
Safety first: what you need to know before opening any chemical
Muriatic acid (hydrochloric acid) is effective but genuinely hazardous. I do not say that to scare you off it, but you need to respect it. The fumes are corrosive to your lungs and eyes, and a splash on bare skin burns fast. Here is the non-negotiable safety setup before you start any chemical cleaning.
- Work outdoors or in a space with strong cross-ventilation. Never use muriatic acid in an enclosed area.
- Wear splash goggles or a full face shield — not just safety glasses. Acid mist travels sideways.
- Use acid-resistant gloves: neoprene or butyl rubber. Standard latex or nitrile work gloves are not sufficient for concentrated muriatic acid.
- Wear an old long-sleeved shirt and long trousers. Acid droplets will eat through fabric and reach skin.
- Mix acid by adding the acid slowly to water, never the other way around. Pouring water into acid causes a violent exothermic reaction.
- Use plastic (polypropylene) buckets and tools. Metal containers react with hydrochloric acid.
- Keep a box of baking soda (sodium bicarbonate) or soda ash open and within arm's reach. If acid splashes on skin, rinse immediately with large amounts of water, then apply baking soda paste.
- Have a garden hose running nearby before you open the acid container.
- If vinegar or bleach is your chosen chemical: vinegar is low-hazard but still causes eye irritation; bleach (sodium hypochlorite) produces chlorine fumes and should never be mixed with acidic cleaners or ammonia.
Regarding runoff: acid wash water flowing into storm drains, garden beds, or waterways is an environmental problem. Before you start, identify where your water drains. The goal is to neutralize rinse water with baking soda until pH strips read between 6 and 8 before it leaves your patio area. Keep a bag of baking soda handy for this step.
Tool and PPE checklist
Most of what you need costs under $50 in total if you already own a garden hose. The bigger equipment can usually be rented from a hardware or tool-hire store for a day at reasonable cost.
| Item | What it's for | Buy or rent? |
|---|---|---|
| Splash goggles or face shield | Eye protection for acid and pressure washing | Buy |
| Neoprene or butyl rubber gloves (long cuff) | Hand and forearm protection with acid | Buy |
| Old long-sleeved clothing / rubber apron | Body protection from splashes | Buy |
| Stiff-bristle nylon or natural-fiber scrub brush | Scrubbing haze and loose mortar | Buy |
| Plastic (polypropylene) bucket and measuring jug | Mixing diluted acid safely | Buy |
| Cold chisel (3/4" or 1") | Chipping cured mortar lumps off hard surfaces | Buy |
| Hammer (club or ball-pein) | Driving chisel | Buy |
| Plastic scraper / stiff putty knife | Removing soft or semi-cured mortar | Buy |
| pH test strips | Checking runoff neutralization | Buy |
| Baking soda (2–3 lbs) | Neutralizing acid wash runoff and spills | Buy |
| Muriatic acid (1 quart) | Dissolving cured cement haze on safe surfaces | Buy |
| White vinegar (1 gallon) | Mild cleaning on light haze, acid-sensitive areas not covered | Buy |
| Garden hose with strong spray setting | Pre-wetting and rinsing | Buy |
| Angle grinder with diamond cup wheel | Rapid cured-mortar removal on hard concrete surfaces | Rent |
| Pressure washer (electric, 1,600–2,000 PSI) | Final rinse, haze removal on concrete and hard brick | Rent |
| HEPA vacuum (with tool attachment) | Silica dust control when using angle grinder | Rent |
| Half-face respirator with P100 + OV cartridges | Silica dust and acid fume protection when grinding or mixing acid | Buy |
On pressure washers: if you rent one, request an electric model in the 1,600–2,000 PSI range for general patio use. Gas models often exceed 3,000 PSI and can be too aggressive for brick and natural stone. Fit it with a 25-degree (green) or 40-degree (white) fan nozzle and keep the wand at least 12 inches from the surface. Start further away and move closer only if needed. The 0-degree red pencil nozzle will etch and pit most patio surfaces and has no place in mortar cleaning.
Test a small patch before you commit to the whole patio
I have learned this from experience: always test in an inconspicuous corner before treating the main surface. This is especially important with chemical methods, but even a stiff brush or chisel can leave a mark on a polished or sealed surface that you did not expect. Pick a spot that will be hidden by furniture or a planter. Apply your chosen method at the intended strength, wait the full dwell time, rinse, and then leave it to dry completely (a minimum of 24 hours) before judging the result. Wet surfaces always look different from dry ones, and you want to see the final color and texture before going further. If the test area shows etching, discoloration, or a white haze forming after it dries, stop and reconsider the method or dilution.
For acid tests: mix a small amount at the recommended dilution (1 part acid to 10–20 parts water), apply to a 6-inch square area with a brush, watch for fizzing (normal on concrete and brick but should subside within 30–60 seconds), scrub lightly, rinse thoroughly, and let dry. If the surface color is unchanged and there is no pitting, proceed. If you see any surface darkening or new white deposits forming as it dries, you may be releasing salts from the masonry and should discontinue acid use.
Surface-specific warnings: know what your patio can handle
Not all patio surfaces respond the same way to mortar removal methods, and getting this wrong can cause damage that is harder to fix than the original mortar stain. Here is a clear breakdown.
| Surface | Safe for muriatic acid? | Safe for vinegar? | Safe for pressure washing? | Notes |
|---|---|---|---|---|
| Concrete (plain/broom-finished) | Yes, diluted 1:10–1:20 | Yes for light haze only | Yes, 1,500–2,500 PSI, 25° nozzle | Acid is most effective; rinse and neutralize thoroughly |
| Clay brick | Yes, diluted 1:10–1:20 max | Yes for light deposits | Yes, 1,200–1,800 PSI, 25–40° nozzle | Test first; soft or reclaimed bricks can absorb acid and produce new staining |
| Concrete pavers (colored/sealed) | Use with caution; test first | Preferred option | Yes, low pressure 40° nozzle | Acid may bleach colorants; sealer may need reapplication after cleaning |
| Travertine | NO — acid etches and dissolves travertine | NO — vinegar (acetic acid) also etches it | Yes, low pressure only (under 400 PSI) | Use only water, neutral pH stone cleaner, and gentle mechanical methods |
| Flagstone (limestone-based) | NO — limestone is calcium carbonate, acid dissolves it | NO | Low pressure only, test first | Same acid sensitivity as travertine; stick to mechanical and neutral cleaners |
| Flagstone (sandstone/quartzite) | Yes with caution; diluted, test first | Yes | Yes, moderate pressure, test first | Non-calcareous flagstone is acid-tolerant but softer stone may etch |
| Bluestone / slate | Yes with caution; test first | Yes | Yes, moderate pressure | Generally acid-tolerant but iron-rich stones may stain with acid; test |
| Sealed or coated surfaces (any material) | No until sealer is stripped | Generally safe | Low pressure only | Acid and high pressure strip sealers; reseal after any chemical treatment |
The key rule: if your stone contains calcium carbonate (travertine, marble, limestone, and many flagstones), any acid including vinegar, muriatic acid, and even long-term exposure to rainwater that has absorbed acid pollutants will visibly etch the surface. Use only water, neutral pH cleaners, and gentle mechanical methods on these materials. If you are unsure what your flagstone is made of, apply a drop of vinegar to a hidden area: if it fizzes, the stone is calcareous and acid-sensitive.
Mechanical removal: step-by-step
Mechanical removal is always the safest starting point because it works on every surface type and introduces no chemical risk. It is also the only realistic option for thick cured mortar lumps where chemicals would take impractically long to work through the mass. Use the least aggressive tool that gets the job done.
Step 1: dry brush (for fresh or lightly set haze)
Before adding any water or chemical, try a stiff-bristle nylon or natural-fiber brush on loose or very lightly set mortar. Dry brushing removes cement dust and partially set haze without driving moisture into the masonry. Work with short, firm strokes. This step is especially recommended for efflorescence (white salt deposits), where NPS guidance explicitly suggests dry brushing before any wet treatment. Collect and dispose of the dry debris rather than sweeping it into garden beds.
Step 2: scraping soft or semi-cured mortar
- Use a stiff plastic scraper or putty knife for mortar that is firm but not rock-hard (up to about 3–5 days old).
- Hold the scraper at a low angle (15–20 degrees) to shave the mortar rather than dig into the surface beneath.
- Work in short strokes toward you. Do not lever the tool against the edge of a paver or brick — you risk chipping the unit.
- Wet the area with plain water after scraping to soften any remaining film, then follow with a stiff brush.
- Rinse thoroughly and check the surface when dry.
Step 3: cold chisel for cured mortar lumps
- Equip yourself with a 3/4" or 1" cold chisel and a club hammer. Wear eye protection: chips fly.
- Position the chisel at a low angle, nearly parallel to the patio surface, at the base of the mortar lump.
- Strike with controlled, moderate blows. You are splitting the mortar away from the surface, not hammering downward into it.
- Work around large blobs in sections rather than trying to remove everything in one strike.
- On brick and pavers, be especially cautious near the corners and edges of units — these are the most likely to chip.
- Once the bulk is removed, switch to a stiff brush and water to clean up the remaining thin film.
Step 4: angle grinder with diamond cup wheel (hard concrete and hard pavers only)
This is the fastest method for cured mortar on hard concrete surfaces, but it carries real risks: silica dust generation, surface gouging if the angle is wrong, and vibration fatigue. I would only recommend it for large flat areas of plain concrete where you have either rented an appropriate machine or own one, and where you have dust controls in place.
- Fit a HEPA vacuum with a shroud attachment to the grinder, or use wet grinding. Silica dust from mortar and concrete is a serious respiratory hazard. Wear a half-face respirator with P100 + organic vapor cartridges.
- Use a diamond cup wheel (turbo or segmented) matched to the surface hardness.
- Keep the grinder moving at all times. Pausing concentrates heat and grinds a depression into the surface.
- Work at a low angle (10–15 degrees) and sweep in overlapping passes.
- This method is not suitable for brick, soft stone, pavers with color coatings, travertine, or flagstone.
Step 5: pressure washing
Pressure washing is best used as a final rinse and light-haze removal step, not as the primary mortar removal tool. On its own, it cannot remove cured mortar lumps; it works well for flushing away debris after scraping or chemical treatment, and for clearing thin mortar haze off hard concrete and brick surfaces.
- Connect a 25-degree (green) or 40-degree (white) fan nozzle. Never use the 0-degree (red) nozzle on any patio surface.
- Start with the nozzle at least 18 inches from the surface and move closer gradually only if the 12-inch distance is not shifting the deposit.
- Keep pressure at or below 1,800 PSI for brick and pavers. For travertine and soft flagstone, use a garden hose with a strong spray nozzle (roughly 40–100 PSI) instead.
- Sweep in consistent overlapping strokes rather than holding the jet in one spot.
- Allow the surface to dry fully (24 hours minimum) before evaluating results or applying any sealer.
Chemical removal: choosing the right cleaner for your situation
Three chemicals come up in almost every mortar-cleaning discussion: muriatic acid, household bleach (sodium hypochlorite), and white vinegar. They do very different things and are appropriate for very different situations. Here is an honest comparison.
| Chemical | What it removes | Best surfaces | Avoid on | Dilution | Dwell time | Key risk |
|---|---|---|---|---|---|---|
| Muriatic acid (hydrochloric acid) | Cured cement haze, mortar smear, heavy lime deposits, efflorescence (with caution) | Concrete, clay brick, acid-tolerant stone (bluestone, sandstone, quartzite) | Travertine, marble, limestone, flagstone (calcareous), colored/sealed pavers (test first) | 1 part acid to 10–20 parts water (add acid to water) | 2–5 minutes maximum; do not allow to dry on surface | Corrosive fumes, skin and eye burns, surface etching if too strong or left too long, salt mobilization on masonry |
| Household bleach / sodium hypochlorite | Biological growth: algae, moss, mildew, mold | Most patio surfaces for biological cleaning; non-porous surfaces most effective | Do not mix with acid cleaners or ammonia; avoid on metal fixtures | ~1 cup bleach per 1 gallon water (roughly 1:16 dilution) | 10–20 minutes for biological growth | Chlorine fumes; does NOT remove mortar or cement haze; can fade some colored pavers with repeated use |
| White vinegar (5% acetic acid) | Light alkaline deposits, mild organic grime, very light cement haze on tolerant surfaces | Concrete, brick, acid-tolerant stone for very light cleaning | Travertine, marble, limestone, calcareous flagstone — vinegar etches these | Undiluted or 50/50 with water for light work | 5–15 minutes | Weak against cured mortar; repeated use slowly alters stone surfaces; ineffective against biological growth on its own |
The bottom line on chemical selection: muriatic acid is the effective choice for cured cement haze and mortar smear on concrete and brick. Bleach handles the biological side of things (algae, moss, green slime) but does nothing to mortar. Vinegar is a low-risk option for very light, relatively fresh haze on concrete or brick, or for readers who want to avoid stronger chemicals and are willing to put in extra scrubbing time. It is genuinely worth trying vinegar first on light haze, if it works, you avoided acid entirely. If it does not work after two attempts, move to diluted muriatic acid. For more information on using bleach for biological growth on brick surfaces, the guide on cleaning brick patios with bleach covers that process in full. Similarly, if your patio brick is heavily stained with cured mortar and you have decided acid is necessary, the detailed guide on cleaning brick patios with muriatic acid walks through that specific process step by step. For step-by-step instructions specific to brick, see the guide on how to clean brick patio with muriatic acid.
How to apply diluted muriatic acid for mortar haze
- Pre-wet the entire patio surface thoroughly with clean water. Wet masonry absorbs less acid and reduces the risk of deep penetration and salt mobilization.
- Mix your solution in a plastic bucket: for light haze, add 1 part muriatic acid slowly to 15–20 parts water. For heavy deposits on concrete, you can go to 1:10 but no stronger for DIY use.
- Apply the diluted acid to a manageable section (about 4–6 square feet at a time) using a stiff plastic or natural-bristle brush. Do not use metal brushes.
- You should see light fizzing as the acid reacts with the cementitious deposits. This is normal and expected. If there is no fizzing at all, the mortar is likely polymer-modified and acid may not be effective enough on its own.
- Scrub the area firmly with the brush while the solution is still active.
- After no more than 5 minutes, rinse the section thoroughly and completely with a garden hose or pressure washer on a wide fan setting.
- Move on to the next section and repeat.
- Once the entire area is treated and rinsed, prepare a neutralizing solution: approximately 1 cup of baking soda per gallon of water. Flood the cleaned area with this solution, scrub lightly, then rinse again.
- Test the rinse water runoff with pH strips. Aim for a reading between 6 and 8 before considering the area neutralized.
- Allow the surface to dry fully for at least 24 hours before evaluating the result or applying any sealer.
Using vinegar for light mortar haze
- Apply undiluted white vinegar (standard 5% acetic acid) directly to the affected area with a brush or spray bottle.
- Allow it to sit for 10–15 minutes. Do not let it dry.
- Scrub firmly with a stiff nylon brush.
- Rinse thoroughly with clean water.
- Repeat once if needed. If the haze does not respond after two applications, vinegar is not strong enough for this deposit and you should switch to muriatic acid.
Using bleach to remove algae and biological growth alongside mortar cleaning
Bleach does not remove mortar, but a patio with mortar stains often has biological growth too (green algae, black mildew, moss). Handle biological growth separately, before or after mortar removal. If treating before mortar removal: mix approximately 1 cup of household bleach into 1 gallon of water, apply to the affected areas, allow 15–20 minutes dwell time, scrub, and rinse thoroughly. The CDC's Mold Clean‑Up Guidelines (Mold Clean‑Up Guidelines (including bleach guidance), Centers for Disease Control and Prevention (CDC)) recommend about 1 cup of household bleach per gallon of water for treating biological growth on non‑porous surfaces and caution against routine use of biocides and mixing bleach with other cleaners blank" rel="noopener noreferrer">Mold Clean‑Up Guidelines (including bleach guidance) — Centers for Disease Control and Prevention (CDC). Never apply bleach and muriatic acid to the same area in the same session. Always rinse and allow the surface to dry between these treatments. For persistent algae specifically on brick, the guide on getting rid of algae on brick patios covers long-term prevention and treatment approaches in detail. For step-by-step instructions and long-term prevention, see how to get rid of algae on brick patio.
Post-cleaning steps: neutralizing, drying, and sealing
After any acid treatment, neutralization is not optional. Residual acid in masonry pores continues to work slowly, drawing out salts and potentially causing new white staining or surface degradation over time. The baking soda flood-and-rinse described in the acid application steps above takes care of this. Check with pH strips and re-treat if the reading stays below 6.
Once neutralized and dry (give it at least 24 hours, longer in humid or cool weather), evaluate the surface. If you see new white powder appearing as the surface dries, that is efflorescence: salt that the acid has drawn to the surface. Let it dry fully and dry-brush it off. It often improves with one or two wet-dry cycles. If heavy efflorescence persists, this is a sign of moisture movement within the masonry that goes beyond surface cleaning.
Sealing after cleaning is a personal and practical choice. A penetrating masonry sealer will reduce future mortar adhesion to the surface, making the next cleanup easier. On concrete and brick, a silane-siloxane penetrating sealer is a good general choice. On travertine and polished stone, use a sealer specifically labeled for that stone type. Wait a full 72 hours after cleaning before applying sealer to ensure the surface is thoroughly dry.
Dealing with whitewash and other coatings on brick
If your brick patio has been whitewashed or painted and you are trying to restore the natural brick appearance, the process overlaps somewhat with mortar removal but is its own challenge. Whitewash is a diluted lime or cement-based coating that can respond to the same diluted acid approach used for mortar haze, though heavily applied whitewash may require a dedicated paint stripper or significant mechanical work. For a full breakdown of that specific process, the guide on how to whitewash brick patios (and how to reverse the process) covers the chemistry and steps in detail.
Prevention: how to avoid mortar cleanup next time
- Wet the patio surface thoroughly before any mortar work begins. This prevents cement paste from bonding directly to the dry masonry surface and makes cleanup far easier.
- Keep a bucket of clean water and a sponge or soft brush on hand during the job. Wipe off mortar smears within minutes of occurrence — before they start to set.
- Cover surrounding patio areas with plastic sheeting when repointing or laying new sections.
- If using a grout float or trowel over pavers, apply a light coat of release agent (or even damp burlap) to the paver faces first so that mortar residue does not bond as aggressively.
- For large jobs, consider applying a temporary masonry sealer to the existing patio surface before work starts. This sacrificial coat takes the mortar contamination and is then cleaned off, leaving the original surface intact beneath.
- After any mortar work, do your initial cleanup (soft brush, water, sponge) within 24 hours while the mortar is still in early cure and the surface film is most easily removed.
When to call a professional
Most mortar cleanup on residential patios is genuinely manageable as a DIY project. But there are situations where hiring a professional mason or stone restoration specialist is the smarter call: if your patio is historic or heritage masonry where incorrect cleaning could permanently alter the appearance or structural integrity; if you have significant areas of travertine or polished natural stone where one wrong acid splash causes irreversible etching; if after two rounds of mechanical and chemical cleaning a thick residue remains (this may indicate polymer-modified mortar that requires specialist products); or if you discover that the mortar cleanup has revealed cracks, hollow-sounding areas, or structural movement in the paving. Mortar haze is cosmetic. Structural issues are not. A mason can also assess whether repointing or resetting is needed, which would make further cleaning pointless until the underlying work is completed.
FAQ
How do I tell fresh (uncured) mortar smears from cured mortar haze or lumps on my patio?
Fresh mortar is soft, can smear or wipe off within minutes–hours, and feel slightly tacky. Cured mortar hardens within hours and continues gaining strength for days to weeks; cured haze appears as a thin, powdery or film‑like light coating and lumps are hard, crusty deposits. Do a small fingertip wipe and a soft‑brush test on an inconspicuous spot: if it wipes off with water and a brush it’s fresh or only partially set; if it resists brushing or flakes as hard particles it’s cured.
What are the safest first steps before using chemicals or power tools?
Start with the least aggressive methods: dry sweep or brush with a stiff nylon or natural‑fiber brush, then try low‑pressure rinsing (garden hose or pressure washer on a low setting, ≥12 in standoff). Always test any method on an inconspicuous area first, wear PPE, protect nearby plants and drains, mask runoff, and allow surfaces to dry so you can assess remaining residue.
Which mechanical approaches work best for different mortar conditions and materials?
Fresh smear: stiff brush + water or a plastic scraper. Light cured haze on durable surfaces (concrete, hard pavers, dense brick): nylon brush, plastic or wooden scrapers, medium‑stiff bristle hand brushes, or a pressure washer starting at low psi (≈100) and up to ~300–400 psi if needed. Hard cured lumps: cold chisel/tuckpointing tool for joints; angle grinder with diamond cup or tuckpoint wheel for robust materials (concrete, very hard stone) using wet methods or HEPA vacuum. Avoid grinders on soft brick, sandstone, travertine or flagstone to prevent surface loss.
What pressure‑washer settings and nozzle tips should I use on patios?
Begin at the gentlest setting—garden hose then a pressure washer at low pressure (~100 psi). Use larger fan‑angle nozzles (25°–40°) and keep the wand at least 12–24 inches from the surface. Move in sweeping passes, not in one spot. Do not exceed ~300–400 psi on masonry without testing; softer materials need lower pressure. Maintain consistent angle and distance to avoid etching or removing the face of stone or brick.
When is muriatic (hydrochloric) acid appropriate, and how do I use it safely?
Muriatic acid is effective for heavy cementitious residue and cured mortar haze on acid‑resistant materials (concrete, dense brick, some hard natural stone that is non‑calcareous). Use only after testing: dilute acid to ~1:10–1:20 (acid:water) by adding acid to water slowly, use plastic/acid‑resistant containers, apply briefly (short dwell times), agitate with a brush, rinse thoroughly, then neutralize. Essential PPE: splash goggles/face shield, acid‑resistant gloves (neoprene/butyl), long sleeves, and respiratory protection if fumes are present. Keep plants and drains protected and neutralize rinse water (see neutralization FAQ). Avoid acid on travertine, limestone, marble, and many sandstones because acid will etch and discolor them.
What household cleaners are useful and what are their limits (vinegar, bleach)?
Household vinegar (≈5% acetic acid) can help light alkaline smears but is much weaker than mineral acids and often ineffective on cured cementitious haze; repeated use can also slowly damage some stones and should be tested first. Sodium hypochlorite (household bleach) kills biological growth (moss, algae, mildew) but does not remove hardened mortar. Never mix bleach with acids or ammonia. Use bleach for algae/moss per CDC dilution guidance (about 1 cup bleach per gallon water) on non‑porous areas, rinse and protect nearby plants.
Next Articles
How to Clean Brick Patio with Bleach: Safe Step-by-Step Guide
Learn safe, step-by-step methods to clean brick patios with household bleach, alternatives, PPE, and runoff tips
How to Clean Brick Patio with Vinegar: Step-by-Step Guide
Clean a brick patio with vinegar: step-by-step recipes, safety, stain fixes, pressure-washer option, and sealing tips.
How to Clean Brick Patio with Muriatic Acid: Step-by-Step
Safe step-by-step guide to clean brick patios with muriatic acid: dilutions, PPE, neutralizing, plant/drain protection