
Lawn feed stains on a patio are almost always iron-based rust stains, and they respond best to oxalic acid or oxygen bleach, not regular detergent or pressure washing alone. The brown-orange marks you see after fertilizer granules dissolve in the rain are iron oxide deposits bonding to your patio surface. The good news is that most fresh stains lift in one or two treatments. Older, deeper stains take more patience, and calcareous stones like travertine and limestone need special handling to avoid etching. This guide walks you through the whole process from the first five minutes after a spill to resealing and prevention.
How to Remove Lawn Feed Stains From Patio: Step-by-Step Guide

Dylan Hale
10 Aug 2026
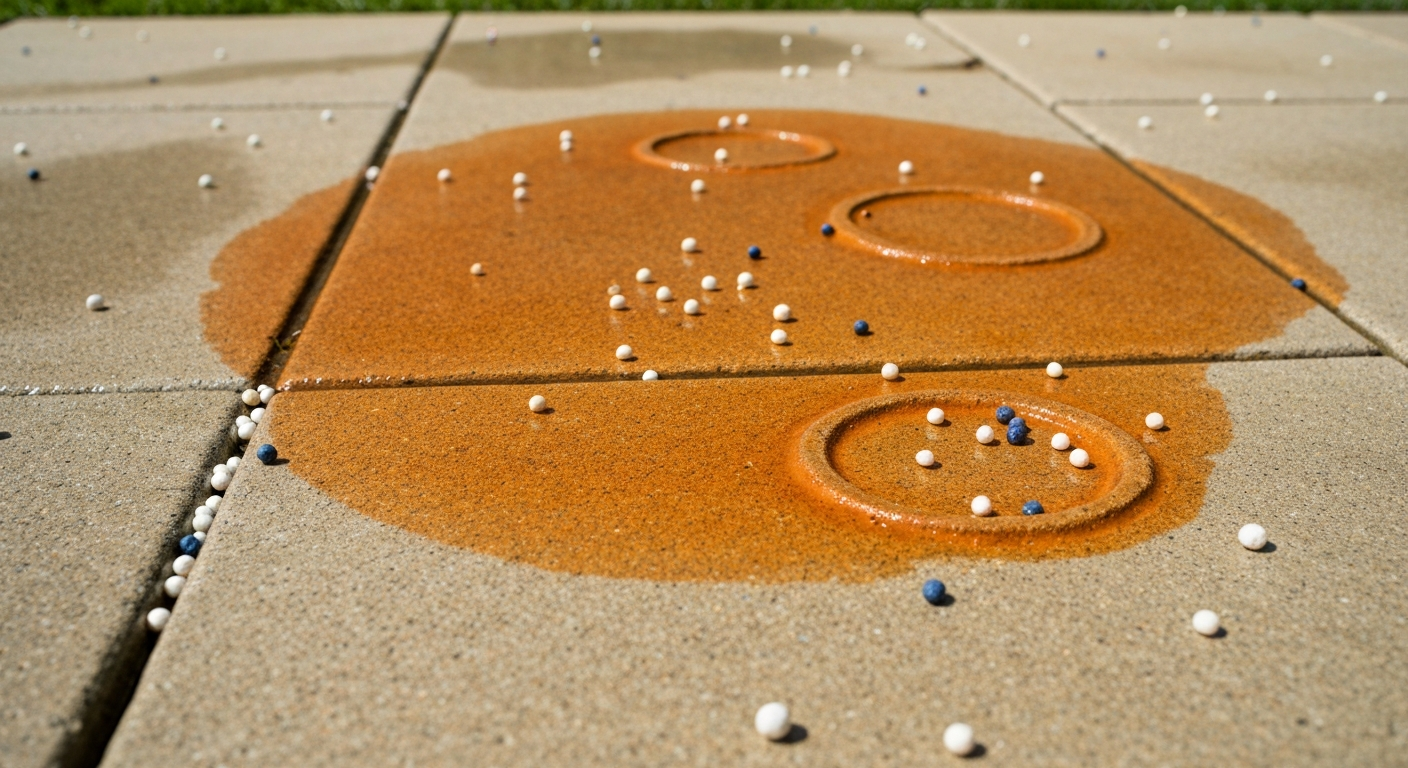
What to do in the first 15 minutes after a lawn feed spill
Speed matters here. The longer iron-containing granules or liquid fertilizer sit on a wet surface, the deeper the iron oxide bonds into the pore structure of the stone or concrete. I've seen a spill that was rinsed within ten minutes leave almost no mark, while the same product left overnight needed three oxalic acid treatments to clear. The moment you notice the spill, do this:
- Stop the spread: sweep or brush loose granules off the patio surface with a stiff broom before hosing, so you're not grinding them into the surface or spreading them wider.
- Flush immediately: use a garden hose on full flow (not a pressure washer at this stage) to rinse the area for at least two minutes. You want to dilute and carry away as much of the dissolved iron as possible before it oxidizes.
- Blot liquids: if the product was a liquid feed or iron supplement spray, blot up as much as you can with old rags or paper towels first, then rinse.
- Don't scrub dry granules in: if any granules have already started dissolving into the surface, resist the urge to scrub them — you'll push iron deeper. Rinse first, then reassess.
- Check the surface: once rinsed, note whether a stain has already started forming. If the surface looks clean after rinsing, monitor it over the next 30 minutes as the iron oxidizes — a faint orange tinge may still develop.
If you catch it in time and the surface looks clean after a good rinse, you may be done. If any orange or brown discolouration remains, move on to the treatment steps below.
What to have on hand before you start
Before mixing anything or touching the stain, gather everything you need. Running back inside mid-treatment to find a bucket usually means leaving acid or bleach sitting on the surface too long. Here is a practical checklist:
- PPE: chemical-resistant nitrile gloves (not latex), safety goggles or a face shield, and old clothing you don't mind ruining. If using oxalic acid powder, add a dust mask (N95 or better).
- Stiff-bristle scrubbing brush (nylon bristles for most surfaces; avoid wire brushes on anything other than concrete or rough brick)
- Two plastic buckets (one for mixing, one for rinse water)
- Garden hose with adjustable nozzle, or access to a pressure washer
- White vinegar (5% acetic acid, standard household grade)
- Dish soap (plain, unscented)
- Oxygen bleach powder (sodium percarbonate, e.g. OxiClean or generic brand)
- Oxalic acid powder or a commercial oxalic-acid-based rust remover (for iron/rust stains on non-calcareous surfaces)
- Household bleach (sodium hypochlorite, 5-8%) for stubborn organic stains on concrete or brick only
- Baking soda or garden lime (for neutralizing acid treatments before rinsing to drain)
- Plastic sheeting or cling film (for poultice applications on natural stone)
- Absorbent powder for poultice: white kaolin clay, diatomaceous earth, or unscented talc
- Spray bottle (for applying diluted solutions to spot-treat)
- Old rags or microfibre cloths
- Muriatic acid (optional, last resort for concrete/brick only — requires full PPE and extreme caution)
How to identify what kind of stain you're dealing with
Not all lawn product stains look the same, and identifying the type tells you which cleaner to reach for first. Grabbing the wrong product wastes time and can damage your surface. Here are the main stain types and their visual clues:
Iron and iron sulfate stains
This is the most common result of lawn feed spills. Iron sulfate (ferrous sulfate) is present in many weed-and-feed products and iron supplement lawn tonics. When it dissolves in water and contacts porous masonry, it oxidizes to iron oxide, which is essentially rust. You'll see a distinct orange-to-brown discolouration, often with circular rings where granules sat, drip marks, or irregular blotches following the direction rainwater flowed. The stain looks very similar to rust from a metal planter or garden furniture leg sitting on the patio. Manufacturer labels for common weed-and-feed products explicitly warn that iron in their formulations will stain concrete and stone, which is worth knowing when you're trying to figure out the cause.
Pigment and synthetic dye stains
Some slow-release or coated fertilizer granules contain coloured coatings or tracking dyes. These leave blue, green, or pink marks rather than orange-brown ones. They're less common but can be stubborn because the dye molecule itself (rather than an inorganic mineral) is bonding to the surface. Oxygen bleach is usually your first move here, with a longer dwell time.
Tannin and organic stains
If the lawn feed landed on an area where grass clippings, leaves, or berries were already present, the resulting stain is a mix of iron and organic tannins. These tend to be brown-to-pinkish with soft, diffuse edges rather than sharp rings. They're more common when lawn feed is applied to damp lawn areas bordering the patio and rainwater carries the blended residue onto the surface. Oxygen bleach handles the organic fraction well. You may still need an oxalic acid treatment for the iron component underneath.
Fertilizer salt and mineral deposits
High-nitrogen or high-potassium fertilizers that don't contain iron can leave whitish, chalky mineral crusts rather than orange stains. This looks similar to efflorescence (salt migration through masonry). It's typically less alarming visually, and a vinegar solution or diluted acid rinse usually handles it on acid-safe surfaces. On travertine or limestone, plain water scrubbing and rinsing often does the job without any chemical needed.
Weed-and-feed combination stains
Weed-and-feed products combine fertilizer (often with iron sulfate) and herbicide. The staining chemistry is predominantly the iron component, so the approach is the same as an iron stain. The herbicide residue itself doesn't typically stain, but some formulations contain additional dyes. If you're dealing specifically with a weed-and-feed product, the treatment approach is essentially the same as for lawn feed, and the detailed guide on removing weed-and-feed stains from patios covers any product-specific nuances worth knowing.
Spot tests and test-patch protocol
I cannot stress this enough: always run a test patch before treating the whole stained area, especially on natural stone. Test‑patch protocol: always test the chosen chemical and method in an inconspicuous area or small patch, follow manufacturer dilution and dwell times, observe for colour change or etching, and wait the full rinse/dry cycle before scaling up Test‑patch protocol: always test the chosen chemical and method in an inconspicuous area or small patch, follow manufacturer dilution and dwell times, observe for colour change or etching, and wait the full rinse/dry cycle before scaling up.. Some cleaners that work brilliantly on concrete will etch travertine, bleach the colour from brick, or strip a sealer you didn't even know was there. The test patch takes ten minutes and can save you an expensive restoration job.
Confirming the stain chemistry: two quick tests
- Vinegar drop test for iron: drip a few drops of undiluted white vinegar directly onto the stain and leave for 60 seconds. If the stain lightens or fizzes very slightly (the acid is reacting with iron oxide), it's almost certainly an iron-based stain. This also tells you the surface isn't calcareous — if the stone itself fizzes aggressively, you're dealing with limestone, travertine, or marble and must avoid acids entirely.
- Hydrogen peroxide drop test for organic stains: apply 3% hydrogen peroxide (standard pharmacy grade) to a corner of the stain. If the mark lightens or bubbles gently within a minute or two, there's an organic component (tannin, pigment, plant matter) to address.
The test-patch protocol
- Choose an inconspicuous area of the same material, ideally a corner, under furniture, or behind a pot.
- Mix the cleaner you plan to use at the exact dilution you intend to use on the stain.
- Apply the cleaner, let it dwell for the full recommended time, then rinse thoroughly.
- Allow the test area to dry completely — at least two to four hours for natural stone, one hour for concrete — before inspecting.
- Look for: colour change (lightening or darkening of the base stone, not just the stain), surface texture change (matt where it was polished, or rough where it was smooth), white haze, or any sign of etching.
- Only proceed to the main stain area if the test patch shows no surface damage.
Decision guide: which method to try first
The golden rule is gentle first, stronger only if needed. Aggressive chemicals used on the wrong material cause damage that cannot be undone. Use this table to choose your starting point based on stain type and patio material.
| Stain type | Concrete slabs/pavers | Brick | Flagstone/slate | Travertine/limestone | Granite/bluestone/hard stone |
|---|---|---|---|---|---|
| Iron/rust (orange-brown) | Oxalic acid solution → muriatic acid (last resort) | Oxalic acid solution → diluted muriatic acid (test joints) | Oxalic acid solution (test patch first) | Poultice with oxalic acid ONLY — no direct acid application | Oxalic acid solution → commercial ferrous remover |
| Pigment/dye (coloured) | Oxygen bleach → household bleach | Oxygen bleach → diluted bleach | Oxygen bleach (test patch) | Oxygen bleach poultice only — no bleach | Oxygen bleach → diluted bleach |
| Tannin/organic (brown, soft-edged) | Oxygen bleach → household bleach | Oxygen bleach → diluted bleach | Oxygen bleach | Oxygen bleach poultice | Oxygen bleach → diluted bleach |
| Mineral/salt crust (white/chalky) | Vinegar solution → diluted muriatic acid | Vinegar → diluted acid (test joints) | Vinegar (test patch) | Water + brush only — NO acid | Vinegar (test patch) |
| Mixed (iron + organic) | Oxygen bleach first, then oxalic acid | Oxygen bleach, then oxalic acid | Oxygen bleach, then oxalic acid (test patch) | Oxygen bleach poultice only | Oxygen bleach, then oxalic acid |
Start with dish soap and water for any fresh stain regardless of material. If that clears it, you're done. Move down the progression only when the milder option fails after the full dwell time and a proper rinse.
Cleaner choices: dilutions, application, dwell times and warnings
Here are the cleaners you'll realistically use, with exact dilutions and honest notes on where each one works and where to avoid it.
Dish soap (any stain type, all surfaces, first step)
Mix 1 tablespoon of plain dish soap into 1 litre of warm water. Apply, scrub firmly for two to three minutes, and rinse. Dwell time: none needed. This works for fresh, light stains on any surface and is the safest starting point for calcareous stone. Don't expect it to shift a day-old iron stain, but always start here.
White vinegar (mineral/salt deposits, light organic, non-calcareous surfaces only)
Use undiluted 5% white vinegar or diluted 50/50 with water for lighter jobs. Apply with a spray bottle or brush, allow 5 to 10 minutes dwell, then scrub and rinse. Safe for concrete, pavers, brick, flagstone, granite and bluestone. Do not use on travertine, limestone, marble or any stone that fizzes in the vinegar drop test. Repeat up to three times if needed.
Oxygen bleach / sodium percarbonate (organic, tannin, pigment stains, most surfaces)
Mix 120 g (roughly half a cup) of sodium percarbonate powder per 4 litres of warm water. Stir until dissolved. Apply generously to the stain, keep the surface visibly wet, and allow 20 to 30 minutes dwell time. Scrub and rinse. For natural stone, apply as a poultice (see the stone-specific section below). Oxygen bleach is safe for most patio surfaces including brick and most natural stone, and it's a good choice if you have pets or want to avoid harsher chemicals. Wear gloves and eye protection, sodium percarbonate is an oxidising irritant. Do not mix with bleach.
Household bleach / sodium hypochlorite (organic stains on concrete and brick only)
Dilute to a 10% solution: 1 part bleach (5-8% sodium hypochlorite) to 1 part water for heavy organic stains, or 1 part bleach to 4 parts water for lighter marks. Apply with a brush, dwell 10 to 15 minutes, then scrub and rinse thoroughly. Bleach is effective on organic/tannin stains on concrete and brick, but it is not a rust remover and will not shift iron stains. Never use bleach on natural stone. Never mix bleach with acids (including vinegar or oxalic acid), as this produces chlorine gas. Work in fresh air, wear goggles and nitrile gloves, and keep children and pets away until fully rinsed.
Oxalic acid (iron/rust stains on non-calcareous surfaces)
This is your main weapon for iron stains. Dissolve 450 g (approximately 1 lb) of oxalic acid powder in 4 litres of warm water. Apply to the stain with a brush or sponge, work it in gently, and allow 10 to 20 minutes dwell. Scrub and rinse well. For deep or old stains, repeat applications are often necessary, allow the surface to dry between treatments and do not exceed three applications without reassessing. For natural stone, apply only as part of a poultice rather than direct liquid application, and keep dwell to 20 to 30 minutes maximum. Oxalic acid is hazardous: wear nitrile gloves, eye protection and a dust mask when handling the dry powder. OSHA lists the occupational exposure limit at approximately 1 mg/m3, so avoid creating dust and work in fresh air. Rinse all residue thoroughly and neutralize with a baking soda solution (60 g baking soda per litre of water) before allowing runoff to reach drains.
Muriatic acid / hydrochloric acid (last resort for concrete and brick only)
Dilute muriatic acid 1 part acid to 10 parts water (always add acid to water, never water to acid). Apply to concrete only in a well-ventilated space, dwell for no more than 5 minutes, then neutralize immediately with a baking soda solution and rinse aggressively. Wear full PPE: acid-resistant gloves, face shield, old clothing. Do not use muriatic acid on brick (it attacks mortar joints), flagstone, natural stone of any kind, or pavers. This is genuinely a last-resort option for stubborn iron staining embedded in concrete. I'd rather try three rounds of oxalic acid first.
A note on neutralizers
After any acid treatment (oxalic acid, vinegar, muriatic acid), neutralize the surface with a baking soda solution: 60 g per litre of water, applied, allowed to sit for two to three minutes, then rinsed. This raises the pH back toward neutral and protects both the surface and your garden or drain system from receiving concentrated acid runoff.
Step-by-step cleaning by patio material
Concrete slabs
Concrete is the most forgiving surface to clean and tolerates a wide range of treatments. Still, run a test patch in a hidden area before using acid products on decorative or coloured concrete.
- Sweep and rinse off all loose granules and debris with a hose.
- Scrub with dish soap solution and a stiff nylon brush. Rinse. If the stain is cleared, you're done.
- For iron/rust stains: apply oxalic acid solution (450 g per 4 litres of water) to the wet surface. Dwell 15 to 20 minutes. Scrub firmly, rinse thoroughly, then neutralize with baking soda solution and rinse again.
- For organic or dye stains: apply oxygen bleach solution (120 g per 4 litres), dwell 20 to 30 minutes, scrub, and rinse. If needed, follow with diluted household bleach (1:4 with water), dwell 10 minutes, scrub and rinse.
- For stubborn deep iron stains as a last resort only: apply diluted muriatic acid (1:10 with water), dwell maximum 5 minutes, neutralize immediately with baking soda solution, and rinse aggressively.
- Repeat the oxalic acid step up to three times for old or deep stains, allowing full drying between attempts.
- Reseal the concrete once fully dry (at least 48 to 72 hours after the final treatment).
Brick and mortar joints
Brick is more porous than concrete and the mortar joints are sensitive to strong acids. Muriatic acid will attack and dissolve mortar, so keep it well away from brick unless you're a mason who knows exactly what they're doing. Test patch is essential here.
- Sweep, then rinse thoroughly with a hose.
- Scrub with dish soap solution. Rinse. Check result.
- For iron stains: apply oxalic acid solution, dwell 10 to 15 minutes (shorter than concrete to protect mortar), scrub with a medium-stiff brush, rinse well, and neutralize with baking soda solution.
- For organic/tannin stains: use oxygen bleach solution at 120 g per 4 litres, dwell 20 minutes, scrub, and rinse. Diluted household bleach (1:4) is acceptable on red brick for stubborn organic stains, but always test on a hidden joint first.
- Repeat the oxalic acid treatment up to twice for persistent iron staining, with full drying between rounds.
- Inspect mortar joints after each treatment. If the mortar appears soft, crumbly, or is discolouring, stop and let an experienced mason assess before continuing.
- Consider applying a brick sealant after the surface has dried for 72 hours or more.
Concrete pavers
Concrete pavers are similar to concrete slabs but the joint sand between them adds a consideration: aggressive chemicals and high-pressure washing can displace jointing sand. Plan to re-sand joints after any intensive cleaning.
- Sweep and hose off all loose material.
- Dish soap scrub as a first pass. Rinse and evaluate.
- For iron stains: oxalic acid solution at 450 g per 4 litres. Dwell 15 minutes. Scrub and rinse. Avoid directing rinse water into joint gaps under pressure. Neutralize, then rinse gently.
- For organic stains: oxygen bleach at 120 g per 4 litres, 20-minute dwell, scrub, rinse.
- After treatment, check whether jointing sand has been displaced and top up as needed.
- Reseal pavers once dry if they were previously sealed, or consider sealing for the first time to reduce future staining.
Flagstone and slate
Flagstone and slate vary considerably in porosity and mineral composition. Most are non-calcareous (they don't fizz with the vinegar drop test), but always confirm before using acid products. The layered structure of slate means it can delaminate if moisture is trapped, so avoid leaving any poultice or wet application in place for too long.
- Run the vinegar drop test on an inconspicuous area before using any acid.
- Sweep and hose down. Dish soap scrub as first attempt.
- For iron stains (confirmed non-calcareous): dilute oxalic acid solution (same recipe as concrete), apply, dwell 10 minutes maximum for slate (it's relatively thin and layered), scrub gently with a medium brush, rinse thoroughly, and neutralize.
- For organic stains: oxygen bleach solution, 20-minute dwell, scrub, rinse. This is the preferred choice for flagstone where you're uncertain of the mineral composition.
- Limit repeat acid treatments to two rounds. If the stain persists, move to a professional rather than applying stronger acid.
- Allow full drying (48 hours) before considering a sealant appropriate for natural stone.
Travertine, limestone and other calcareous stone
This is where you have to be most careful. Travertine, limestone, and marble are calcite-bearing (calcareous) stones. Any acid, including vinegar and oxalic acid in direct liquid form, will etch the surface permanently. Etching looks like a dull, frosted patch where the polish or surface texture has been dissolved. I've seen people ruin expensive travertine patios with products that are completely fine on concrete. The safe approach for iron stains on calcareous stone is a poultice.
- Do the vinegar drop test first to confirm the stone is calcareous (it will fizz noticeably). If it fizzes, follow this protocol exactly.
- Sweep and rinse gently. Do not use a pressure washer on unfilled travertine — the water will widen voids.
- Pre-wet the stained area with clean water (poultices work better on a pre-wet surface).
- For iron stains: mix a poultice paste from absorbent powder (kaolin clay, diatomaceous earth, or unscented talc) and your oxalic acid solution. Combine until you get the consistency of smooth peanut butter. Apply 6 to 12 mm thick over the stain, extend 25 mm beyond the stain edges.
- Cover immediately with plastic sheeting and tape the edges down to slow evaporation. Leave for 24 to 48 hours.
- Remove the plastic, allow the poultice to dry to a powder (do not scrape it off while still wet), then sweep away gently.
- Rinse the area with clean water and neutralize with baking soda solution, then rinse again.
- For organic stains on calcareous stone: same poultice process but use oxygen bleach solution (120 g per 4 litres) as the liquid component instead of oxalic acid.
- Allow at least 48 hours drying time before assessing. Repeat once more if needed. Do not exceed two poultice applications without professional advice.
- Never use household bleach, muriatic acid, or straight vinegar on travertine or limestone. Ever.
Granite, bluestone and other hard natural stone
Granite and bluestone are dense, non-calcareous, and relatively tolerant of moderate chemical treatments. They're the easiest natural stones to work with for stain removal. Still, run the test patch, and be aware that granite can be polished to a high finish that harsh scrubbing or strong chemicals can dull.
- Rinse and scrub with dish soap first.
- For iron stains: apply oxalic acid solution (450 g per 4 litres), dwell 15 minutes, scrub with a medium nylon brush (not metal), rinse, and neutralize.
- For organic stains: oxygen bleach solution, 20 to 30-minute dwell, scrub, rinse.
- For persistent stains on polished granite, consider a poultice approach rather than direct scrubbing, to protect the finish.
- Avoid abrasive powders or wire brushes which will scratch the polished surface.
- After treatment and full drying (48 to 72 hours), apply a penetrating stone sealer suitable for granite.
Pressure washer settings and manual scrub methods
If you have a pressure washer
A pressure washer is useful for rinsing off treatments and removing surface deposits, but it's not a substitute for the right chemical approach when dealing with iron stains. High pressure alone will not remove iron oxide that has bonded into the pore structure. What it will do is help flush loosened stain residue after treatment, and clean surrounding areas effectively.
| Surface | Recommended PSI | Nozzle | Distance from surface | Notes |
|---|---|---|---|---|
| Concrete slabs | 1,500–2,500 PSI | 25-degree (green) or 40-degree (white) | 20–30 cm | Keep nozzle moving; avoid dwelling in one spot |
| Brick | 1,000–1,500 PSI | 40-degree (white) | 30 cm minimum | Risk of mortar joint erosion above 1,500 PSI |
| Concrete pavers | 1,200–1,600 PSI | 25-degree or 40-degree | 20–25 cm | Jointing sand displacement is the main risk; re-sand after |
| Flagstone/slate | 800–1,200 PSI | 40-degree or low-pressure soap nozzle | 30 cm minimum | Slate is layered; excessive pressure can cause delamination |
| Travertine/limestone | 500–800 PSI maximum | Low-pressure (40-65 degree) | 40 cm minimum | Avoid unfilled voids; high pressure widens travertine holes |
| Granite/bluestone | 1,000–1,500 PSI | 25-degree or 40-degree | 25 cm | Polished surfaces: stay at lower end and wider angle |
Always sweep in consistent, overlapping strokes and keep the nozzle moving. Don't hold it stationary, you'll etch a stripe into softer materials or blow out mortar joints. Rinse treatment chemicals by working from the centre of the treated area outward, pushing runoff away from drains wherever possible. Never use a 0-degree (red) nozzle on any patio surface.
If you don't have a pressure washer
Manual scrubbing works perfectly well for most stains, especially recent ones. I've cleared iron stains from concrete pavers with nothing more than an oxalic acid solution, a stiff brush, and a garden hose. Here's how to get the most from manual methods:
- Use a stiff nylon deck brush for concrete, brick, and pavers. The long handle lets you apply good downward pressure.
- Use a smaller hand brush with medium stiffness for natural stone — you want control, not brute force.
- Scrub in small circular motions rather than straight back-and-forth lines on stone to work the cleaner into the pores evenly.
- On concrete and pavers, straight firm strokes with the grain of any surface texture work well.
- Apply firm, consistent pressure throughout — don't just lightly swish. Let the chemistry do most of the work, but the physical agitation matters.
- Rinse with a garden hose on full flow, or pour buckets of water across the surface, working from the stain outward.
- For stubborn staining with no pressure washer, re-wet the area after the initial treatment, re-apply the cleaner at half strength, and scrub again before the second rinse.
Application details: dwell times, agitation, poultices and reapplication
Getting the dwell time right is one of the most common mistakes I see. Too short and the chemistry hasn't had time to work; too long with an acid on calcareous stone and you've etched the surface. Keep the treated area visibly wet during the dwell period by misting with water if it starts to dry out. A dry cleaner stops working and can leave its own residue.
For poultice applications on natural stone, the plastic cover slows evaporation so the oxalic acid or oxygen bleach stays in contact with the stain as the poultice slowly draws it out. Removing the plastic too early and letting the poultice dry too fast reduces effectiveness. The 24 to 48-hour window is genuine, not an over-caution. After removing the dried poultice, resist the urge to scrub hard on the stone surface underneath, rinse gently first and see what remains before applying any scrubbing force.
When reapplying any treatment, allow the surface to dry completely between attempts. This matters especially for iron stains: wet stone makes it harder to see whether the stain has actually lightened or whether you're just looking at a wet, darkened surface. Dry it, assess honestly, and then apply another round if needed. Limit repeated acid treatments (oxalic acid) to three applications before reassessing. After three applications with no significant improvement, either the stain is too deeply embedded for DIY treatment, or there's something else going on, and a professional opinion is worthwhile.
Neutralizing, rinsing and disposing of runoff safely
After any acid treatment (oxalic acid, diluted muriatic acid, or even vinegar on a large scale), neutralize the surface before rinsing to drain. Mix 60 g of baking soda per litre of water, pour or spray over the treated area, let it sit for two to three minutes (you may see slight fizzing as the acid is neutralized), then rinse with clean water. This is especially important when the runoff might flow toward a storm drain, a pond, a water feature, or a planted border.
For concentrated chemical residues, particularly any leftover muriatic acid solution, do not pour them down a household drain or onto soil. Neutralize thoroughly (continue adding baking soda until fizzing stops completely), then dilute heavily with water before disposal. Check your local authority's guidance for disposing of chemical waste, many areas have hazardous waste collection points. Bleach solution can be heavily diluted and allowed to run to waste water drains in small amounts, but check local regulations for larger quantities.
Keep cleaning runoff away from planted areas, grass edges, and drainage channels where possible by using absorbent barriers (sandbags, rolled towels, or absorbent mats) to direct flow to a controlled collection point. Pets and children should be kept off the patio until the surface has been fully rinsed and dried.
Test-patch follow-ups, timing between attempts and avoiding damage
After any treatment, review your test patch as well as the treated stain area once both have dried completely. For concrete and pavers, this means at least one to two hours; for natural stone, allow four to six hours minimum before making a judgment. What looks like a faint remaining stain when wet often disappears when dry, and vice versa, what looks clean when wet can show residual discolouration once dry.
Leave at least 24 hours between repeat treatment attempts, and allow 48 hours for natural stone. Repeated acid applications on calcareous stone without adequate drying time between rounds accumulate etching damage faster than you'd expect. If after two rounds of treatment the stain is significantly lighter but not completely gone, consider whether a visible faint mark is preferable to risking surface damage with another aggressive treatment. In practice, a 90% improved stain that is barely noticeable often beats chasing 100% removal with a third acid treatment.
When and how to reseal your patio after cleaning
Sealing a patio after cleaning serves two purposes: it protects the surface from future staining by reducing porosity, and it restores the appearance of stone or pavers that have been slightly dulled by chemical treatments. You should always wait for the surface to be completely and thoroughly dry before applying any sealer. For concrete and pavers in typical summer conditions, this means a minimum of 48 to 72 hours after the final rinse. For natural stone, especially travertine with its characteristic voids, allow at least 72 hours and ideally a week if the weather has been damp.
Sealer choice depends on the material and the finish you want. For concrete and pavers, a penetrating or impregnating sealer (silane/siloxane-based) provides good stain resistance without significantly altering appearance. For natural stone, use a sealer specifically formulated for natural stone, many penetrating sealers marketed for concrete are not pH-neutral and can react with calcareous stone. For a wet-look or colour-enhancing finish on flagstone or pavers, an enhancing sealer achieves this but typically requires reapplication every one to three years. Always follow the manufacturer's application instructions and apply in dry, mild conditions (ideally above 10°C and below 30°C with no rain forecast for 24 hours).
When to call a professional
Some situations are genuinely beyond practical DIY treatment, and recognizing them early saves you money and prevents making things worse. Consider calling a stone or masonry restoration professional if:
- You have travertine, marble, or polished limestone with iron staining that hasn't shifted after two poultice applications — professionals have reducing agents and specialized poultice mixes not available in hardware stores.
- The stain covers a very large area (more than 2 to 3 square metres) and deep iron oxidation is evident — industrial ferrous stain remover systems applied professionally will be more effective and less likely to cause patchy results.
- The surface has already been etched or damaged by an incorrect cleaning attempt and needs grinding, honing, or re-polishing.
- Mortar joints in brick or pavers have softened, crumbled, or been partially dissolved by acid treatments.
- You suspect the patio has a decorative coating, coloured sealant, or specialist finish and are unsure what chemical compatibility is needed.
- The patio is listed, heritage, or made from an unusual or unidentified stone where incorrect treatment could cause irreversible damage.
For persistent stains on very large concrete areas, a professional cleaning company with industrial-grade oxalic acid or ferrous stain remover equipment and neutralization systems will achieve results that hours of manual work cannot match. It's worth a quote before you spend a full weekend on a second or third DIY round.
Preventing future lawn feed stains
The most effective prevention is keeping lawn feed granules and spray off your patio in the first place. Here are the habits that make the biggest difference:
- Use a spreader with a deflector shield or edge guard when applying granular feed near a patio border, or apply by hand along the edge to avoid overspray.
- Sweep the patio immediately after applying lawn feed to any adjoining lawn — don't wait for rain to do it for you.
- Apply granular feed on a dry day so there's no existing surface moisture to start dissolving granules before you've swept up any overspray.
- When applying liquid iron supplements or liquid weed-and-feed products, use a shield or cardboard barrier to protect the patio edge, and rinse the patio surface immediately if any liquid lands on it.
- Seal your patio (concrete, pavers, flagstone) every two to four years depending on the sealer type. A sealed surface stains far more slowly and is dramatically easier to clean.
- If you use a potted plant fertilizer near the patio, place saucers under pots to catch runoff from iron-containing feeds.
- Keep a spray bottle of diluted dish soap solution to hand during any lawn treatment session — a 30-second spot-rinse after any accidental granule landing prevents most stains entirely.
Related guides for nearby stain problems
Lawn feed stains often arrive with company. If your patio also has berry juice marks from overhanging shrubs or fallen fruit, the guide on how to remove berry stains from patio slabs covers the specific tannin-and-pigment chemistry those stains involve. Grass stains from clippings blowing or being tracked onto the patio surface respond to a similar but slightly different oxygen bleach approach covered in the guide on how to remove grass stains from patio. If autumn leaf debris has left brown tannin marks alongside your fertilizer staining, how to remove leaf stains from patio pavers addresses the specific organic chemistry of those deposits. See the detailed guide on how to remove leaf stains from patio pavers for the specific organic-tannin removal steps. And if you used a combined herbicide-fertilizer product, the more detailed breakdown in how to remove weed-and-feed stains from patio may be worth reading alongside this guide for any product-specific considerations.
FAQ
How do I identify lawn‑feed and related fertilizer stains on my patio?
Look for orange‑to‑brown rust tones (iron/ferrous sulfate) that follow drips or circular rings from spilled granules; diffuse brown‑to‑pink halos usually mean tannin/organic stains (berries, leaves); white or crystalline crusts suggest mineral salts/efflorescence. Smell and timing help: fertilizer spills often appear right after application or rain; organic stains may be seasonal. When unsure, try a small wet‑spot test: dab water on the stain—iron stains often stay strongly colored, organics may lighten with water and soap.
What are the immediate cleanup steps after a fertilizer or weed‑and‑feed spill?
1) Sweep up and remove any remaining granules (don’t hose them into drains). 2) Rinse the area with plenty of water to dilute soluble material. 3) If stain is fresh, scrub with a stiff broom and a bucket of warm water + a few drops of dish soap, then rinse. 4) Protect nearby plants/soil with plastic sheeting and collect rinse water when using concentrated chemicals. Always wear gloves and eye protection for cleanup.
What PPE and safety precautions should I use for stain removal?
At minimum use nitrile or chemical‑resistant gloves, safety goggles, and long sleeves. For powdered acids or strong cleaners use a dust mask or respirator rated for particulates and chemical vapors, and avoid breathing dust. Work in good ventilation, never mix bleach with acids or ammonia, keep chemicals away from plants/soil, and follow product SDS instructions. Neutralize/flush spills promptly and dispose of rinse responsibly (see disposal guidance).
What is the recommended test‑patch protocol before using any cleaner?
Always test on an inconspicuous area or a small 4x4" patch. Mix the cleaner at the intended dilution, apply for the planned dwell time, and fully rinse. Wait until the surface is completely dry (24 hours for stone is best) before judging color change or etching. If there is any discoloration, softening, or surface etch, stop and choose a milder method or consult a pro.
What are safe, eco‑friendly first‑line cleaners and how do I use them?
Start with: 1) Plain water and stiff brush for very fresh/light stains. 2) Warm water + dish soap (2–3 tsp per gallon) — scrub 2–5 minutes, rinse. 3) Oxygen bleach (sodium percarbonate powder): 1/2–1 cup per gallon of warm water; apply, agitate with a brush, let sit 10–30 minutes (never let dry), then rinse. Wear gloves and eye protection; do not mix with chlorine bleach or acids.
How do I treat iron/rust stains (from ferrous fertilizer) on concrete, pavers and brick?
For light/new stains: use an oxalic‑acid solution (home recipe ~1 lb oxalic acid per 1 gallon water) or a commercial oxalic rust remover at label dilution. Apply, scrub with a stiff brush for 3–5 minutes, let dwell 10–30 minutes, then rinse thoroughly. For older/deeper stains use a poultice (absorbent powder like diatomaceous earth or paper pulp mixed with oxalic solution to a paste, 1/4–1/2" thick): apply, cover with plastic, tape edges, let dry 24–48 hours, remove, rinse and repeat as needed. Test patch first; avoid oxalic acid on calcareous stone without pro guidance.
Next Articles
How to Remove Grass Stains from Patio: Complete Guide
How to remove grass stains from patio: step-by-step fixes for concrete, brick, stone & pavers, safe cleaners and sealing
How to Remove Leaf Stains From Patio Pavers Safely
Step-by-step methods to remove leaf stains from concrete and stone pavers safely, including mildew fixes and prevention
How to Remove Thompson’s Patio Sealer Step by Step
Step-by-step removal of Thompson’s patio sealer on concrete, brick, pavers, and stone, with safety, tests, and cleanup.