To refresh a concrete patio, you work through a simple sequence: assess what's actually wrong, deep clean the surface, treat any specific stains, repair cracks or spalling, then seal it. how to polish concrete patio how to refresh your patio. Most tired-looking patios are just dirty, and a thorough clean with the right solution makes them look almost new. Cracks and spalling need a little more work, but nothing here requires professional equipment or expertise.
How to Refresh Concrete Patio: Step by Step Guide

Dylan Hale
29 Apr 2026
First, figure out what you're actually dealing with

Before you grab a bucket or fire up a pressure washer, spend five minutes walking the patio and noting what you see. The fix for general grime is very different from the fix for rust or crumbling edges, and getting this right saves you a lot of time and wasted product.
- General gray-brown buildup and a dull surface: embedded dirt, pollen, and organic grime. This is the most common issue and responds well to a basic deep clean.
- Green or black patches, especially in shaded corners: algae, mildew, or moss. You need a disinfecting cleaner, not just water pressure.
- White powdery or crusty deposits: efflorescence. This is salt crystallizing on the surface as moisture migrates through the slab, not just surface dirt. It brushes off temporarily but comes back if moisture is still moving.
- Dark oily spots near a grill or driveway edge: grease or oil stains. These need a degreaser, not bleach.
- Orange-brown staining near metal furniture or irrigation: rust. Requires an acid-based rust remover.
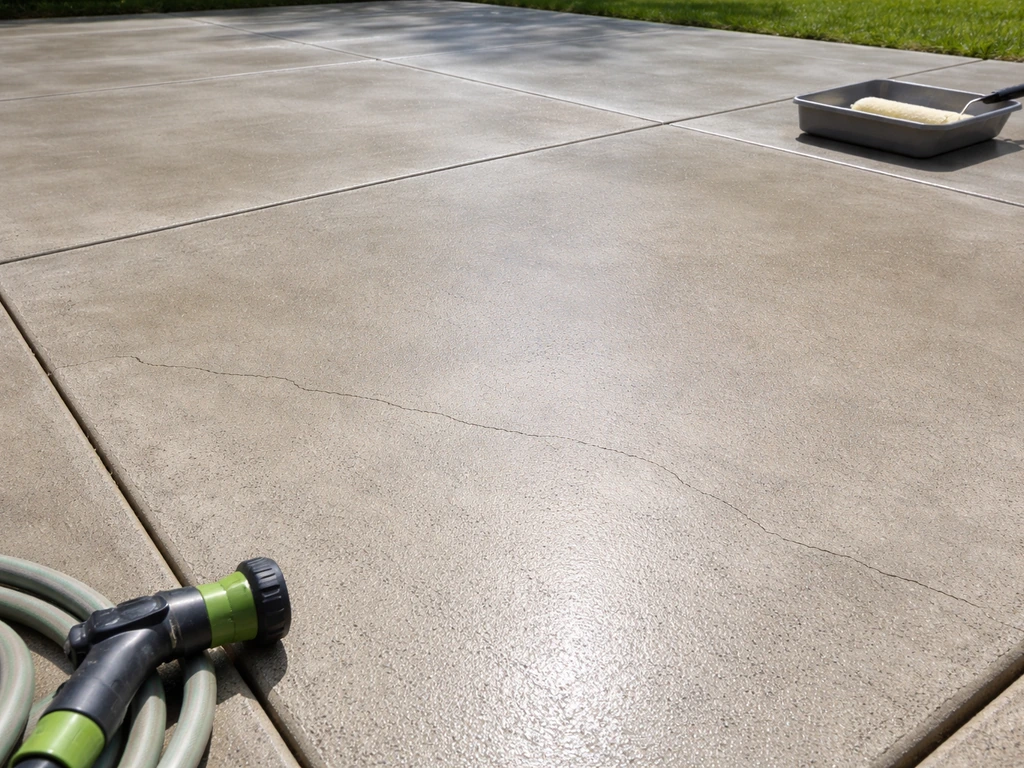
- Hairline cracks, spalling (surface flaking), or chipped edges: structural wear. Clean first, then patch before sealing.
Once you know which of these apply to your patio, you can move through the steps below in order. If your patio has multiple issues, do them in sequence: deep clean first, then spot-treat stains, then repair, then seal. Skipping straight to sealing over a dirty or stained surface is one of the most common mistakes I see.
Deep cleaning: getting rid of grime, mildew, and algae
A proper deep clean is the foundation of any patio refresh. Even if you plan to patch cracks or apply a sealer, you need a clean surface first. For most concrete patios, a dilute bleach solution handles dirt, mildew, and algae in one shot.
Bleach solution (the workhorse cleaner)
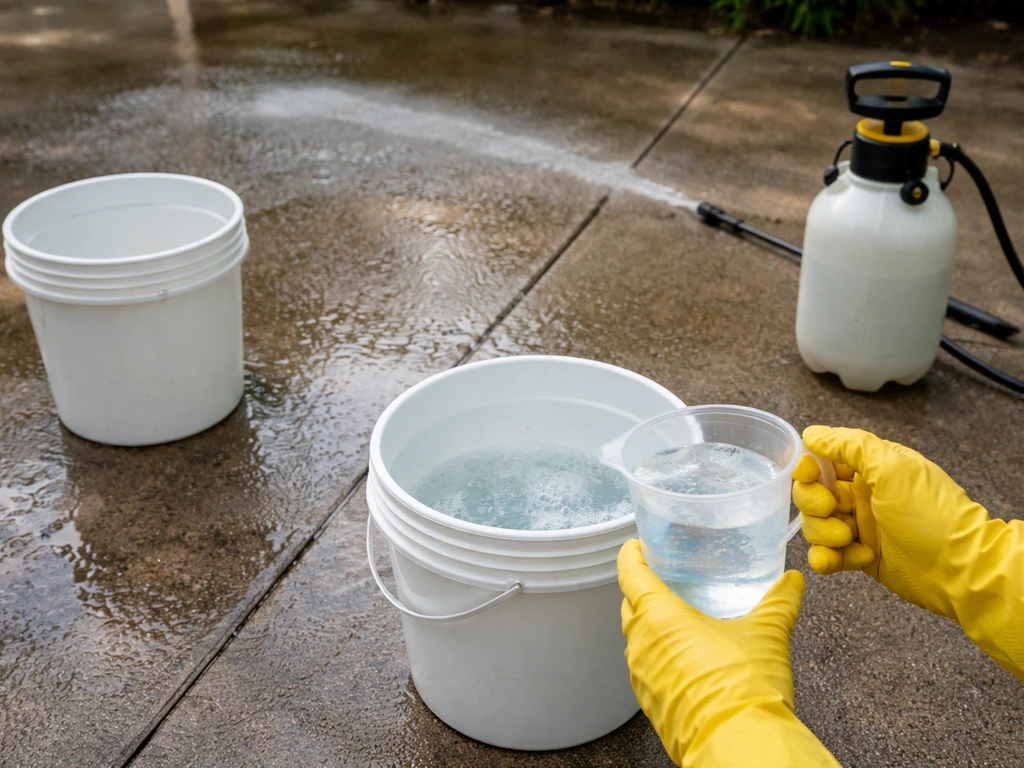
The mix that works consistently is 1/3 cup of standard household disinfecting bleach per 1 gallon of water. That's the ratio recommended by Clorox for exterior concrete, and I've found it hits the sweet spot between effective and safe for the surface. Mix it in a pump sprayer or bucket, apply it to the damp concrete, let it sit for about 5 to 10 minutes, scrub with a stiff brush, then rinse thoroughly with a garden hose.
- Sweep or blow off loose debris first.
- Wet the concrete with plain water before applying the bleach solution. This prevents the cleaner from absorbing too fast and helps it spread evenly.
- Apply 1/3 cup bleach per gallon of water with a pump sprayer or pour-and-spread method.
- Let it dwell for 5 to 10 minutes. You should see green or black patches start to lighten.
- Scrub with a stiff-bristle deck brush. Work in sections.
- Rinse thoroughly with a garden hose and spray nozzle. Rinse twice if you can.
- If algae or mildew is still visible, repeat the application once more.
One thing that trips people up: protect your landscaping. Before you start, water down any grass, flower beds, or shrubs within splash range. After you rinse the patio, water them again. Dilute runoff from a single cleaning session usually won't kill established plants, but the extra rinse is good practice and keeps the bleach from concentrating around roots.
Oxygen bleach (gentler alternative, better for pets and plants)
If you have pets that spend time on the patio, or you're cleaning right next to a vegetable garden, sodium percarbonate (sold as oxygen bleach or OxiClean powder) is a solid alternative. It breaks down into oxygen and water after use, so the residue is far less harsh. It's slower and takes a longer dwell time (15 to 20 minutes) but does a genuinely good job on mildew and algae. Mix according to package directions, usually around 1/2 cup per gallon of warm water. The tradeoff is that it's less effective on heavy buildup, so if your patio is seriously green or black, chlorine bleach will get you there faster.
Spot stain removal: oil, rust, paint, and discoloration
General cleaning won't touch oil, rust, or paint stains. These need targeted treatment before or after your overall clean. Treat them as separate steps.
Oil and grease stains
Grease soaks into concrete quickly, so old stains are harder than fresh ones. For fresh spills, blot up as much as possible immediately, then cover with cat litter or baking soda to absorb the rest before it sets. For set-in grease, apply a dedicated concrete degreaser (available at hardware stores) or a generous squirt of dish soap directly onto the stain. Work it in with a stiff brush, let it sit for 10 to 15 minutes, then scrub and rinse.
For old, stubborn grease stains, a poultice method works well: mix an absorbent powder (diatomaceous earth or baking soda) with a degreaser into a thick paste, spread it over the stain, cover with plastic sheeting, and leave it for 24 hours. The paste draws the oil out as it dries.
Rust stains
Rust stains come from metal furniture, tools, or iron in the water supply. Bleach makes rust stains worse, so skip it here. Use a dedicated rust remover for concrete (oxalic acid-based products work well) or mix a paste of cream of tartar and a few drops of hydrogen peroxide directly on the stain. Apply, let it sit for 10 minutes, scrub, and rinse. For stubborn rust, a dilute muriatic acid solution (covered more in the efflorescence section below) can be effective, but it's the strongest tool in the kit and requires more caution.
Paint and other marks
Latex paint that's still somewhat fresh can be scrubbed off with hot soapy water and a stiff brush. Dried latex or oil-based paint usually needs a paint stripper formulated for concrete or masonry. Apply the stripper, let it dwell per the product directions, then scrape and scrub. For small marks like pen, tire rubber, or general scuffs, acetone on a rag applied directly to the mark works in many cases. Always test in a small hidden area first, especially on colored or stamped concrete.
Dealing with mold and efflorescence
Mold and mildew
Surface mold and mildew on concrete are common in shaded or damp areas. The bleach cleaning method described above handles most cases. The key is dwell time: letting the bleach solution sit for at least 5 to 10 minutes before scrubbing gives it time to actually kill the mold rather than just staining over it. If mold keeps coming back in the same spot every few months, that's a moisture or drainage problem rather than just a cleaning problem. A penetrating sealer applied after cleaning can significantly reduce moisture absorption and slow regrowth.
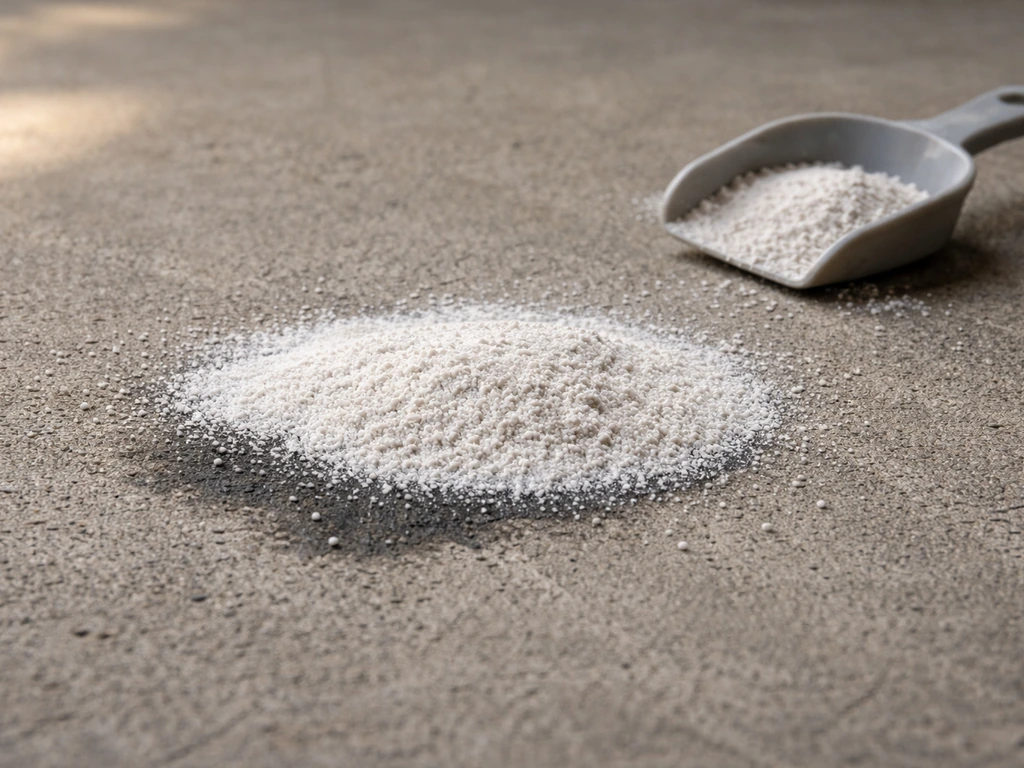
Efflorescence: the white powdery stuff
Efflorescence looks like white powder or a chalky crust on the surface. What's actually happening is that water is moving through the concrete slab, picking up soluble salts along the way, and depositing them on the surface as it evaporates. The deposits crystallize as they hit air. It can look similar to dried bleach or lime, but if you brush it and it leaves a powdery white residue with no visible staining underneath, it's almost certainly efflorescence. It's worth knowing that efflorescence can be a signal that moisture is still actively moving through your slab, which is worth addressing with a sealer after cleaning.
For removal, a stiff non-metallic bristle brush and clean water is the starting point. Scrub the deposits dry first (this actually dislodges more material than scrubbing wet), then rinse. For heavier efflorescence, blank" rel="noopener noreferrer">a dilute muriatic acid solution (1 part acid to 10 parts water, always adding acid to water, never the other way around) dissolves the salt crystals effectively. Apply it with a brush, let it react for a couple of minutes, then scrub and rinse very thoroughly.
Wear rubber gloves, eye protection, and work in a ventilated area. Neutralize the surface afterward with a baking soda and water rinse (about 1 cup per gallon) before the final clean water rinse. If you'd rather skip acid entirely, white vinegar applied directly and scrubbed in is a gentler option for light efflorescence, though it takes more effort and repeated applications for heavier deposits.
Pressure washing vs. hand scrubbing: which one to use
Both methods work. Pressure washing is faster and does a better job on large areas and embedded grime. Hand scrubbing gives you more control and is the right call for delicate surfaces, around joints, or if you don't have access to a pressure washer.
| Factor | Pressure Washing | Hand Scrubbing |
|---|---|---|
| Speed | Fast, covers large areas quickly | Slower, more labor-intensive |
| Equipment needed | Pressure washer (rental or owned), appropriate nozzle | Stiff deck brush, bucket, garden hose |
| Control | Less precise around edges and joints | Very precise, good for tight spots |
| Effectiveness on heavy grime | Excellent | Good with the right cleaner |
| Risk of surface damage | Higher if wrong nozzle or angle used | Low |
| Best for | General deep clean on large patios | Spot treatment, small patios, renters without equipment |
Pressure washing tips for concrete
Start with a 25-degree nozzle (the green tip on most consumer washers). PressureWashersDirect also notes that the [green wand tip produces a 25° spray pattern](https://www.
pressurewashersdirect. com/amp/stories/205-How-to-choose-the-perfect-spray-tip-for-the-job. html), while the white tip produces a 40° spray pattern. A 40-degree tip is safer if you're unsure, and you can step down to 25 degrees if the wider tip isn't cutting through the grime.
Avoid zero-degree or 15-degree nozzles on concrete patios; they concentrate too much force in too small an area and can pit or etch the surface. Hold the wand at a consistent angle to the surface (not perpendicular) and keep it moving. Don't stop the spray in one spot. Keep the nozzle about 6 to 12 inches from the surface and use overlapping passes.
One thing to avoid specifically: don't blast directly into cracks or joints at a 90-degree angle. That forces water behind the surface and can worsen moisture problems over time.
Hand scrubbing tips
A stiff-bristle deck brush on a long handle is your main tool. Apply your cleaning solution to a pre-wetted surface, scrub in overlapping circular or back-and-forth motions, and rinse with a garden hose on a strong spray setting. For tough spots, get on your knees with a smaller hand brush and put real pressure into it. It's more work, but you have full control over where the cleaner goes and how long it dwells, which actually makes it better than a pressure washer for targeted stain treatment.
Concrete repair and surface prep before sealing
If your patio has cracks or spalling (flaking, pitting, or chunks missing from the surface), deal with them after cleaning but before sealing. Sealing over unrepaired concrete traps moisture inside and can cause the patch or sealer to fail faster.
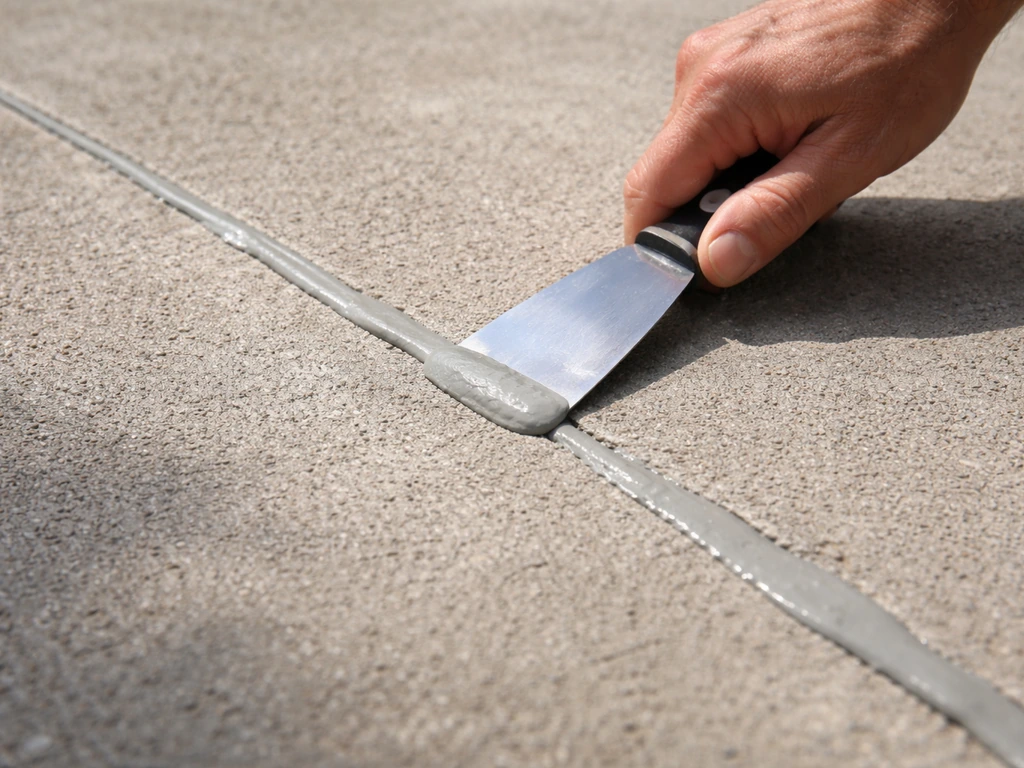
Cracks
Hairline cracks (under 1/8 inch wide) can be filled with a liquid concrete crack filler or polyurethane sealant applied from a caulk gun. For wider cracks (1/8 inch or more), clean out any loose debris and use a cold chisel and hammer to undercut the edges slightly (widening the crack at the base so the patch has something to grip). Fill with a concrete patching compound, pressing it in firmly and feathering the edges level with the surrounding surface. Let it cure according to the product directions, usually 24 to 48 hours before foot traffic.
Spalling and surface damage
Spalling is that flaky, pitted look you get when the surface layer of concrete breaks away. It's common on older patios that went through a lot of freeze-thaw cycles or were sealed too early. For minor spalling, a concrete resurfacer (a thin-layer product you mix and trowel or squeegee on) can restore the surface. Clean the area thoroughly first, dampen it slightly, then apply the resurfacer according to the product directions. Most products go on about 1/8 to 1/4 inch thick and look nearly new when done.
Surface profile for good adhesion
Sealers and resurfacers bond better to a slightly rough surface than to a smooth, polished one. After cleaning, check whether water beads on the surface. If it does, the concrete is either already sealed or has a very smooth profile that will resist adhesion. In that case, a light acid etch (the same dilute muriatic acid approach used for efflorescence) opens the surface pores and gives the sealer something to grip. If you acid-etched for efflorescence earlier in the process, you've already done this step. Always neutralize, rinse thoroughly, and let the surface dry completely (at least 24 hours, longer in humid conditions) before applying any sealer or patch product.
Sealing and protecting your patio
Sealing is what takes a cleaned, repaired patio from looking okay to looking genuinely refreshed, and it's what protects all that work from coming undone in another season. The type of sealer you choose matters a lot depending on your goals.
Choosing the right sealer
| Sealer Type | Appearance | Best For | Reapplication |
|---|---|---|---|
| Penetrating/silane-siloxane sealer | Invisible, no sheen | Moisture control, efflorescence prevention, natural look | Every 3 to 5 years |
| Acrylic sealer (water-based) | Light sheen to glossy | General protection, mild color enhancement | Every 1 to 3 years |
| Epoxy or polyurethane coating | High gloss, film-forming | Heavy-use patios, long-lasting protection | Every 3 to 5 years, prep-intensive |
| Wet-look/gloss acrylic | Wet, glossy finish | Color boost on plain or decorative concrete | Every 1 to 2 years |
For most residential concrete patios, a water-based acrylic sealer or a penetrating silane-siloxane sealer is the right call. If efflorescence was your main problem, go with the penetrating sealer; it reduces moisture absorption without trapping vapor inside the slab, which is the approach recommended for moisture-related issues. If you just want protection and a slight enhancement to the color, a water-based acrylic is easy to apply and forgiving.
How to apply sealer
- Make sure the concrete is fully dry. After cleaning or patching, wait at least 24 to 48 hours in warm, dry conditions. In humid or cooler weather, wait 72 hours.
- Check the weather forecast. Apply sealer when temperatures are between 50°F and 90°F and no rain is expected for at least 24 hours.
- Stir the sealer thoroughly. Don't shake it, as that introduces bubbles.
- Apply a thin, even first coat with a roller (3/8-inch nap for smooth concrete) or a pump sprayer for penetrating sealers. Work in small sections.
- Let the first coat dry to the touch (usually 1 to 2 hours for acrylics), then apply a second thin coat in the opposite direction.
- Keep foot traffic off for at least 24 hours. Allow 72 hours before moving furniture back.
Thin coats are always better than one thick coat. Thick applications trap air, take forever to dry, and can turn white or bubble. If you see bubbles forming, you're applying too thick or the concrete is still off-gassing moisture. Let it dry longer and reapply in thinner coats.
Timing after cleaning
One of the most common mistakes is sealing too soon after cleaning, especially if you used water-based cleaners or did any pressure washing. The concrete needs to be bone dry all the way through, not just on the surface. In warm, sunny weather, 24 to 48 hours is usually enough. In shade or humid climates, give it 72 hours to be safe. You can do a simple moisture test: tape a small piece of plastic sheeting flat to the concrete and leave it for a few hours. If you see condensation under it, the slab is still releasing moisture and isn't ready to seal.
Once the sealer is down and cured, your patio is in genuinely better shape than it was before the refresh. The cleaning handles the cosmetic issues, the repairs handle the structural ones, and the sealer extends how long both last.
For deeper-level cleaning work, an acid wash is worth exploring if your concrete has mineral staining or heavy surface contamination, and polishing is an option if you want to take the surface to a smooth, refined finish rather than just protecting it. If you want a true smooth, refined look, the polishing process can be a bit different from just sealing polishing is an option.
For deeper-level cleaning work, an acid wash is worth exploring if your concrete has mineral staining or heavy surface contamination, and polishing is an option if you want to take the surface to a smooth, refined finish rather than just protecting it how to scrub concrete patio. If your goal is shine and smoothness beyond standard sealing, follow these steps on how to polish concrete patio surfaces after cleaning.
Acid washing concrete patio surfaces is a step that can help with mineral staining or heavy buildup before you seal. To learn the exact mix, timing, and safety steps, see the guide on how to acid wash concrete patio acid washing concrete patio surfaces.
FAQ
Can I refresh a concrete patio without a sealer?
Yes, but the refresh will be shorter-lived. Without sealing, stains, mildew, and water-related discoloration return faster, and small repairs can look worse sooner. If you skip sealing, plan on re-cleaning more often and consider a penetrating sealer if moisture is your main issue.
How do I know whether my patio has old sealer on it before I clean and reseal?
Do a water drop test. If water beads tightly and stays beaded after a few minutes, the surface is likely already sealed or very smooth, and new sealer may not bond well. In that case, either plan on a light acid etch (followed by full neutralization and rinse) or use a sealer marketed for bonding over existing coatings.
What’s the safest way to deal with multiple stains at once (rust, grease, algae)?
Treat them as separate systems. Clean for algae first, then spot-treat grease and rust using the correct chemistry, and only then repair and seal. Avoid using bleach on rust spots, because it can darken or worsen the discoloration you are trying to remove.
Will pressure washing damage concrete if I use the wrong nozzle or angle?
Yes. Zero-degree or very narrow nozzles can pit concrete and force water into cracks, which can worsen spalling over time. Keep the nozzle wide enough (for example, around a 25-degree tip), keep a consistent moving pattern, and avoid blasting directly into joints at a 90-degree angle.
How long should I wait after pressure washing before sealing?
Wait for the concrete to dry through, not just on top. Even if the surface looks dry, moisture trapped in the slab can cause bubbling or failure of the sealer. In warm weather, start with 24 to 48 hours, and in humid or shaded conditions, extend to about 72 hours, then confirm with a plastic sheeting moisture check if you’re unsure.
Can I seal over hairline cracks without repairing them?
Usually you should not. Even hairline cracks can leak moisture and allow the sealer to fail prematurely. The article recommends using a crack filler or polyurethane sealant for under 1/8 inch cracks, then letting it cure before sealing.
What if my repairs look level, but the new patch still looks different after sealing?
That’s common because patches cure differently and can be more porous. Make sure the patch is fully cured, then consider applying a sealer that’s designed to penetrate rather than only sit on top. If you still see flashing, a second thin sealer coat often helps even out appearance.
How do I choose between acrylic sealer and penetrating silane-siloxane for a patio with efflorescence?
If efflorescence is the main problem, prioritize a penetrating sealer. It helps reduce moisture absorption without trapping vapor inside the slab, which is important when salts are being carried to the surface by active moisture movement.
Can I remove efflorescence and skip acid entirely?
For light, powdery deposits you can sometimes rely on dry scrubbing plus water rinsing to dislodge the salts. If the white residue keeps returning or won’t brush off, that’s when a controlled acid treatment is typically needed, followed by neutralization with baking soda solution and a thorough rinse.
How do I handle mineral stains if I’m planning to use bleach for general cleaning?
Bleach is mainly for organic growth like mildew and algae. For mineral or rust-type discoloration, use the correct spot method after the general cleaning, since the wrong product can worsen the stain. Then proceed with repairs and sealing only after the mineral stains are fully addressed.
What’s a good way to prevent mold and mildew from coming back after I refresh the patio?
First, remove the buildup with proper dwell time, then address the moisture cause. If mold keeps reappearing in the same shaded damp spots, improve drainage, adjust nearby watering, and use a penetrating sealer to reduce moisture absorption, so growth is less likely to return quickly.
Is it okay to apply sealer in cold weather or on a forecasted rain day?
Avoid sealing if rain is likely before cure, and don’t seal when temperatures are too low for the product to cure properly. Check the sealer label for minimum temperature and cure time, and if rain could hit during dry-down, delay the job. Water exposure during curing can lead to clouding, streaks, or adhesion failure.
Next Articles
How to Acid Wash Concrete Patio Step by Step Safely
Step-by-step guide to acid wash concrete safely: choose acid, dilute, scrub, rinse neutralize, and seal for better bondi

How to Remove Thompson’s Patio Sealer Step by Step
Step-by-step removal of Thompson’s patio sealer on concrete, brick, pavers, and stone, with safety, tests, and cleanup.
Can You Remove Patio Sealer? How to Strip It Safely
Learn if you can remove patio sealer and how to strip it safely by type, material, and method.