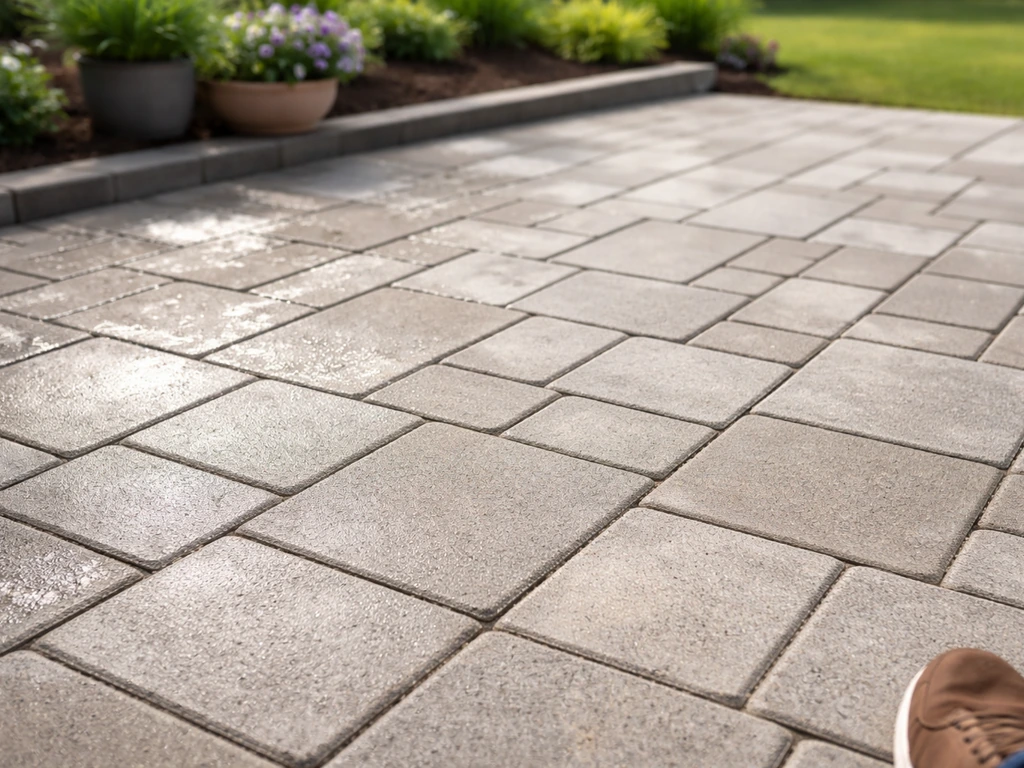
The safest, most effective way to clean a paver patio is to sweep off debris, pre-rinse with a hose, scrub with a diluted dish soap or dedicated paver cleaner and a stiff brush, then rinse thoroughly so no cleaner is left sitting on the surface. That single routine handles most dirt, grime, and light organic staining without touching your joint sand or dulling the paver surface. Everything else in this guide builds on that foundation for tougher stains or specific paver types. If your patio pavers have lost their color, restoring it usually starts with thorough cleaning and stain-specific treatment, then finishing with the right protection restore color to patio pavers.
How to Clean Pavers Patio Step-by-Step Best Methods

Dylan Hale
1 May 2026
Quick prep before you start
Before you apply a single drop of cleaner, a few minutes of prep will save you from common mistakes like streaking, haze, or washing joint sand out of the gaps.
- Clear the patio completely: furniture, plant pots, rugs, anything sitting on the surface.
- Sweep or blow off loose dirt, leaves, and debris so you're not scrubbing grit into the surface.
- Pre-wet the entire paved area with a garden hose. This stops cleaner from soaking in too fast and helps prevent residue from drying on the surface.
- Check the weather: clean in mild temperatures, ideally overcast or in the shade. Cleaning in direct sunlight or on a hot surface causes soap to dry before you can rinse it, leaving a film behind.
- Read your cleaner's label before mixing anything. Some products are already diluted; others need to be cut with water.
- Test any new cleaner or method in a small, inconspicuous spot first. This is especially important with natural stone or colored pavers.
Also take a quick look at your joints. If the polymeric sand or jointing material is already eroding badly, aggressive pressure washing will make it worse. Plan to re-sand those joints after cleaning anyway.
Routine cleaning for patio pavers
For regular maintenance, this four-step process handles nearly everything. I do this a few times a year and it keeps pavers looking fresh without any special equipment.
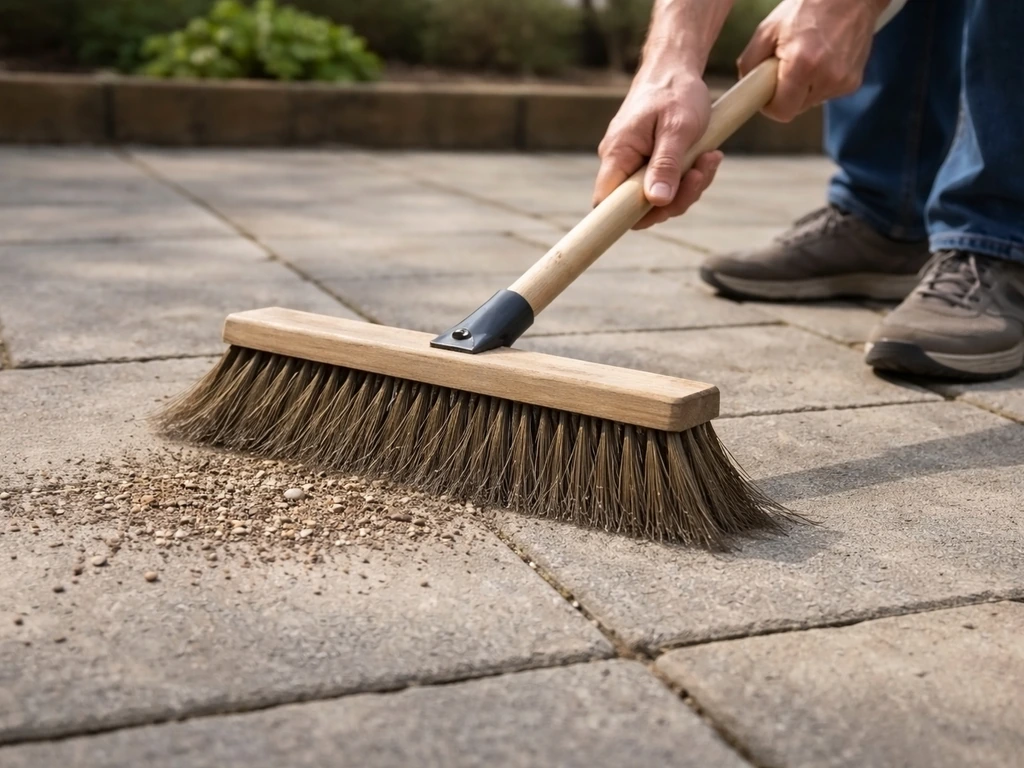
- Sweep: Remove all loose material with a stiff broom or leaf blower. Don't skip this step even if it looks clean.
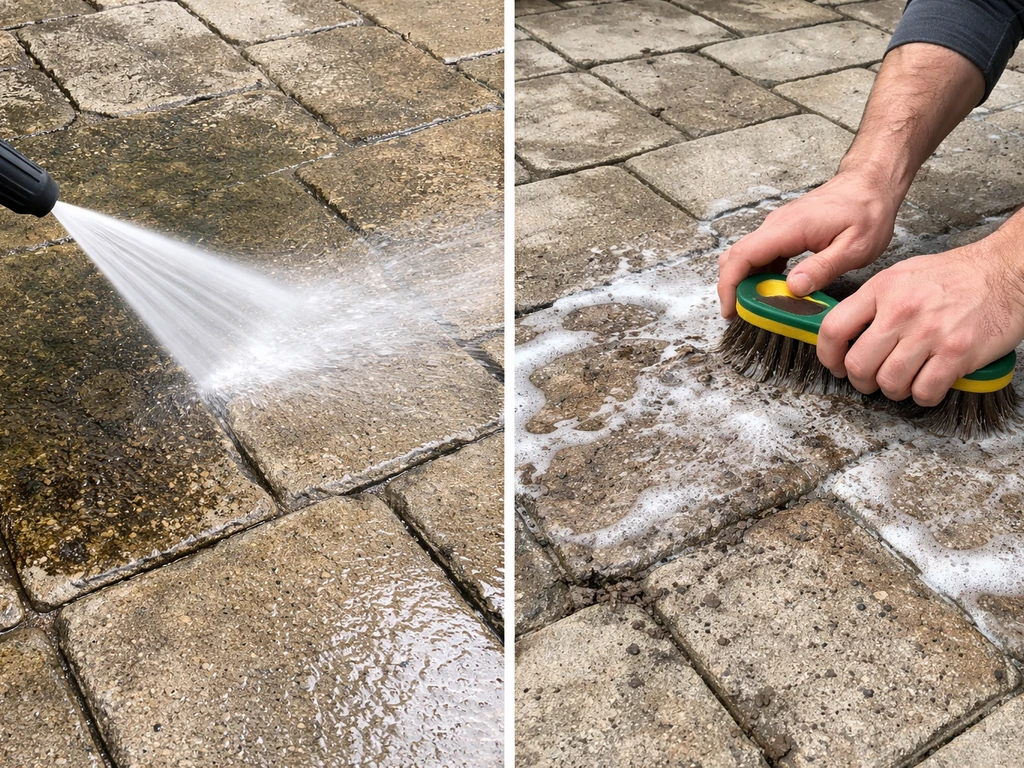
- Pre-rinse: Wet the whole surface with a garden hose on a medium-pressure setting. This softens any dried-on grime and cools the surface so cleaner doesn't dry prematurely.
- Wash: Mix a few squirts of mild dish soap into a bucket of warm water, or use a diluted paver-specific cleaner. Apply it to a manageable section at a time (roughly 10–15 square feet), then scrub in a circular motion with a stiff-bristled brush. Don't let the soap sit long enough to dry.
- Rinse thoroughly: Use your hose to flush the area completely, directing water toward a suitable drain point. Every trace of soap needs to come off. Soap residue left on pavers attracts more dirt and can cause a hazy film over time.
After rinsing, inspect the joints. If you notice sand has washed out or gaps look wider, sweep in fresh jointing sand or polymeric sand once the surface is fully dry. This is a normal part of paver maintenance and not a sign something went wrong.
Best cleaners and what to use
The right cleaner depends on what you're dealing with. For routine grime, something simple works just fine. For organic stains, mold, or efflorescence, you'll want something with more punch. Here's a practical breakdown of your options.
Natural and gentle options
- Dish soap and warm water: The go-to for routine cleaning. Dilute a tablespoon or two per gallon of warm water. Safe for all paver types, pets, and nearby plants once rinsed away.
- White vinegar: A good natural option for mild mold, mildew, and light organic staining. Use it undiluted or mixed 50/50 with water. It's worth knowing it can etch natural stone over time with repeated use, so stick to dish soap for those surfaces. There's a full breakdown of this approach if you want to go the vinegar route.
- Baking soda paste: Mix baking soda with just enough water to form a paste, apply to small stained areas, scrub, and rinse. Works well on surface-level grime and is gentle enough for delicate finishes.
Commercial and chemical options
- Dedicated paver cleaners (like Techniseal, Simple Green Oxy Solve, or brand-specific cleaners from manufacturers like Unilock or Techo-Bloc): These are formulated to clean pavers without degrading joint sand or leaving residue. Follow the dilution instructions on the label.
- Sodium hypochlorite (diluted bleach): Effective against mold, algae, and mildew. Mix one part bleach with ten parts water. Rinse extremely well afterward, protect nearby plants, and never use on natural stone like travertine or limestone.
- Muriatic acid: Reserve this for stubborn efflorescence on concrete pavers only. It's aggressive, requires full PPE (gloves, eye protection, ventilation), must be heavily diluted (roughly 1 part acid to 10 parts water), and should be neutralized with a baking soda rinse afterward. Not appropriate for brick, natural stone, or colored pavers.
| Cleaner | Best for | Safe on natural stone? | Pet-safe after rinsing? |
|---|---|---|---|
| Dish soap + warm water | Routine dirt and grime | Yes | Yes |
| White vinegar | Mold, mildew, light stains | No (can etch) | Yes |
| Baking soda paste | Surface-level spot cleaning | Yes | Yes |
| Dedicated paver cleaner | General cleaning, organic stains | Check label | Yes (once rinsed) |
| Diluted bleach (sodium hypochlorite) | Mold, algae, mildew | No | Yes (once rinsed fully) |
| Muriatic acid (diluted) | Efflorescence on concrete only | No | Only after full neutralization |
How to remove stains from paver patios
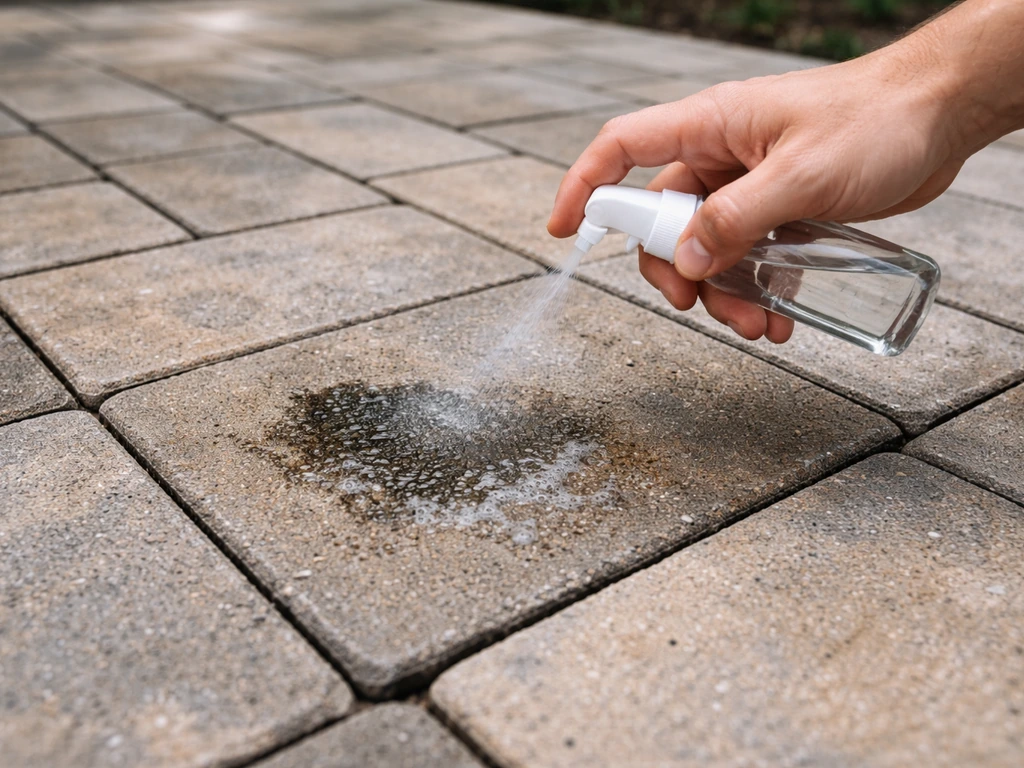
Stain removal is where most people get frustrated because they try one thing, don't wait long enough, give up, and assume the stain is permanent. Patience matters here. Multiple lighter applications with dwell time between them almost always work better than one aggressive scrub. Here's how I approach the most common ones.
Organic stains (leaves, moss, algae, mildew)
These are the most common stains on outdoor pavers and usually the easiest to treat. Apply diluted dish soap or a dedicated paver cleaner, let it sit for 5–10 minutes (don't let it dry), then scrub with a stiff brush and rinse well. For heavier algae or mildew, a diluted bleach solution (1:10 bleach to water) applied and left for 10 minutes before scrubbing is very effective on concrete and brick pavers. Sweep dead leaves regularly to prevent tannin staining from building up in the first place.
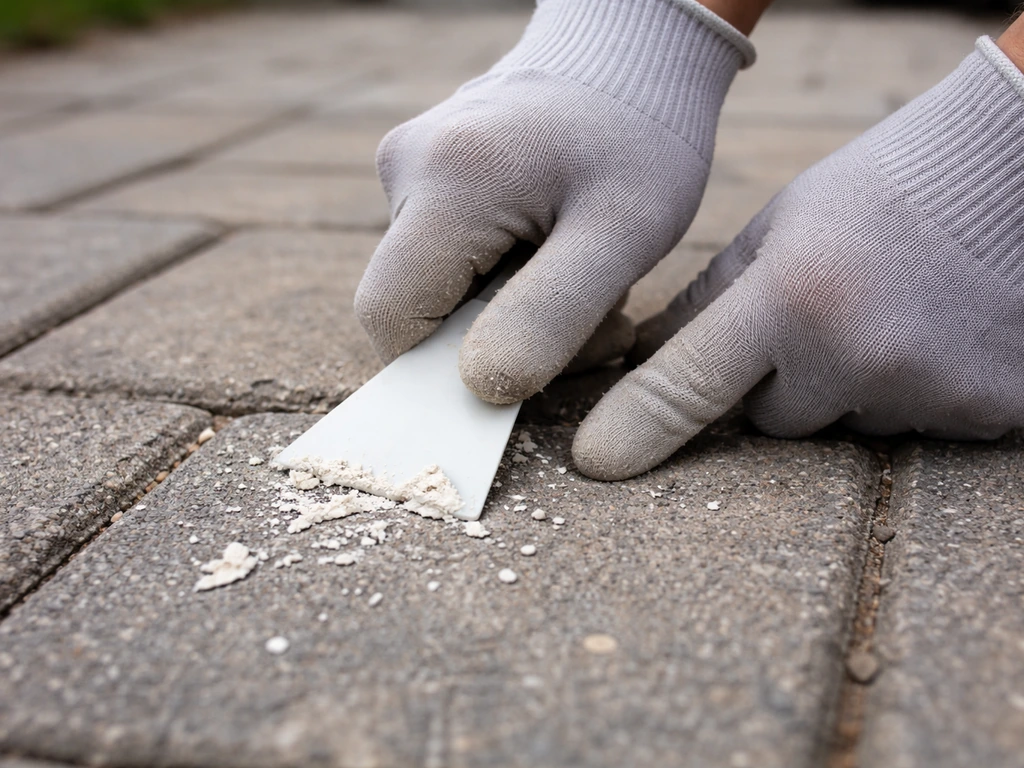
Efflorescence (the white haze)
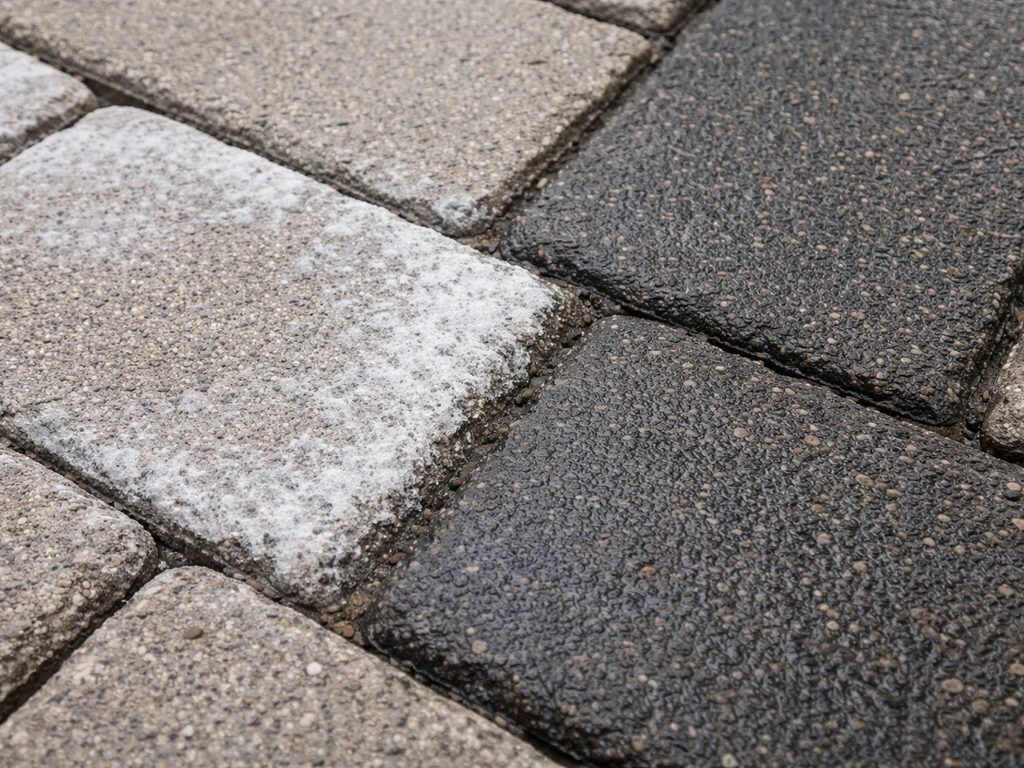
Efflorescence is that chalky white film that appears when naturally occurring salts in the paver material migrate to the surface. It looks alarming but it's normal, especially on new pavers. For light cases, a stiff dry brush can remove it. For heavier buildup, a diluted muriatic acid solution (1:10 on concrete pavers only) applied with a scrub brush, left for 2–3 minutes, then neutralized with a baking soda-water rinse works well. One important note: if you plan to seal your pavers, wait 2–3 months after installation so efflorescence can fully work itself out before you seal it in.
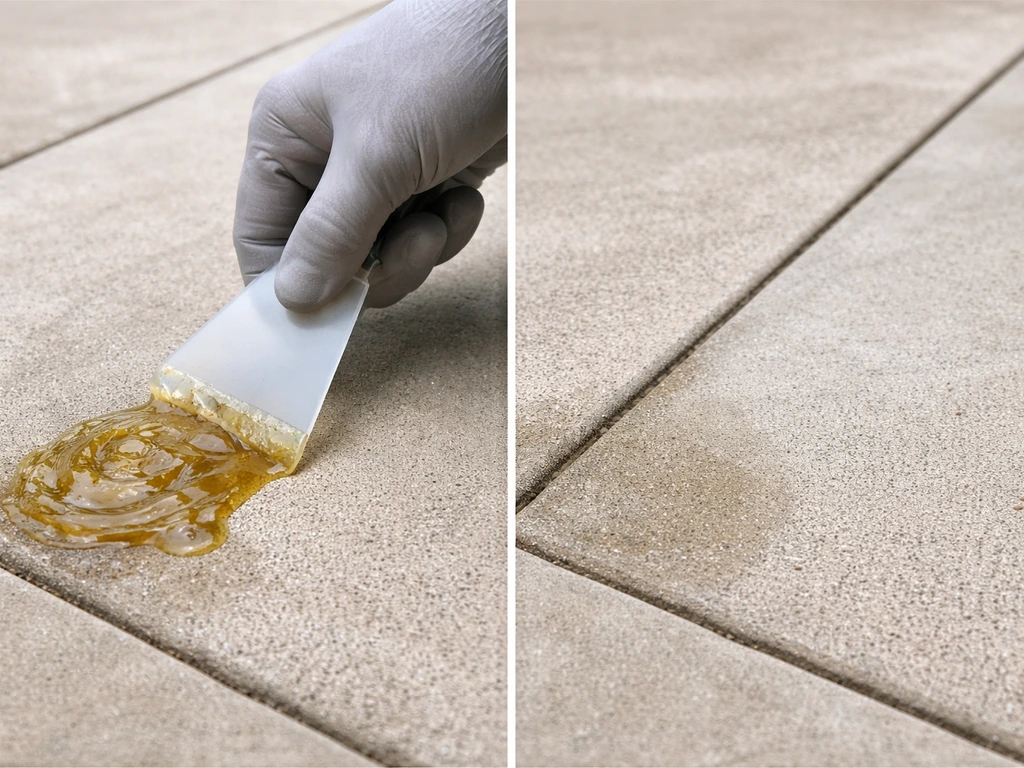
Grease and oil
Act fast with grease. Absorb as much as possible immediately using cat litter, baking soda, or cornstarch. Let it sit for 30 minutes, then sweep away. Follow up with a degreasing dish soap or a commercial degreaser applied directly to the stain, scrubbed with a stiff brush. You may need two or three applications. Avoid hosing a fresh oil spill before absorbing it first, as this just spreads the stain.
Rust stains
Rust stains from metal furniture or pots need a dedicated rust remover (look for oxalic acid-based products). Apply to the stain, allow the dwell time specified on the product (typically 5–15 minutes), scrub, and rinse. Don't use bleach on rust, it can set the stain deeper.
Paint or sealant drips
Scrape off as much dried paint as possible with a plastic scraper (not metal, which can scratch the surface). Then use a paint stripper appropriate for the paver type, applied to a small section at a time. Always test in a hidden spot first.
Concrete paver patios vs other paver types
Cleaning method matters a lot depending on what your pavers are actually made of. Concrete pavers are the most forgiving and can handle stronger cleaners. Natural stone pavers (travertine, flagstone, sandstone, slate) are more sensitive and need gentler treatment. Brick pavers sit somewhere in the middle.
| Paver type | Best routine cleaner | Pressure washing? | Avoid |
|---|---|---|---|
| Concrete pavers | Dish soap, dedicated paver cleaner, diluted bleach for mold | Yes, low setting + 45° angle | Undiluted muriatic acid, high-pressure direct jets |
| Brick pavers | Dish soap, diluted vinegar for moss, paver cleaner | Yes, with care | Muriatic acid at high concentration, wire brushes |
| Natural stone (travertine, flagstone, sandstone) | Mild dish soap, microfiber cloth, pH-neutral cleaner | Very low pressure only, or avoid | Vinegar, bleach, muriatic acid, anything acidic |
| Porcelain pavers | pH-neutral cleaner, dish soap | Yes, moderate setting | Acidic cleaners, abrasive scrubbers |
For natural stone specifically, I've found that a microfiber cloth and diluted dish soap in warm water is the safest approach for most cleaning tasks. Anything acidic (vinegar, bleach, muriatic acid) can etch and permanently dull the surface. When in doubt, go milder. You can always do a second pass; you can't undo etching.
How to clean new patio pavers
New pavers need a slightly different approach because the joint sand, polymeric sand, or other jointing material is still settling and hardening. New paver joint materials can also benefit from pre-wetting before application: Techniseal’s technical data sheet instructs saturating the joints with water to reduce penetration into the sand joints and to make the product easier to rinse after it dries pre-wetting the joints with water. Blasting a brand-new installation with a pressure washer on day one is a reliable way to undo the installer's work.
- Wait at least 24–48 hours after installation before any washing, longer if polymeric sand was used (check the product's cure time, often 24–72 hours).
- For the first clean, use just a garden hose on a gentle setting and mild dish soap. No pressure washer for at least the first few weeks.
- Sweep off construction dust, dirt, and debris gently with a soft broom first.
- If there's efflorescence on the new pavers (common), don't panic. Brush it off with a dry stiff brush for now. Wait 2–3 months before attempting any chemical treatment, and definitely wait before sealing.
- Avoid walking heavily on new polymeric sand joints for at least 24 hours post-installation.
- Inspect the joints after the first rain or hose-down. Some sand washout is normal. Top up with fresh jointing sand and compact lightly.
The main goal with new pavers is gentleness and patience. They'll look their best once the surface dust has worn off after a few weeks of normal use and a couple of careful washes.
Pressure washing vs manual scrubbing
Both methods work. Your choice depends on what tools you have, how large the area is, and what kind of pavers you're cleaning. Here's the honest comparison.
Using a pressure washer
Pressure washing is faster and handles embedded grime and algae very effectively. But it's the method most likely to damage joint sand or etch softer paver surfaces if used carelessly. If you're going to pressure wash, follow these rules: use a fan-tip nozzle (25- or 40-degree), keep the pressure on the lower end (around 1,000–1,500 PSI for most pavers), hold the wand at a 45-degree angle rather than pointing straight down, and keep it roughly at knee height. Never hold a concentrated jet over one spot. Work in smooth, even passes. On natural stone, I'd recommend skipping the pressure washer entirely or using the absolute lowest setting with the widest fan nozzle.
Manual scrubbing
Manual scrubbing takes more effort but gives you more control, which matters on delicate surfaces or around fragile joint sand. Use a stiff-bristled scrub brush (not wire, which scratches), work in sections, and rinse each section before moving to the next. If you already have scratches, focus on gentle cleaning and light refinishing so you do not worsen the damage. This is the better method for renters without access to a pressure washer, anyone cleaning natural stone, or first-time cleaning of a new installation. It's slower but honestly safer if you're unsure about your surface.
| Factor | Pressure washing | Manual scrubbing |
|---|---|---|
| Speed | Fast (large areas in minutes) | Slower (more elbow grease) |
| Risk to joint sand | Higher if angle or pressure is wrong | Low if rinsing is controlled |
| Safe for natural stone | Risky, use lowest setting only | Yes, with soft brush |
| Equipment needed | Pressure washer (rent or buy) | Bucket, brush, hose |
| Best for | Concrete and brick, large areas | All paver types, small areas, renters |
How to keep patio pavers clean long-term
The easiest cleaning is the one you don't have to do because you stayed ahead of the buildup. A few habits make a noticeable difference.
- Sweep regularly: Once a week during fall (leaves = tannin stains) and at least every couple of weeks otherwise. Dead leaves sitting on pavers are the most common cause of organic staining.
- Rinse after use: After a BBQ or garden party, a quick hose-down stops grease and food residue from setting.
- Deal with spills immediately: The faster you absorb grease or blot up wine or oil, the less it penetrates. Blot, don't rub.
- Re-sand joints as needed: After cleaning or at least once a year, check the joints. Eroded joint sand lets weeds take root and lets pavers shift. Top up with fresh polymeric sand or jointing sand and compact it.
- Consider sealing: A quality paver sealer (applied once the pavers are fully clean and efflorescence-free, usually 2–3 months after installation) makes future cleaning much easier by creating a barrier that resists staining. If you want your pavers to shine or look richer in color, a wet-look or enhancing sealer achieves this while also protecting the surface.
- Trim nearby plants: Overhanging shrubs and trees drop organic material constantly. Keeping them trimmed back reduces the debris landing on the patio.
- Use furniture pads: Rubber feet or pads under metal furniture prevent rust transfer stains and surface scratches.
If your pavers have faded and you're hoping to bring back their original look, cleaning is the essential first step, but there are dedicated approaches for restoring color to faded pavers or making old patio slabs look new again once the surface is clean. After you clean thoroughly, you can focus on restoring paver color and making the surface shine restore paver color. To get the best results, follow up with the right restoration step for your paver material after cleaning how to make old patio slabs look new. Getting the cleaning right first is what makes everything else work. Unilock also recommends washing or cleaning the entire paver surface and letting it dry completely before applying a sealer, including when sealing after polymeric sand has cured.
FAQ
Can I clean my paver patio without disturbing the joint sand or polymeric sand?
Yes. Use the rinse and scrub approach, rinse from a moderate distance, and avoid directing a high-pressure jet into the joints. After cleaning, inspect the gaps and top up jointing material only after the surface is completely dry.
How long should I wait after cleaning before sealing pavers?
Let the patio dry fully first, then plan for additional time if any staining solutions or efflorescence treatments were used. As a practical rule, allow at least a couple of dry days, and longer if the patio stays humid or damp at night.
Is it safe to use a pressure washer on natural stone pavers like travertine or slate?
Usually it is risky. Stone can etch or lose its finish, and the force can erode joints. If you must, use the lowest setting, the widest fan tip, and keep the nozzle angled and moving, then test in a hidden area first.
Why do I get a whitish haze after cleaning, and how do I fix it?
Haze often comes from leftover cleaner residue or minerals from efflorescence being disturbed. Stop using the same product, rinse more thoroughly next time, and if it is chalky film, treat efflorescence specifically instead of trying to scrub harder.
What is the best way to prevent stains from spreading while cleaning?
Pre-soak and absorb first for known spills like grease or oil, then clean the surrounding area slightly beyond the stain edge. Avoid spraying liquids directly onto dry oil, because it can carry the stain outward and down into pores.
Can I mix different cleaners, like bleach with other products?
Avoid combining cleaners or using them in close sequence without a thorough rinse in between. Bleach and acid-based products can create harmful reactions and can also worsen discoloration, so stick to one chemistry at a time and rinse fully.
How do I remove mold or algae without damaging the paver surface finish?
Use a dwell time, do not let the treatment dry on the surface, then scrub gently and rinse thoroughly. If you see light surface etching or color dulling, pause and switch to a milder routine (soap and water plus targeted agitation) to avoid long-term finish damage.
My pavers feel slippery after washing, what caused it and what should I do?
Often it is residue, algae regrowth left in place, or soap film. Re-rinse until runoff looks clear, and if you see organic growth, re-treat with an appropriate solution and allow time for it to work before scrubbing and rinsing again.
Should I sweep up and remove leaves before cleaning to avoid tannin stains?
Yes. Regular leaf removal prevents tannins from leaching and bonding into the surface. If tannin staining already started, focus on stain-specific treatment after a thorough pre-rinse, rather than only doing general grime cleaning.
How do I clean around furniture legs, grills, or planters without leaving marks?
Lift items and check for trapped moisture or rust spots. Clean stains at the point of contact, use the correct chemistry for the stain type (for rust, use an oxalic acid-based remover), then dry the area so salts or residue do not re-deposit.
What should I do if my pavers are new and still have joint sand settling?
Go gentle. Avoid strong blasting on day one, and stick to soft rinsing and careful scrubbing. After a few weeks of normal use, revisit joints, top up sand if needed, and only then decide if restoration or sealing is appropriate.
Does cleaning frequency matter for stain prevention?
Yes. Cleaning a few times per year and rinsing off organic debris quickly reduces the need for harsher chemicals later. If you wait until stains are fully embedded, you usually need multiple applications with dwell time, which increases the risk of residue and joint issues.
Next Articles

How to Remove Thompson’s Patio Sealer Step by Step
Step-by-step removal of Thompson’s patio sealer on concrete, brick, pavers, and stone, with safety, tests, and cleanup.
Can You Remove Patio Sealer? How to Strip It Safely
Learn if you can remove patio sealer and how to strip it safely by type, material, and method.
How to Remove Resin From Patio Safely by Surface Type
Step by step guide to remove resin from patio by surface type with safe scraping, softening and solvent methods.